- Made by AppCoda
- Contact us / Support
- Tweet this book
- Preface
- 1. The Development Tools, the Learning Approach, and the App Idea
- 2. Your First Taste of Swift with Playgrounds
- 3. Build Your First App in Swift and SwiftUI
- 4. Designing UI Using Stack Views
- 5. Introduction to Prototyping
- 6. Understanding List and ForEach
- 7. Customizing List Views
- 8. Displaying Confirmations and Handling List View Selection
- 9. Understanding Struct, Project Organization and Code Documentation
- 10. List Deletion, Swipe Actions, Context Menus and Activity Controller
- 11. Working with Navigation View
- 12. Detail View Enhancement, Custom Fonts and Navigation Bar Customization
- 13. Understanding Colors, Swift Extensions and Dynamic Type
- 14. Working with Maps
- 15. View Animations and Blur Effect
- 16. Working with Observable Objects and Combine
- 17. Working with Forms and Camera
- 18. Working with Core Data
- 19. Adding a Search Bar Using Searchable
- 20. Building Walkthrough Screens Using TabView
- 21. Working with Tab View and Tab Bar Customizations
- 22. Displaying Web Content with WKWebView and SFSafariViewController
- 23. Working with CloudKit
- 24. Localizing Your App to Support Multiple Languages
- 25. Deploying and Testing Your App on a Real iOS Device
- 26. Beta Testing with TestFlight and CloudKit Production Deployment
- 27. Submit Your App to App Store
- 28. Adopting Haptic Touch
- 29. Working with User Notifications
- 30. Appendix - Swift Basics
- Published with GitBook
Chapter 9
Understanding Struct, Project Organization and Code Documentation

Most good programmers do programming not because they expect to get paid or adulation by the public, but because it is fun to program.
- Linus Torvalds
If you read from the very beginning of the book and have worked through all the projects, you've gone pretty far. By now, you should be able to build a list-based iOS app using SwiftUI. We'll further enhance the FoodPin app and add more features. However, before diving deeper into iOS app development and learn other APIs, I want to introduce you the basics of Object Oriented Programming and teach you how to write better code.
Don't be scared by the term "Object Oriented Programming" or OOP in short. It's not a new kind of programming language, but a programming concept. While some programming books start out by introducing the OOP concept, I intentionally left it out when I began writing this book. I want to keep things interesting and show you how to create an app. I don't want to scare you away from building apps, just because of a technical term or concept. Having said that, I think it's time to discuss OOP. After going through 8 chapters and you're still reading the book, I believe you're determined to learn iOS programming. And, I believe you really want to take your programming skills to the next level to become a professional developer.
Okay, let's get started.
The Basic Theory of Object Oriented Programming
You have been working with struct since building your first app. However, I haven't explained what it is. Before we look into struct, let me give you a brief overview of Object Oriented Programming.
Like Objective-C and many other programming languages, Swift is known as an Object Oriented Programming (OOP) language. OOP is a way of constructing software application composed of objects. In other words, the code written in an app in some ways deals with objects of some kinds. The View, Button, and List objects that you have used are some sample objects that come with the SwiftUI framework. Not only can you use the built-in objects, you have already created your own objects in the project such as RestaurantListView.
First, why OOP? One important reason is that we want to decompose complex software into smaller pieces (or building block) which are easier to develop and manage. Here, the smaller pieces are the objects. Each object has its own responsibility and objects coordinate with each other in order to make the software work. That is the basic concept of OOP.
In Object Oriented Programming, an object shares two characteristics: properties and functionalities. Let's consider a real world object – Car. A car has its own color, model, top speed, manufacturer, etc. These are the properties of a car. In terms of functionalities, a car should provide basic functions, such as accelerate, brake, steering, etc.
Software objects are conceptually similar to real-world objects. If we go back to the iOS world, let's take a look at the properties and functionalities of the Button object:
- Properties – Background, size, color, and font are examples of the
Button's properties - Functionalities – When the button is tapped, it recognizes the tap event. The ability to detect a touch is one of the many functions of
Button.
In earlier chapters, you always come across the term method. In Swift, we create methods to provide the functionalities of an object. Usually, a method corresponds to a particular function of an object.
Classes, Objects and Structures
Other than methods and objects, you have come across terms like class and structure . All these are the common terms in OOP. Let me give you a brief explanation.
A class is a blueprint or prototype from which objects are created. Basically, a class consists of properties and methods. Let's say, we want to define a Course class. A Course class contains properties, such as name, course code, and the total number of students.
This class represents the blueprint of a course. We can use it to create different courses like iOS Programming course with course code IPC101, Cooking course with course code CC101, etc. Here, the "iOS Programming course" and "Cooking course" are known as the objects of the Course class. We typically refer a single course as an instance of the Course class. For the sake of simplicity, the term instance and object are sometimes interchangeable.
A blueprint for a house design is like a class description. All the houses built from that blueprint are objects of that class. A given house is an instance.
Source: http://stackoverflow.com/questions/3323330/difference-between-object-and-instance
Structures
Structures and classes are general-purpose, flexible constructs that become the building blocks of your program’s code. You define properties and methods to add functionality to your structures and classes using the same syntax you use to define constants, variables, and functions.
- Apple Documentation (https://docs.swift.org/swift-book/LanguageGuide/ClassesAndStructures.html)
Other than classes, you can use use structures (or structs) in Swift to create your own type with properties and methods. Structs in Swift are very similar to Classes and have a lot in common. Both can define properties to store values and methods to provide functionalities. Both can create their own initializers to configure the initial state of the object.
Inheritance is one of the important features of Object Oriented Programming. Structs, however, do not allow inheritance. You can't inherit one struct from another. This is one of main differences between Classes and Structs in Swift.
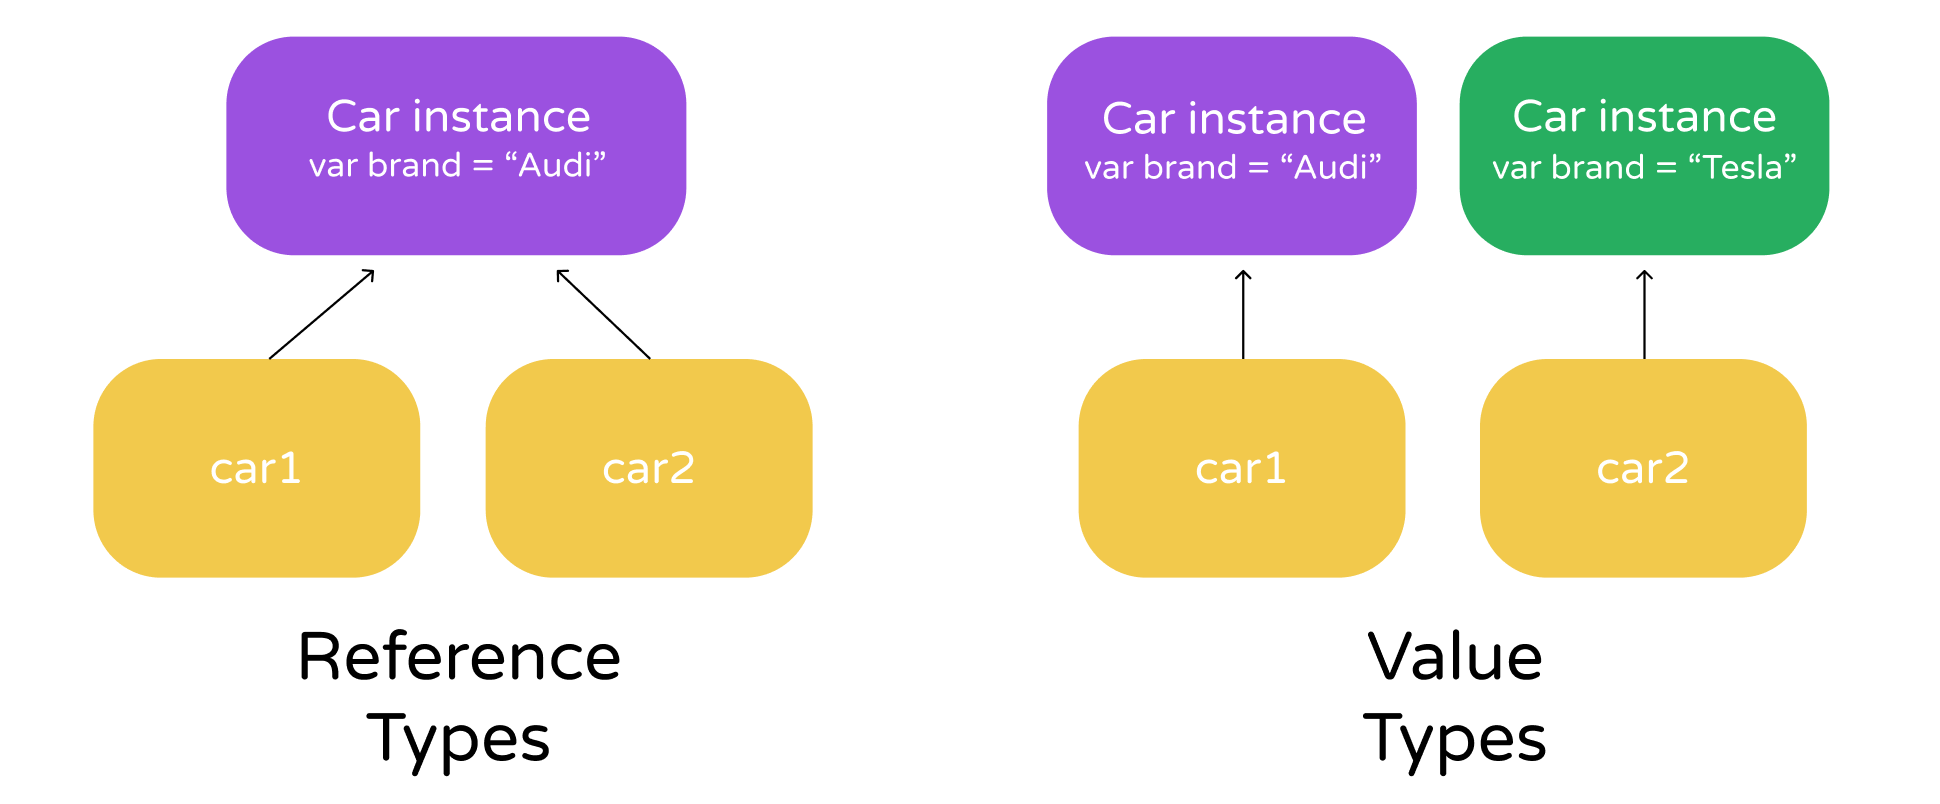
Types in Swift fall into two categories: value types and reference types. All structures in Swift are value types, while classes are reference types. This is another core difference between Classes and Structs. For structs, each instance has a unique copy of its data. On the other hand, reference types (classes) share a single copy of the data. When you assign an instance of a class to another variable, rather than copy the data of that instance, a reference to that instance is used.
Let me demonstrate the difference between value types (struct) and reference types (class) using an example. In the code snippet below, we have a class named Car with a property named brand. We create an instance of Car and assign it to a car1 variable. Then we assign car1 to another variable named car2. Lastly, we modify the brand value of car1.
class Car {
    var brand = "Tesla"
}

var car1 = Car()
var car2 = car1

car1.brand = "Audi"
print(car2.brand)
Can you guess the brand value of car2? Should it be Tesla or Audi? The answer is Audi. This is the nature of reference types. Both car1 and car2 are referring to the same instance, sharing the same copy of the data.
Contrarily, if you rewrite the same piece of code with struct (i.e. value types), you will see a different result.
struct Car {
    var brand = "Tesla"
}

var car1 = Car()
var car2 = car1

car1.brand = "Audi"
print(car2.brand)
In this case, only the brand value of car1 is updated to Audi. For car2, its brand is still Tesla because each variable of value types has its own copy of data. Figure 9-1 illustrates the difference between classes and structs visually.
Since both classes and structures provides similar features, which one should you use? In general, use structures to create your own type by default. This is a recommendation from Apple (https://developer.apple.com/documentation/swift/choosing_between_structures_and_classes). In case if you need additional functionalities like inheritance, choose classes over structs.
Revisiting the FoodPin Project
So, why do we cover OOP in this chapter? There is no better way to explain the concept than showing you an example. Take a look at the FoodPin project (http://www.appcoda.com/resources/swift57/swiftui-foodpin-list-selection-exercise.zip) again.
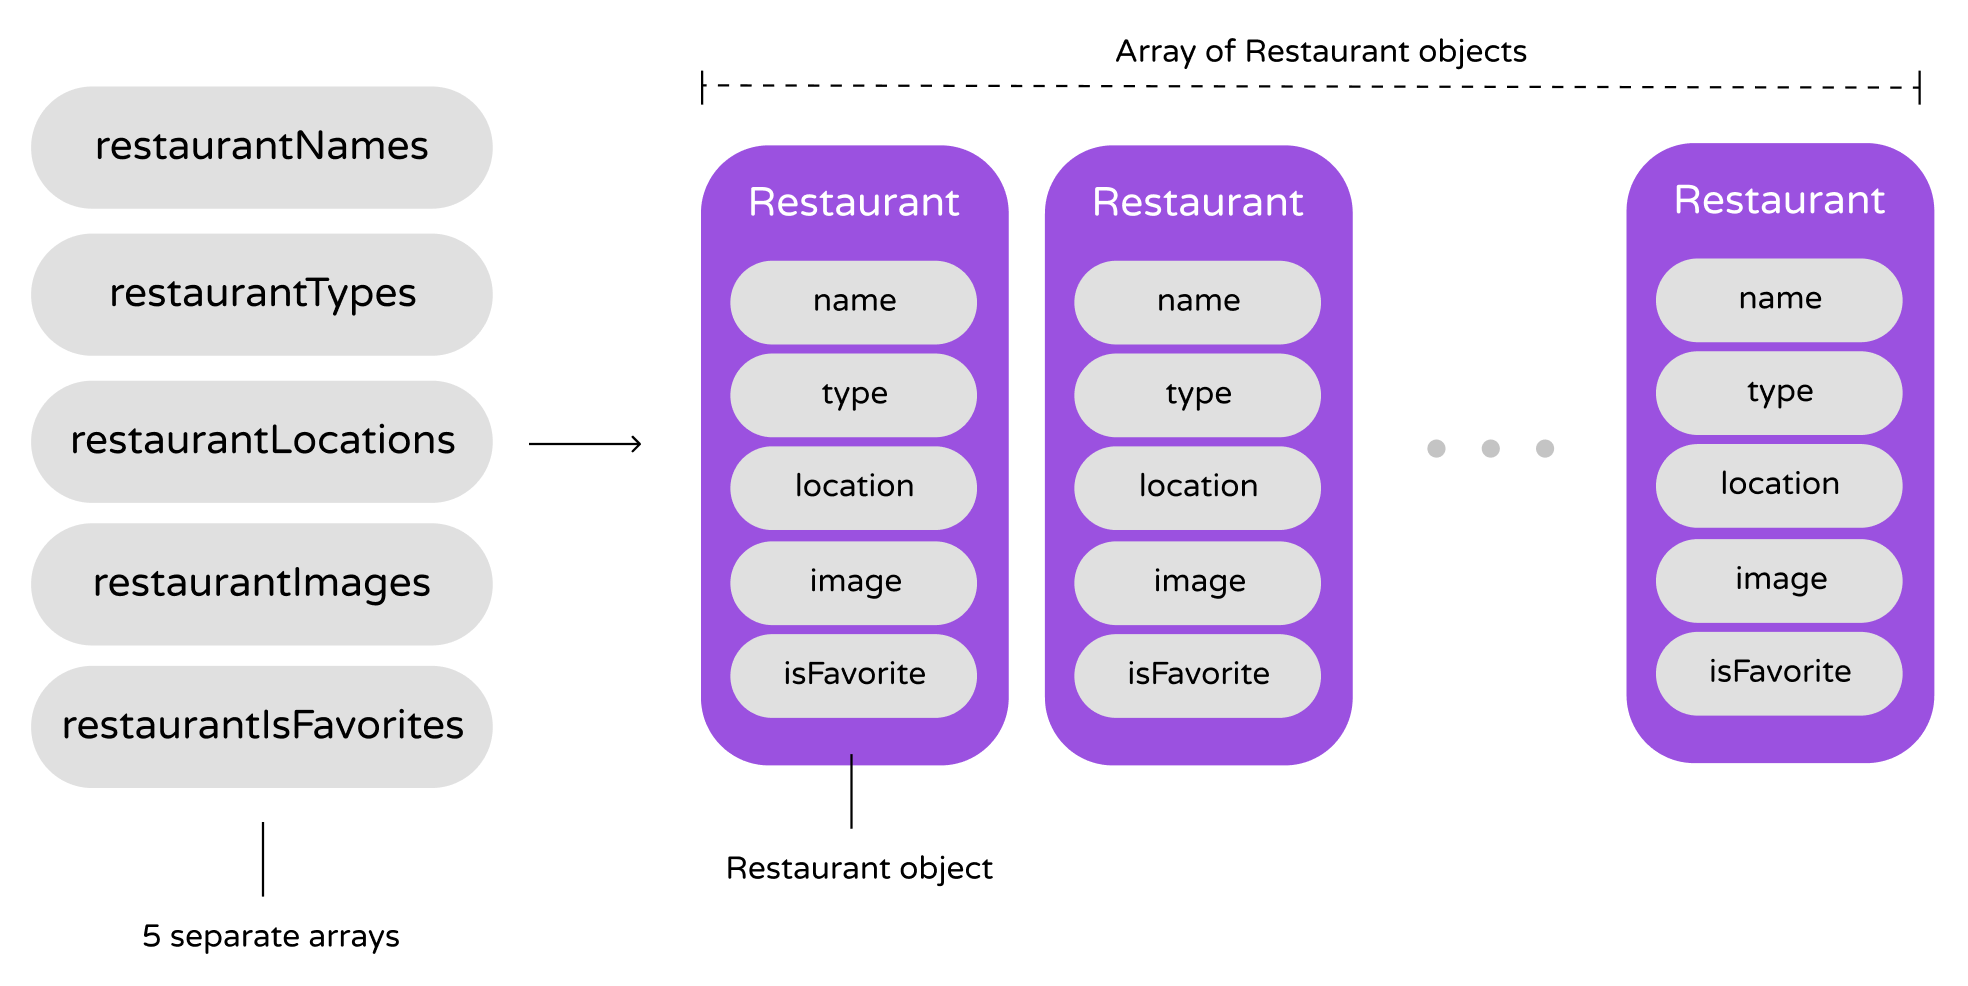
In the RestaurantListView struct, we created multiple arrays to store the names, types, locations, and images of the restaurants.
var restaurantNames = ["Cafe Deadend", "Homei", "Teakha", "Cafe Loisl", "Petite Oyster", "For Kee Restaurant", "Po's Atelier", "Bourke Street Bakery", "Haigh's Chocolate", "Palomino Espresso", "Upstate", "Traif", "Graham Avenue Meats And Deli", "Waffle & Wolf", "Five Leaves", "Cafe Lore", "Confessional", "Barrafina", "Donostia", "Royal Oak", "CASK Pub and Kitchen"]

var restaurantImages = ["cafedeadend", "homei", "teakha", "cafeloisl", "petiteoyster", "forkee", "posatelier", "bourkestreetbakery", "haigh", "palomino", "upstate", "traif", "graham", "waffleandwolf", "fiveleaves", "cafelore", "confessional", "barrafina", "donostia", "royaloak", "cask"]

var restaurantLocations = ["Hong Kong", "Hong Kong", "Hong Kong", "Hong Kong", "Hong Kong", "Hong Kong", "Hong Kong", "Sydney", "Sydney", "Sydney", "New York", "New York", "New York", "New York", "New York", "New York", "New York", "London", "London", "London", "London"]

var restaurantTypes = ["Coffee & Tea Shop", "Cafe", "Tea House", "Austrian / Causual Drink", "French", "Bakery", "Bakery", "Chocolate", "Cafe", "American / Seafood", "American", "American", "Breakfast & Brunch", "Coffee & Tea", "Coffee & Tea", "Latin American", "Spanish", "Spanish", "Spanish", "British", "Thai"]

@State var restaurantIsFavorites = Array(repeating: false, count: 21)
All these data are actually related to a list of restaurants. Why do we need to separate them into multiple arrays? Have you ever wondered if we can group these data together?
In Object Oriented Programming, these data can be characterized as the properties of a restaurant. Instead of storing these data in separate arrays, we can create a Restaurant structure to model a restaurant and store multiple restaurants in an array of Restaurant objects.

Now let's tweak the FoodPin project, create the Restaurant struct and convert the code to use a list of Restaurant objects.
Creating a Restaurant Struct
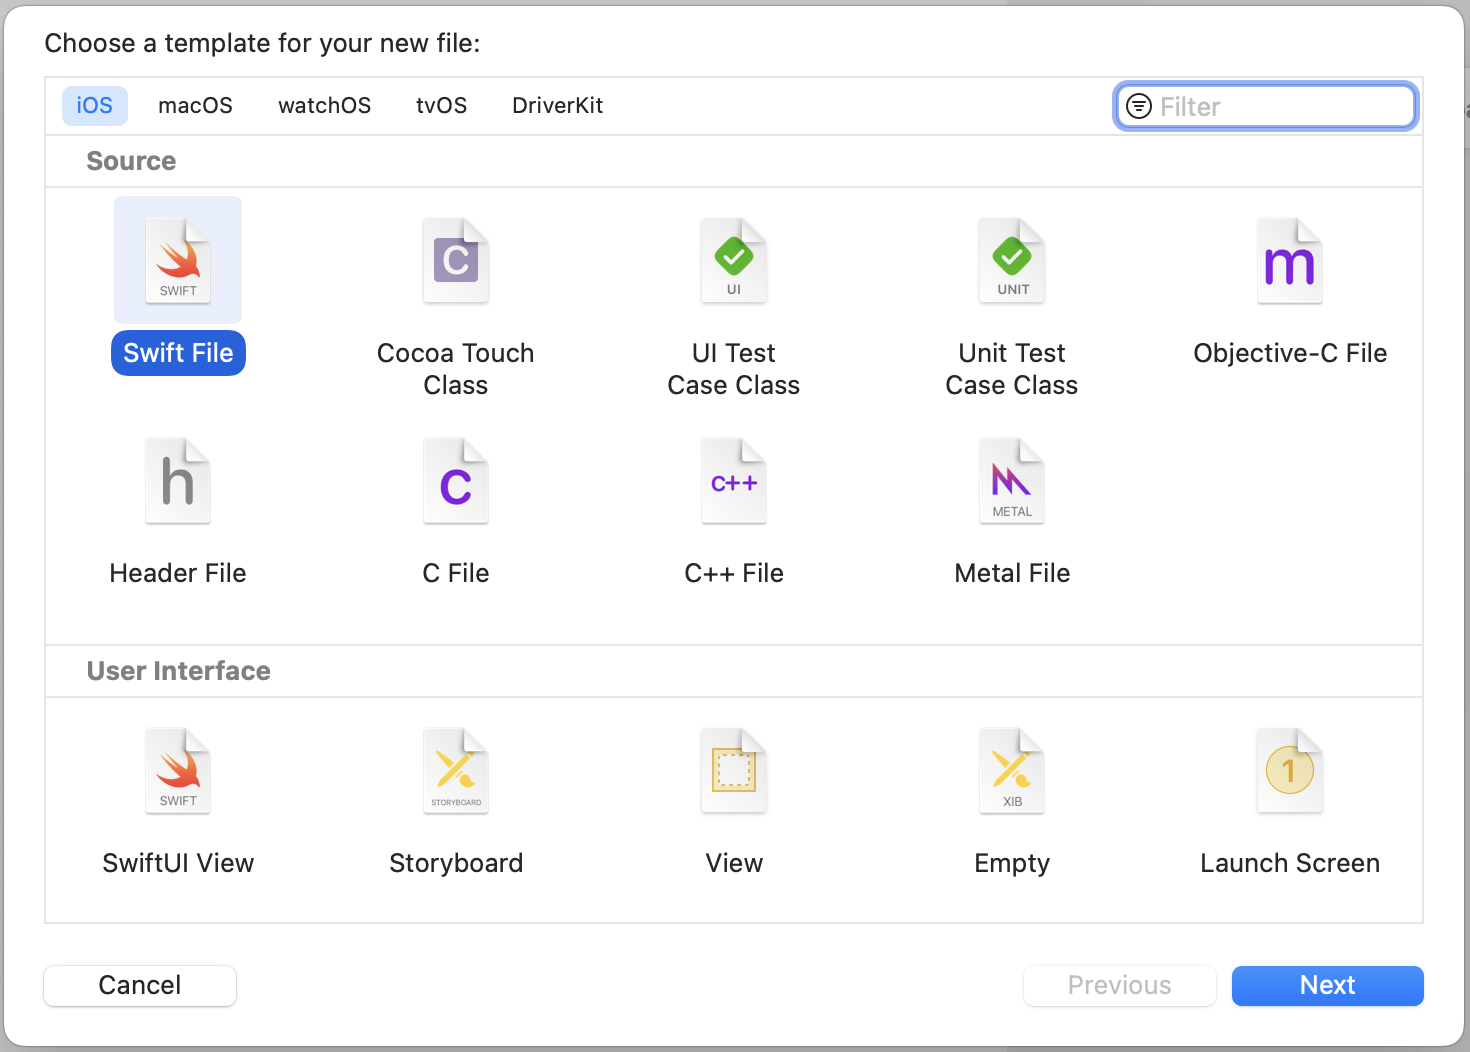
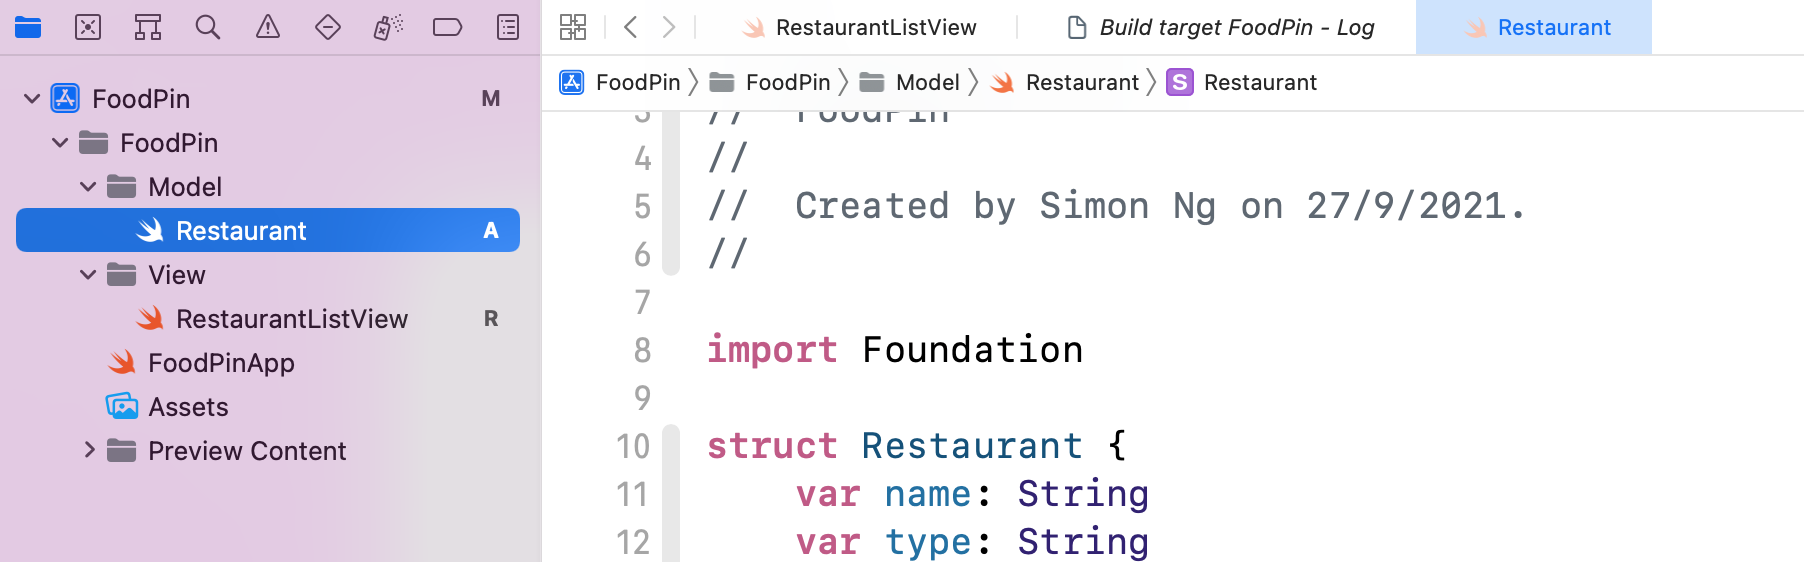
First, we'll start with the Restaurant struct. In the project navigator, right click on the FoodPin folder and select "New File…". This time we are not extending the UI objects provided by the iOS SDK. Instead, we are going to create a brand new struct. So, choose the "Swift File" template under Source and click "Next". Name the file Restaurant.swift and save it in the project folder.
Once completed, declare the Restaurant struct in the Restaurant.swift file using the below code:
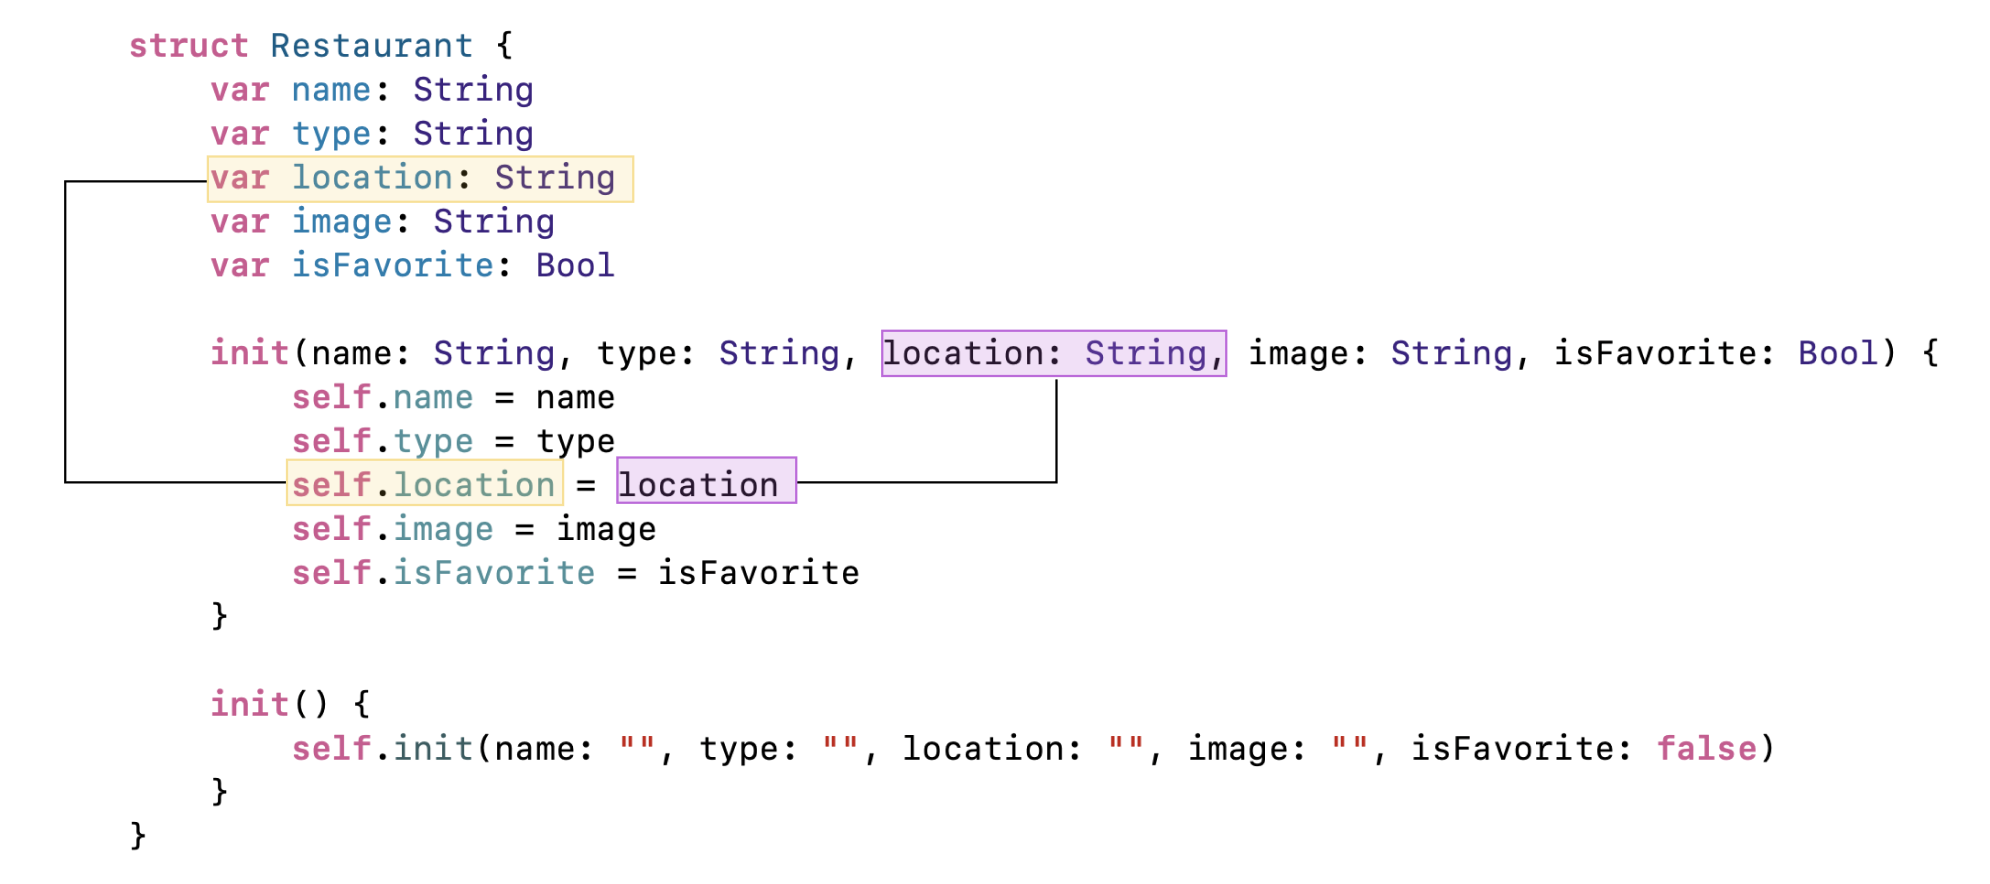
struct Restaurant {
    var name: String
    var type: String
    var location: String
    var image: String
    var isFavorite: Bool

    init(name: String, type: String, location: String, image: String, isFavorite: Bool) {
        self.name = name
        self.type = type
        self.location = location
        self.image = image
        self.isFavorite = isFavorite
    }

    init() {
        self.init(name: "", type: "", location: "", image: "", isFavorite: false)
    }
}
You use the struct keyword to define a structure. The code above defines a Restaurant struct with five properties including name, type, location, image and isFavorite. Except for isFavorite, which is a boolean (i.e. Bool), the rest of the properties are of the type String. You can either set a default value or explicitly specify the type for each property. Here we demonstrate the latter option.
Initializers Explained
Initialization is the process of preparing an instance of a structure (or class). When you create an object, the initializer is called for setting an initial value for each stored property on that instance and performing any extra setup, before the instance is ready to use. You use the init keyword to define an initializer. In its simplest form, it looks like this:
init() {

}
You can also customize an initializer to take input parameters, just like the one we have defined in the Restaurant struct. Our initializer has five parameters. Each of them is given a name and explicitly specified with a type. In the initializer, it initializes the values of the property with the given values.
To create an instance of the Restaurant struct, the syntax is like this:
Restaurant(name: "Thai Cafe", type: "Thai", location: "London", image: "thaicafe", isFavorite: false)
You are allowed to define multiple initializers that accepts different parameters. In the code, we created another initializer for convenience purpose.
init() {
    self.init(name: "", type: "", location: "", image: "", isFavorite: false)
}
Without this initializer, you can initialize an empty Restaurant object like this:
Restaurant(name: "", type: "", location: "", image: "", isFavorite: false)
Now with the convenience initializer, you can initialize the same object like this:
Restaurant()
It saves you time from typing all the initialization parameters every time you need to initialize an empty Restaurant object.
The self Keyword
What's the self keyword in the initializer? In Swift, you use self to differentiate between property names and arguments in initializers. Because the arguments have the same name as the properties, we use self to refer to the property of the struct/class.
Default Initializers
You can actually assign each property with a default value and omit the initializator. Swift will generate the default initializer behind the scene. Therefore, a short version of the Restaurant struct can be written like this:
struct Restaurant {
    var name: String = ""
    var type: String = ""
    var location: String = ""
    var image: String = ""
    var isFavorite: Bool = false
}
Using the Array of Restaurant Objects
With a basic understanding of classes, structs, and object initializations, let's go back to the FoodPin project and combine the existing arrays into an array of Restaurant objects. First, delete the restaurant-related arrays from the RestaurantListView struct:
var restaurantNames = ["Cafe Deadend", "Homei", "Teakha", "Cafe Loisl", "Petite Oyster", "For Kee Restaurant", "Po's Atelier", "Bourke Street Bakery", "Haigh's Chocolate", "Palomino Espresso", "Upstate", "Traif", "Graham Avenue Meats And Deli", "Waffle & Wolf", "Five Leaves", "Cafe Lore", "Confessional", "Barrafina", "Donostia", "Royal Oak", "CASK Pub and Kitchen"]

var restaurantImages = ["cafedeadend", "homei", "teakha", "cafeloisl", "petiteoyster", "forkee", "posatelier", "bourkestreetbakery", "haigh", "palomino", "upstate", "traif", "graham", "waffleandwolf", "fiveleaves", "cafelore", "confessional", "barrafina", "donostia", "royaloak", "cask"]

var restaurantLocations = ["Hong Kong", "Hong Kong", "Hong Kong", "Hong Kong", "Hong Kong", "Hong Kong", "Hong Kong", "Sydney", "Sydney", "Sydney", "New York", "New York", "New York", "New York", "New York", "New York", "New York", "London", "London", "London", "London"]

var restaurantTypes = ["Coffee & Tea Shop", "Cafe", "Tea House", "Austrian / Causual Drink", "French", "Bakery", "Bakery", "Chocolate", "Cafe", "American / Seafood", "American", "American", "Breakfast & Brunch", "Coffee & Tea", "Coffee & Tea", "Latin American", "Spanish", "Spanish", "Spanish", "British", "Thai"]

@State var restaurantIsFavorites = Array(repeating: false, count: 21)
Instead of using the above arrays, replace them with a new array of Restaurant objects:
@State var restaurants = [
    Restaurant(name: "Cafe Deadend", type: "Coffee & Tea Shop", location: "Hong Kong", image: "cafedeadend", isFavorite: false),
    Restaurant(name: "Homei", type: "Cafe", location: "Hong Kong", image: "homei", isFavorite: false),
    Restaurant(name: "Teakha", type: "Tea House", location: "Hong Kong", image: "teakha", isFavorite: false),
    Restaurant(name: "Cafe loisl", type: "Austrian / Causual Drink", location: "Hong Kong", image: "cafeloisl", isFavorite: false),
    Restaurant(name: "Petite Oyster", type: "French", location: "Hong Kong", image: "petiteoyster", isFavorite: false),
    Restaurant(name: "For Kee Restaurant", type: "Bakery", location: "Hong Kong", image: "forkee", isFavorite: false),
    Restaurant(name: "Po's Atelier", type: "Bakery", location: "Hong Kong", image: "posatelier", isFavorite: false),
    Restaurant(name: "Bourke Street Backery", type: "Chocolate", location: "Sydney", image: "bourkestreetbakery", isFavorite: false),
    Restaurant(name: "Haigh's Chocolate", type: "Cafe", location: "Sydney", image: "haigh", isFavorite: false),
    Restaurant(name: "Palomino Espresso", type: "American / Seafood", location: "Sydney", image: "palomino", isFavorite: false),
    Restaurant(name: "Upstate", type: "American", location: "New York", image: "upstate", isFavorite: false),
    Restaurant(name: "Traif", type: "American", location: "New York", image: "traif", isFavorite: false),
    Restaurant(name: "Graham Avenue Meats", type: "Breakfast & Brunch", location: "New York", image: "graham", isFavorite: false),
    Restaurant(name: "Waffle & Wolf", type: "Coffee & Tea", location: "New York", image: "waffleandwolf", isFavorite: false),
    Restaurant(name: "Five Leaves", type: "Coffee & Tea", location: "New York", image: "fiveleaves", isFavorite: false),
    Restaurant(name: "Cafe Lore", type: "Latin American", location: "New York", image: "cafelore", isFavorite: false),
    Restaurant(name: "Confessional", type: "Spanish", location: "New York", image: "confessional", isFavorite: false),
    Restaurant(name: "Barrafina", type: "Spanish", location: "London", image: "barrafina", isFavorite: false),
    Restaurant(name: "Donostia", type: "Spanish", location: "London", image: "donostia", isFavorite: false),
    Restaurant(name: "Royal Oak", type: "British", location: "London", image: "royaloak", isFavorite: false),
    Restaurant(name: "CASK Pub and Kitchen", type: "Thai", location: "London", image: "cask", isFavorite: false)
]
This new array is also annotated with the @State property wrapper because we need to update the value of isFavorite.
Once you replaced the original arrays with the restaurants array, you'll end up with a few errors in Xcode because some of the code still refer to the old arrays.
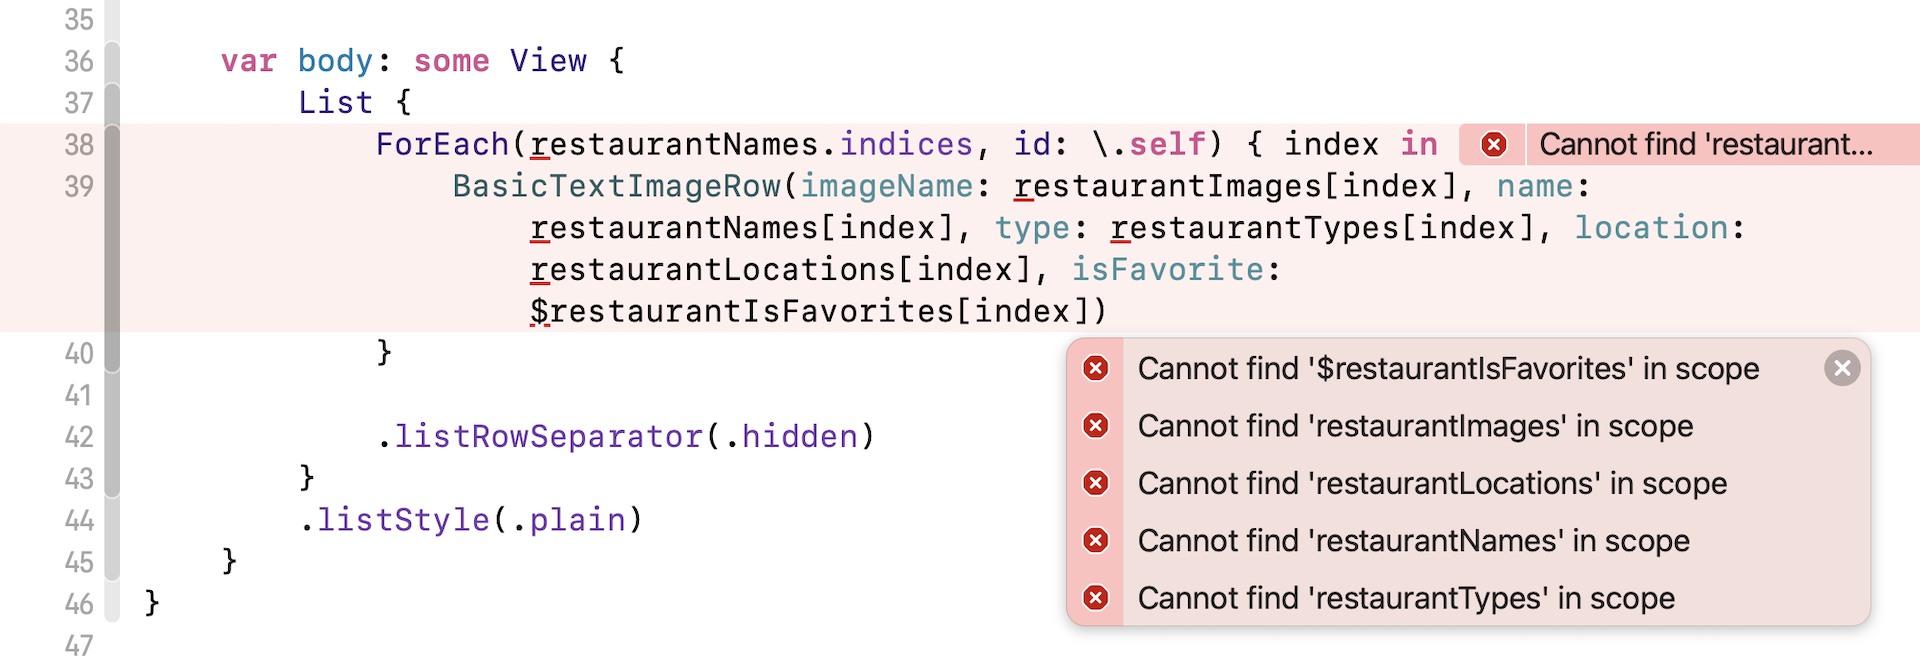
To fix the errors, we have to modify the code to use the new restaurants array like this:
ForEach(restaurants.indices, id: \.self) { index in
    BasicTextImageRow(imageName: restaurants[index].image, name: restaurants[index].name, type: restaurants[index].type, location: restaurants[index].location, isFavorite: $restaurants[index].isFavorite)
}
Since we now use an array of Restaurant object instead of an array of restaurant names to model the restaurants, we can retrieve the restaurant data by accessing the properties of the Restaurant object.
This should fix all the errors. You can now run your app. The look & feel of the app is exactly the same as before. However, we have refactored the code to use the new Restaurant struct. By combining multiple arrays into one, the code is now cleaner and more readable.
We can refactor the code even further. In the BasicTextImageRow struct, we have 5 parameters:
var imageName: String
var name: String
var type: String
var location: String
@Binding var isFavorite: Bool
Each of these parameters are actually the properties of the Restaurant struct. Therefore, instead of declaring these parameters separately, we can combine them into one like this:
@Binding var restaurant: Restaurant
We request the caller to pass us the binding to the Restaurant object. Again, once you made the changes, you will see quite a number of errors. To fix them, you have to update the code to use the restaurant object. For example, you should use restaurant.image instead of imageName.
If you've properly fixed the errors, your code should look like this:
struct BasicTextImageRow: View {

    @Binding var restaurant: Restaurant

    @State private var showOptions = false
    @State private var showError = false

    var body: some View {
        HStack(alignment: .top, spacing: 20) {
            Image(restaurant.image)
                .resizable()
                .frame(width: 120, height: 118)
                .cornerRadius(20)

            VStack(alignment: .leading) {
                Text(restaurant.name)
                    .font(.system(.title2, design: .rounded))

                Text(restaurant.type)
                    .font(.system(.body, design: .rounded))

                Text(restaurant.location)
                    .font(.system(.subheadline, design: .rounded))
                    .foregroundColor(.gray)
            }

            if restaurant.isFavorite {
                Spacer()

                Image(systemName: "heart.fill")
                    .foregroundColor(.yellow)
            }
        }
        .onTapGesture {
            showOptions.toggle()
        }
        .confirmationDialog("What do you want to do?", isPresented: $showOptions, titleVisibility: .visible) {

            Button("Reserve a table") {
                self.showError.toggle()
            }

            Button(restaurant.isFavorite ? "Remove from favorites" : "Mark as favorite") {
                self.restaurant.isFavorite.toggle()
            }
        }
        .alert("Not yet available", isPresented: $showError) {
            Button("OK") {}
        } message: {
            Text("Sorry, this feature is not available yet. Please retry later.")
        }
    }
}
We are not done yet. There are a couple of errors awaiting us to fix. First, replace the following line of code in RestaurantListView:
BasicTextImageRow(imageName: restaurants[index].image, name: restaurants[index].name, type: restaurants[index].type, location: restaurants[index].location, isFavorite: $restaurants[index].isFavorite)
with:
BasicTextImageRow(restaurant: $restaurants[index])
Instead of passing the parameters separately, we pass BasicTextImageRow the binding to the Restaurant object.
In RestaurantListView_Previews, we also need to modify this line of code from:
BasicTextImageRow(imageName: "cafedeadend", name: "Cafe Deadend", type: "Cafe", location: "Hong Kong", isFavorite: .constant(true))
to:
BasicTextImageRow(restaurant: .constant(Restaurant(name: "Cafe Deadend", type: "Cafe", location: "Hong Kong", image: "cafedeadend", isFavorite: true)))
That's it! The code now looks even simpler, though the look & feel of the app is still the same.
Organizing Your Xcode Project Files
As we continue to build our app, we will create even more files in the project folder. Therefore, I want to take this chance to show you a technique to better organize our projects.
Let's first look at the project navigator. All files you have created are placed at the top level of the FoodPin folder. As you add more files, it will be getting more difficult to locate your desired file. To better organize your project files, Xcode provides a group feature that lets you organize the files by group/folder.
There are a number of ways to group your files. You may group them by features or functions. One good practice is to group them by their responsibilities. Say, for views, they will be grouped under View. Model classes like Restaurant will be grouped under Model.
To create a group in the project navigator, right click the FoodPin folder and select New Group to create a new group. Name it View.
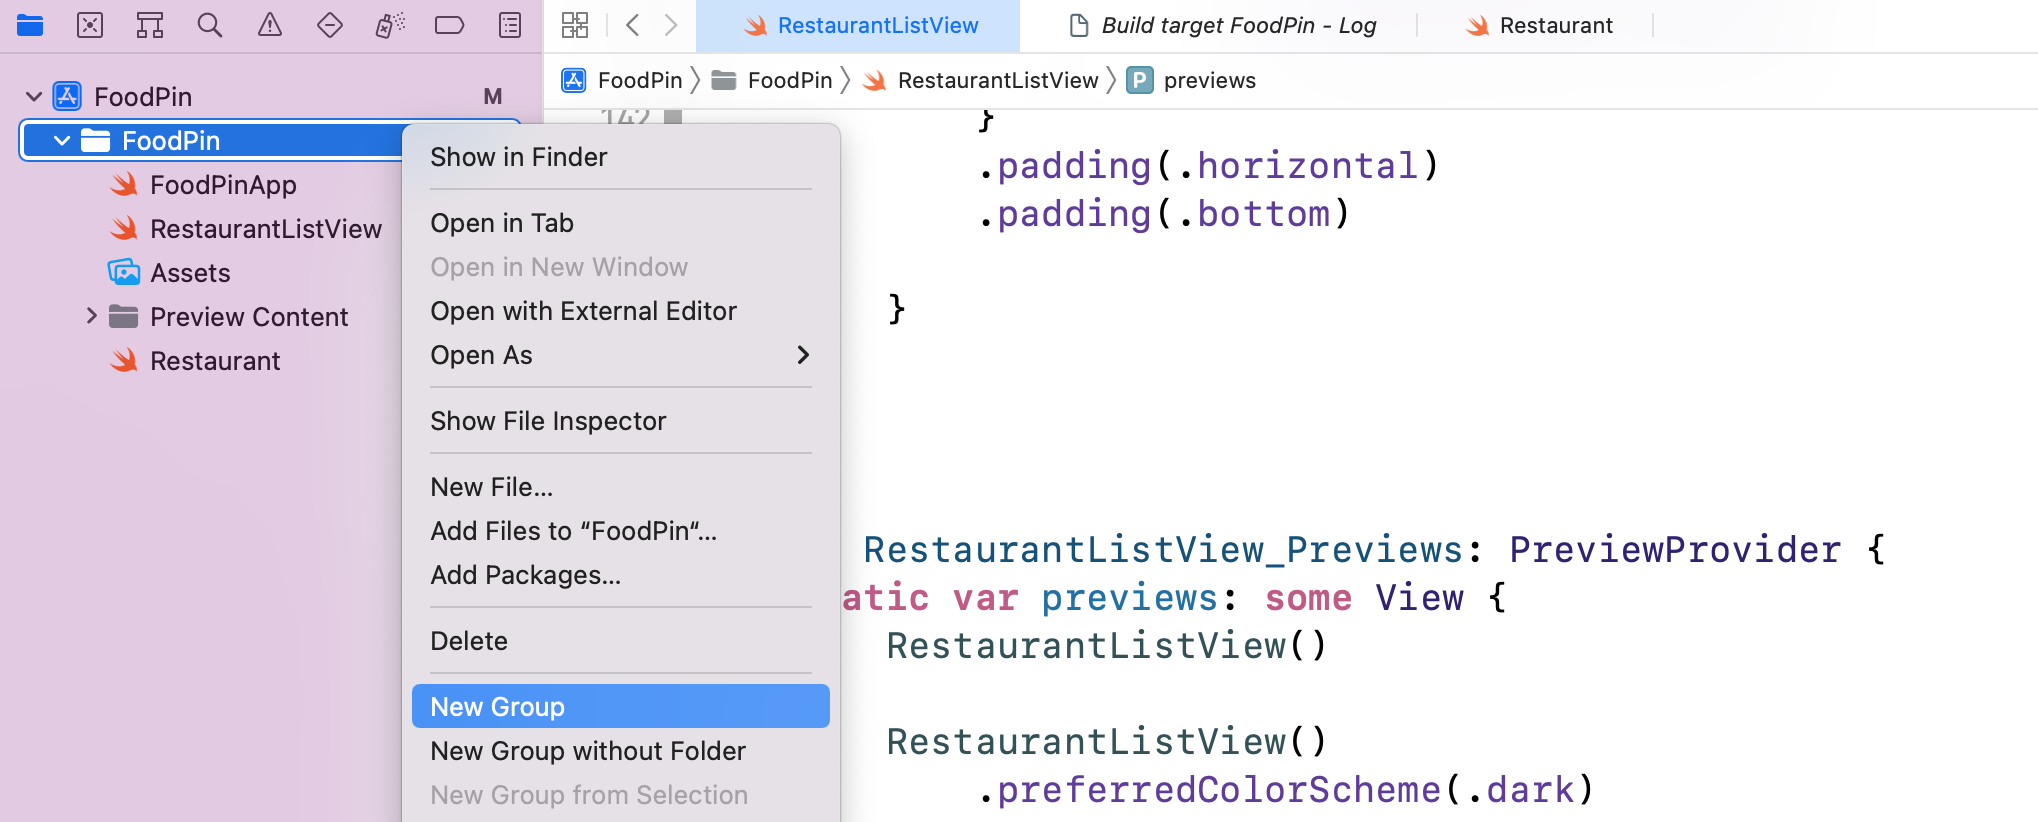
Next, select RestaurantListView and drag it to the View group. Repeat the same procedure to group to the Model group and drag the Restaurant file to the group.
If you open your project folder in Finder, you will find that all files are nicely organized into folders (i.e. Model & View). Each of which corresponds to the specific group in your Xcode project.
Even if you have moved the files to different folders, you can still run the projects without any changes. Hit the Run button and try it out.
Documenting and Organizing Swift Code with MARK
"Indeed, the ratio of time spent reading versus writing is well over 10 to 1. We are constantly reading old code as part of the effort to write new code. ...[Therefore,] making it easy to read makes it easier to write." ― Robert C. Martin, Clean Code: A Handbook of Agile Software Craftsmanship
Other than project files, there are some best practices to organizing the source code better. Here I am going to show you a powerful technique to organize your Swift code into useful and easy to read sections.
As you know, those lines of code which begins with // are comments. Comments serve as a note to yourself or other developers (if you are working in a team), providing extra information (e.g. intent) about the code. The primary purpose is just to make your code more easy to understand.
// Add "Reserve a table" action
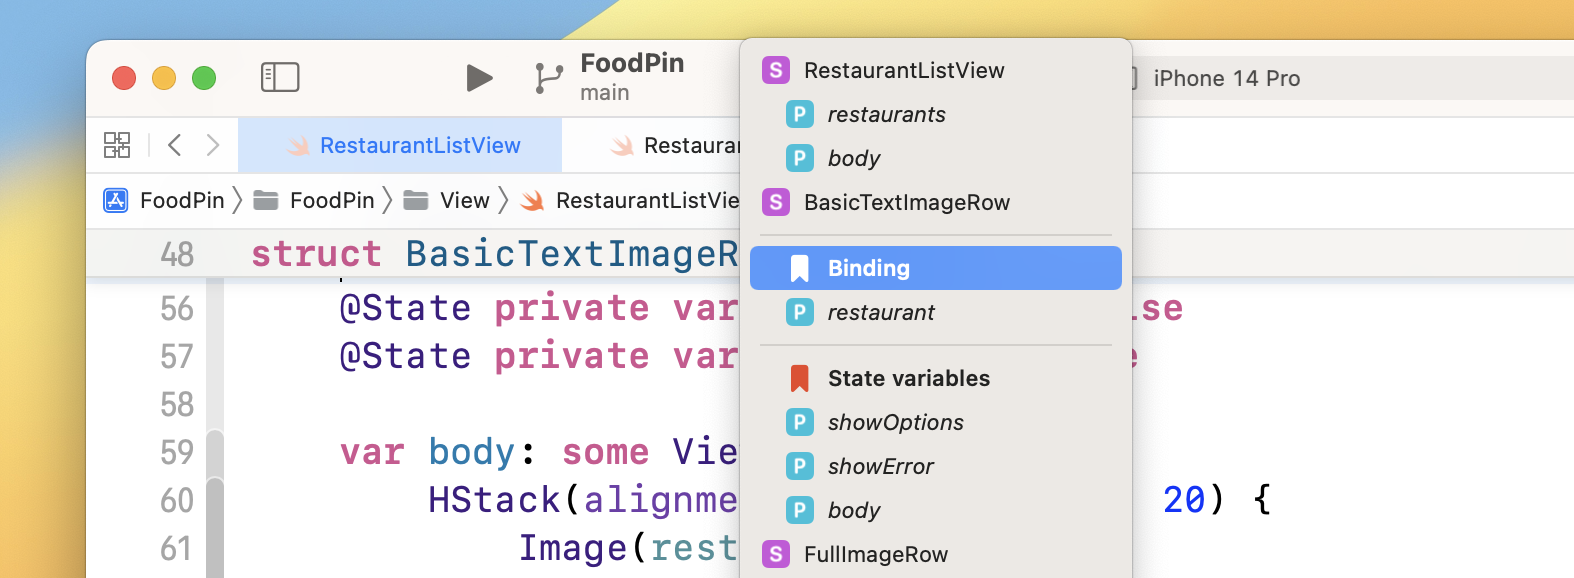
There is another type of comment in Swift which starts with the // MARK: marker. Here is an example:
// MARK: - Binding
MARK is a special comment marker in Swift for organizing your code into easy-to-navigate sections. Say, for the BasicTextImageRow struct, some of the variables are binding and some of them are state variables. We can then add the MARK comment to separate them into sections.
// MARK: - Binding

@Binding var restaurant: Restaurant

// MARK: - State variables

@State private var showOptions = false
@State private var showError = false
Now when you click the jump bar on top of your editor window, you can see the methods are organized into different meaningful sections.
Summary
Congratulations if you made it this far. I hope you're not bored by the chapter. What I have covered is the basics of Struct and Object Oriented Programming. I also showed you some techniques for organizing your code and project files.
There are a lot more about the OOP concepts, such as polymorphism. However, we do not have time to discuss in-depth in this book. If you want to become a professional iOS developer, check out the references to learn more. It'll take you a lot of practices to truly pick up OOP. Anyhow, if you manage to finish this chapter, this is a good start.
For reference, you can download the complete Xcode project from http://www.appcoda.com/resources/swift57/swiftui-foodpin-oop.zip. In the next chapter, base on what we've learned, you'll continue to tweak the detail view screen of the FoodPin app. It's going to be fun!
Further References
Swift Programming Language - Classes and Structures https://docs.swift.org/swift-book/LanguageGuide/ClassesAndStructures.html
Swift Programming Language - Initialization https://docs.swift.org/swift-book/LanguageGuide/Initialization.html
Swift Programming Language - Inheritance https://docs.swift.org/swift-book/LanguageGuide/Inheritance.html
Object Oriented Programming from MIT Open Courseware https://ocw.mit.edu/courses/6-0001-introduction-to-computer-science-and-programming-in-python-fall-2016/resources/lecture-8-object-oriented-programming/