- Made by AppCoda
- Contact us / Support
- Tweet this book
- Preface
- 1. The Development Tools, the Learning Approach, and the App Idea
- 2. Your First Taste of Swift with Playgrounds
- 3. Build Your First App in Swift and SwiftUI
- 4. Designing UI Using Stack Views
- 5. Introduction to Prototyping
- 6. Understanding List and ForEach
- 7. Customizing List Views
- 8. Displaying Confirmations and Handling List View Selection
- 9. Understanding Struct, Project Organization and Code Documentation
- 10. List Deletion, Swipe Actions, Context Menus and Activity Controller
- 11. Working with Navigation View
- 12. Detail View Enhancement, Custom Fonts and Navigation Bar Customization
- 13. Understanding Colors, Swift Extensions and Dynamic Type
- 14. Working with Maps
- 15. View Animations and Blur Effect
- 16. Working with Observable Objects and Combine
- 17. Working with Forms and Camera
- 18. Working with Core Data
- 19. Adding a Search Bar Using Searchable
- 20. Building Walkthrough Screens Using TabView
- 21. Working with Tab View and Tab Bar Customizations
- 22. Displaying Web Content with WKWebView and SFSafariViewController
- 23. Working with CloudKit
- 24. Localizing Your App to Support Multiple Languages
- 25. Deploying and Testing Your App on a Real iOS Device
- 26. Beta Testing with TestFlight and CloudKit Production Deployment
- 27. Submit Your App to App Store
- 28. Adopting Haptic Touch
- 29. Working with User Notifications
- 30. Appendix - Swift Basics
- Published with GitBook
Chapter 28
Adopting Haptic Touch

As your first app, the FoodPin app is pretty good. That said, if you want to make it even better and adopt some modern technologies provided by the iOS devices, I have two more chapters for you.
Since the release of the iPhone 6s and 6s Plus, Apple introduced us an entirely new way to interact with our phones known as 3D Touch. It literally adds a new dimension to the user interface and offers a new kind of user experience. Not only can it sense your touch, iPhone can now sense how much pressure you apply to the display.
Since the release of iPhone 11, 11 Pro, and 11 Pro Max, Apple was replacing 3D Touch with Haptic Touch across its entire iPhone lineup. Haptic Touch is pretty similar to 3D Touch. While 3D Touch supports force touch, Haptic Touch is a touch and hold gesture.
In the home screen, have you tried to press an app icon a little harder? When you did that, it shows a set of quick actions, each of which allows you to jump straight to a particular part of an app. This is a sample usage of Haptic Touch, known as Quick Actions.
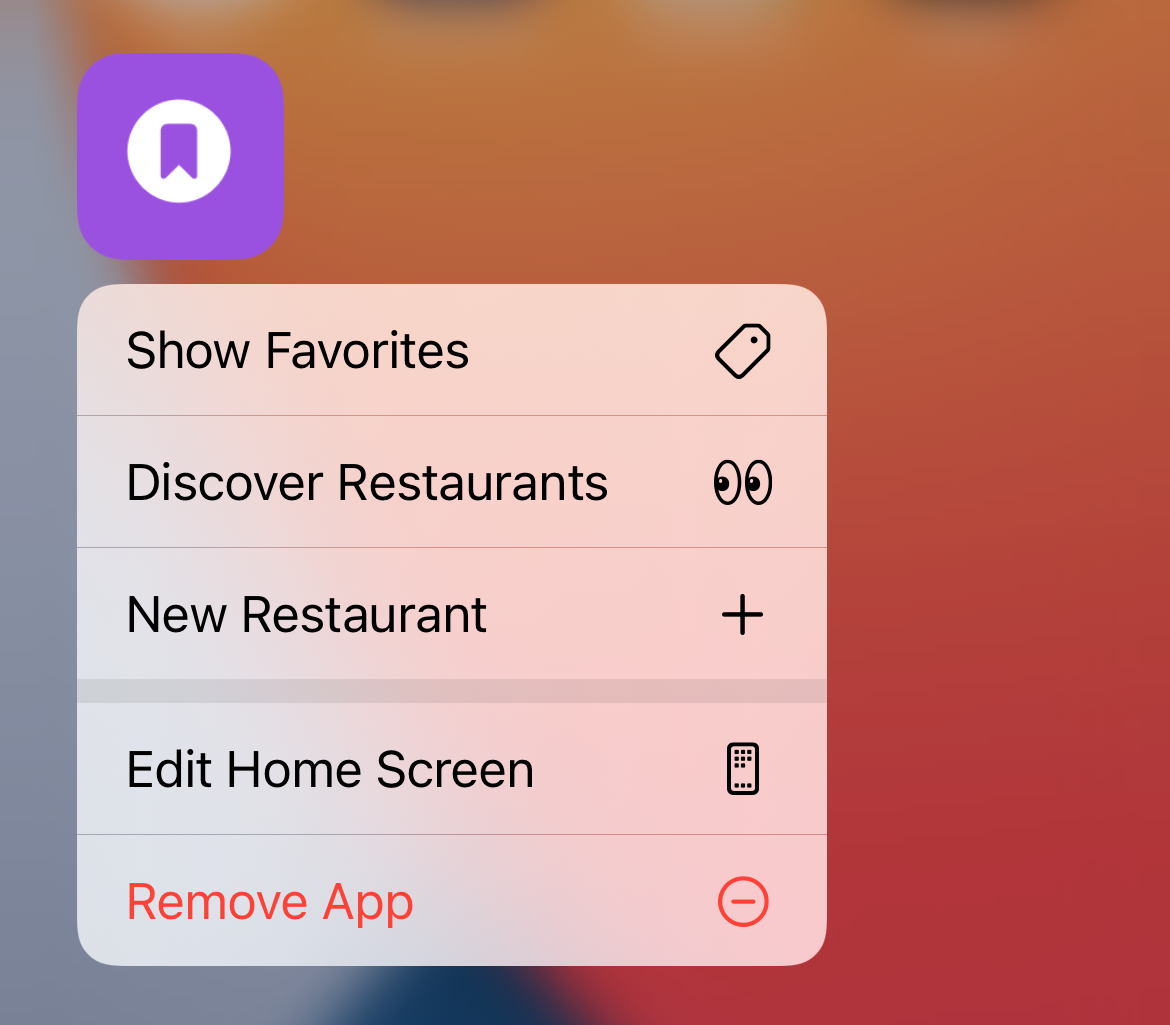
In this chapter, I will go through with you how to implement quick actions in SwiftUI projects and create your custom URL type for handling these quick actions:
- New Restaurant - go to the New Restaurant screen directly
- Discover restaurants - jump right into the Discover tab
- Show Favorites - jump right into the Favorites tab
Home Screen Quick Actions
Apple offers two types of quick actions: static and dynamic. Static quick actions are hardcoded in the Info.plist file. Once the user installs the app, the quick actions will be accessible, even before the first launch of the app.
As the name suggests, dynamic quick actions are dynamic in nature. The app creates and updates the quick actions at runtime. Take the Instagram app as an example. Its quick actions show an option for switching the account. They must be dynamic because the account name varies from time to time.
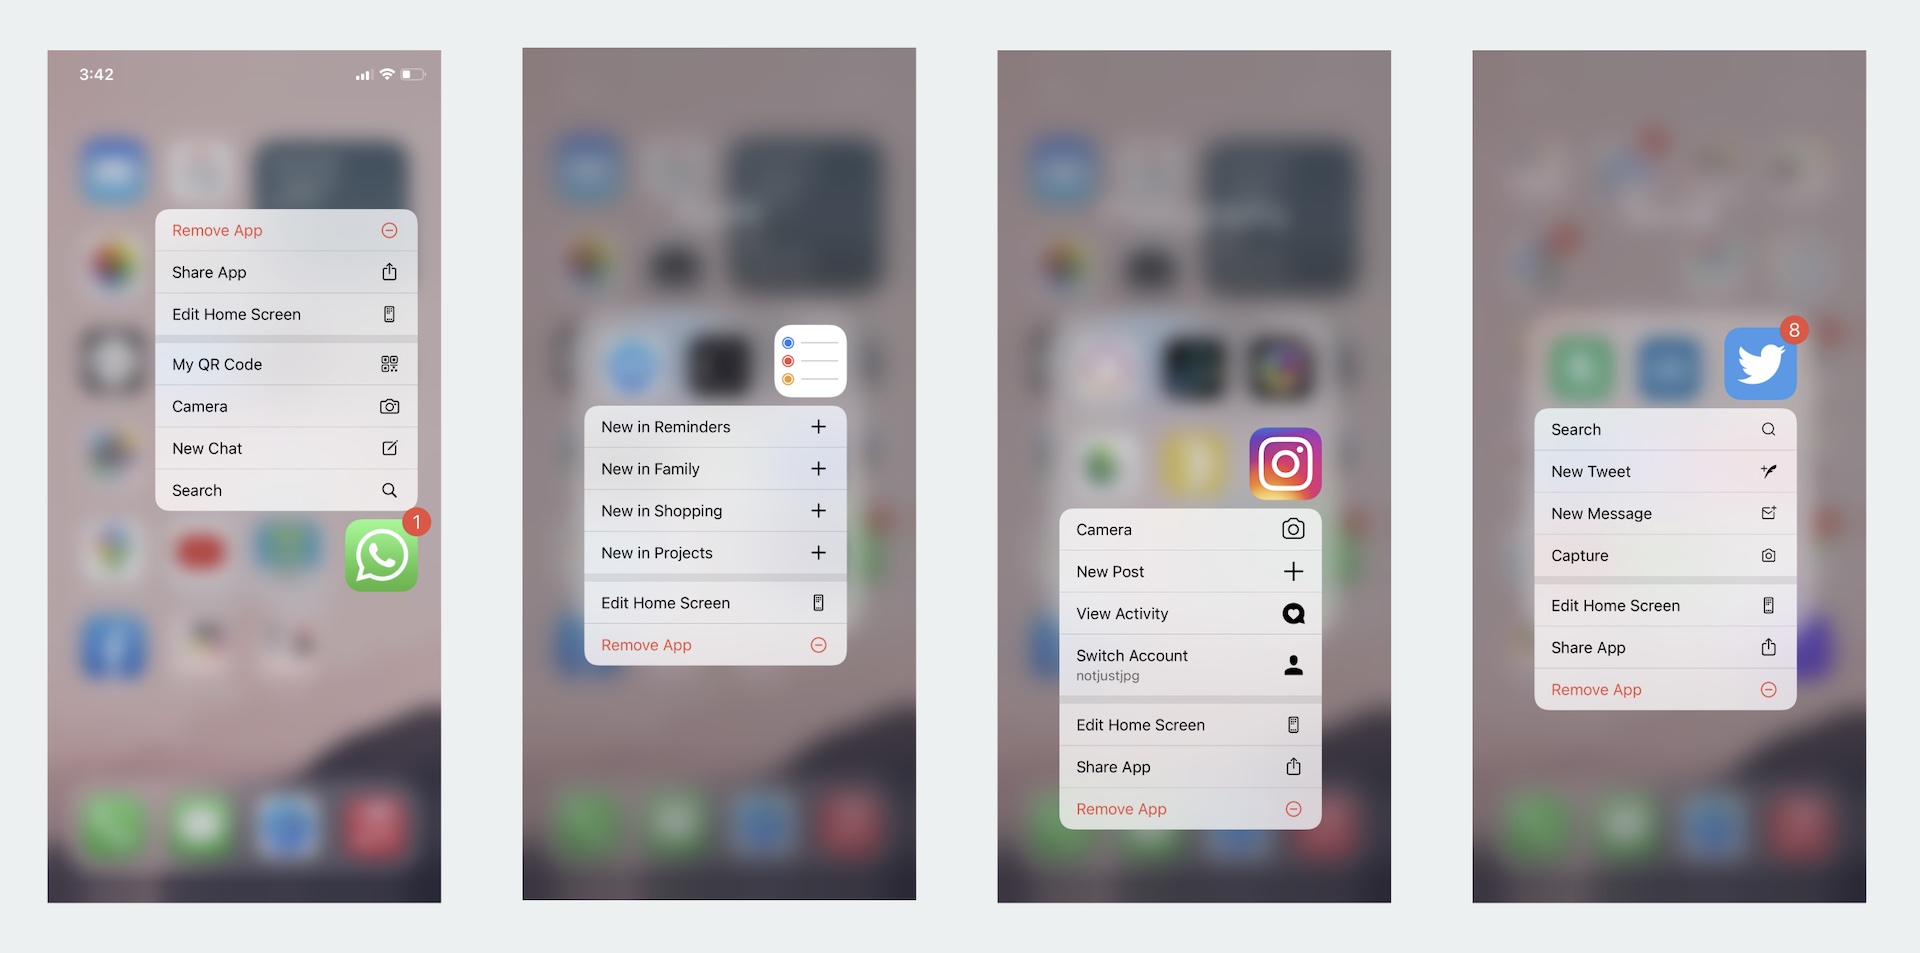
But one thing they have in common is that you can create at most 4 quick actions, no matter you're using static or dynamic quick actions.
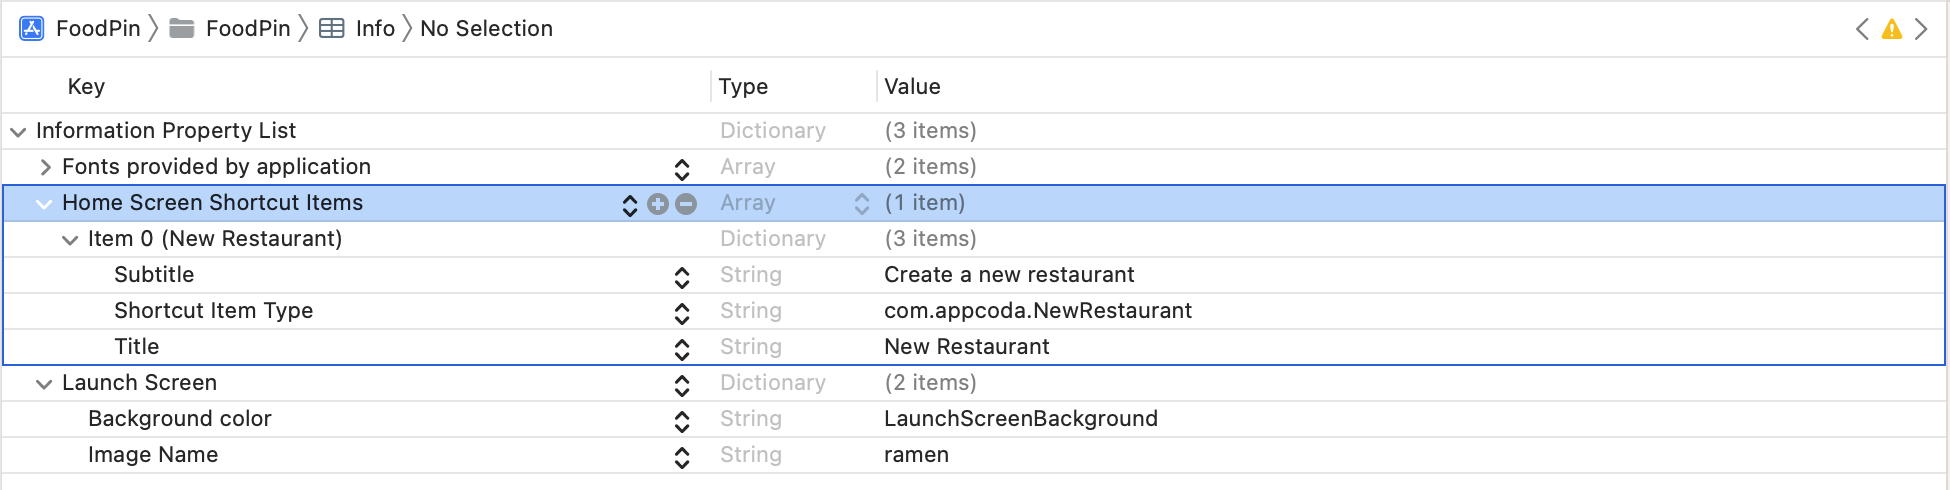
It's pretty simple to create static quick actions. All you need to do is edit the Info.plist file and add a UIApplicationShortcutItems array. Each element of the array is a dictionary containing the following properties:
UIApplicationShortcutItemType(required) - a unique identifier used to identify the quick action. It should be unique across all apps. So a good practice is to prefix the identifier with the app bundle ID (e.g. com.appcoda.). UIApplicationShortcutItemTitle(required) - the name of the quick action visible to the user.UIApplicationShortcutItemSubtitle(optional) - the subtitle of the quick action. It is an optional string displayed right below the title of the quick action.UIApplicationShortcutItemIconType(optional) - an optional string to specify the type of an icon from the system library. Refer to this document for the available icon type.UIApplicationShortcutItemIconFile(optional) - if you want to use your own icon, specify the icon image to use from the app's bundle. Alternatively, specify the name of the image in an asset catalog. These icons should be square, single colour with sizes 35x35 (1x), 70x70 (2x) and 105x105 (3x).UIApplicationShortcutItemUserInfo(optional) - an optional dictionary containing some extra information you want to pass. For example, one use for this dictionary is to pass the app version.
If you want to add some static quick actions, here is an example of the UIApplicationShortcutItems array, which creates a "New Restaurant" shortcut:
Now that you should have some ideas about static quick actions, let's talk about the dynamic ones. As a demo, we will modify the FoodPin project and add three quick actions to the app:
- New Restaurant - go to the New Restaurant screen directly
- Discover restaurants - jump right into the Discover tab
- Show Favorites - jump right into the Favorites tab
First things first, why do we use dynamic quick actions? A simple answer is that I want to show you how to work with dynamic quick actions. But the actual reason is that I want to enable these quick actions only after the user goes through the walkthrough screens.
To create a quick action programmatically, you just need to instantiate a UIApplicationShortcutItem object with the required properties and then assign it to the shortcutItems property of UIApplication. Here is an example:
let shortcutItem = UIApplicationShortcutItem(type: "com.appcoda.NewRestaurant", localizedTitle: "New Restaurant", localizedSubtitle: nil, icon: UIApplicationShortcutIcon(type: .add), userInfo: nil)
UIApplication.shared.shortcutItems = [shortcutItem]
The first line of code defines a shortcut item with the quick action type com.appcoda.NewRestaurant and system icon .add. The title of the quick action is set to New Restaurant. The second line of code initializes an array with the shortcut item and set it to the shortcutItems property.
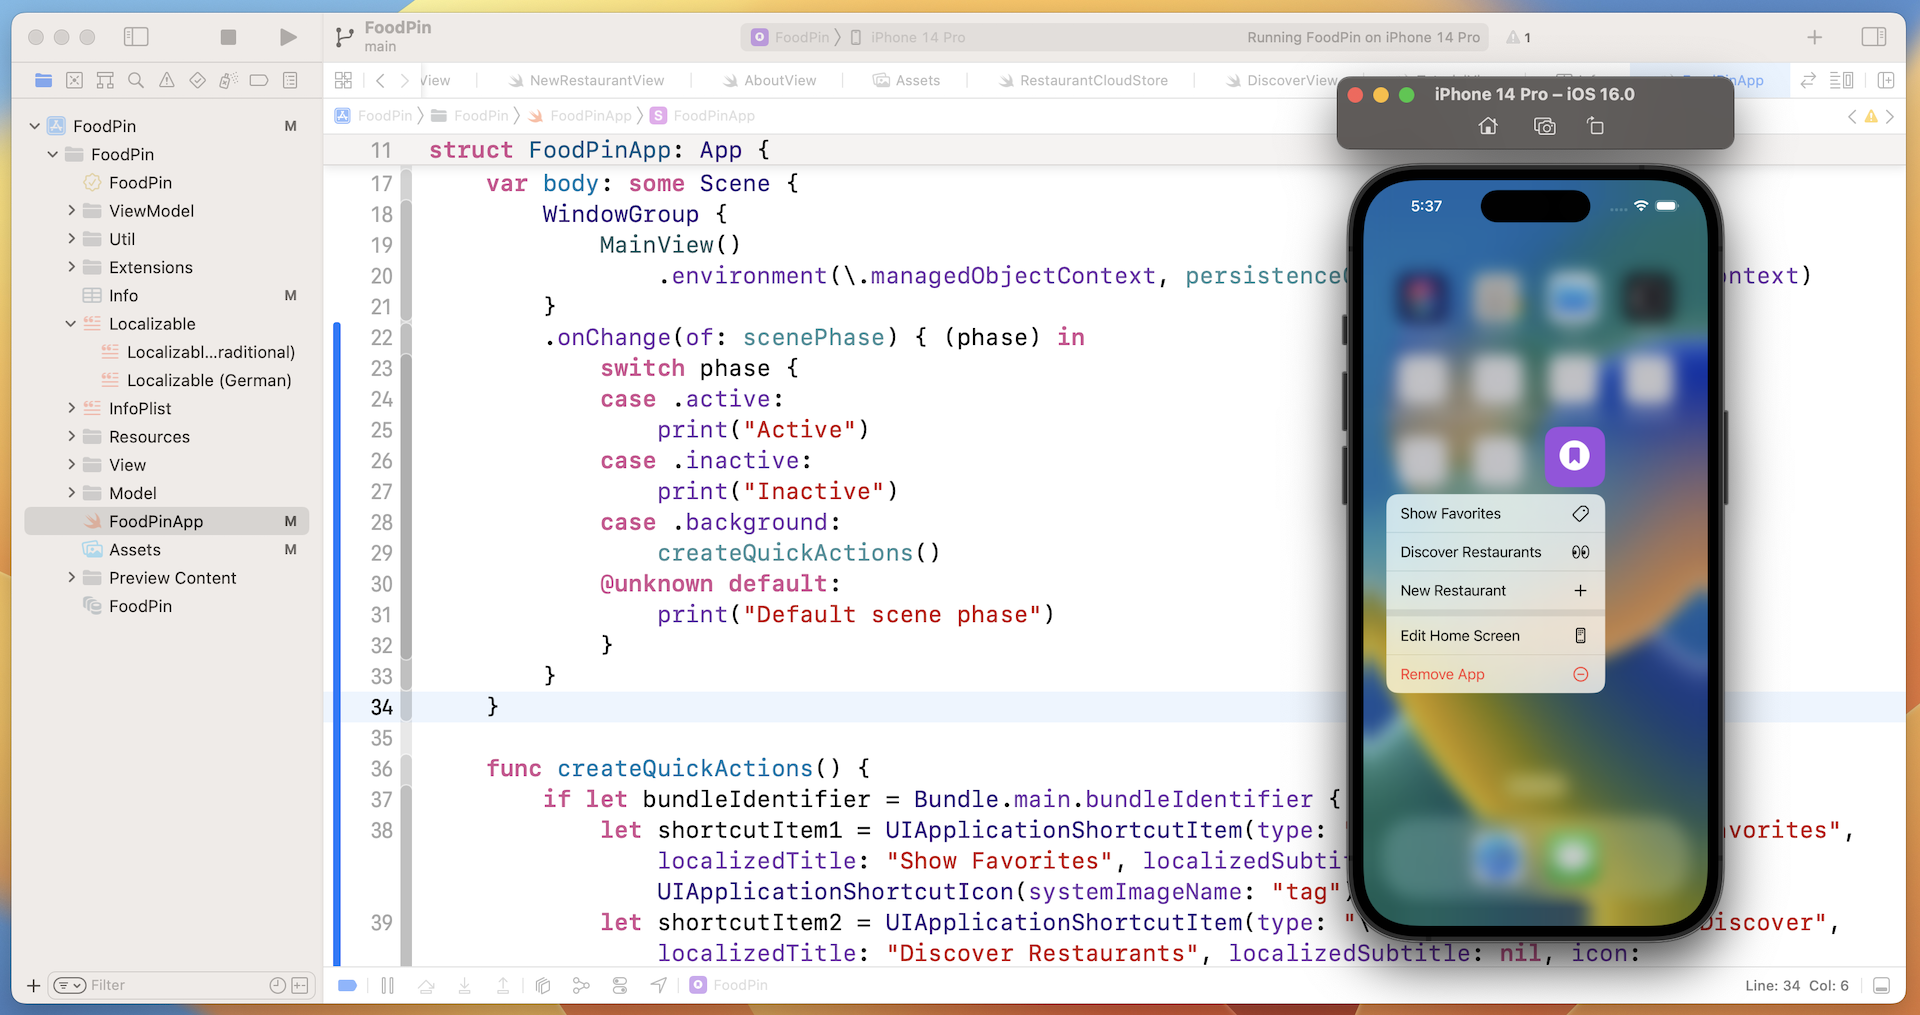
To create the quick actions, let's open FoodPinApp.swift and create a helper method in the FoodPinApp struct:
func createQuickActions() {
    if let bundleIdentifier = Bundle.main.bundleIdentifier {
        let shortcutItem1 = UIApplicationShortcutItem(type: "\(bundleIdentifier).OpenFavorites", localizedTitle: "Show Favorites", localizedSubtitle: nil, icon: UIApplicationShortcutIcon(systemImageName: "tag"), userInfo: nil)
        let shortcutItem2 = UIApplicationShortcutItem(type: "\(bundleIdentifier).OpenDiscover", localizedTitle: "Discover Restaurants", localizedSubtitle: nil, icon: UIApplicationShortcutIcon(systemImageName: "eyes"), userInfo: nil)
        let shortcutItem3 = UIApplicationShortcutItem(type: "\(bundleIdentifier).NewRestaurant", localizedTitle: "New Restaurant", localizedSubtitle: nil, icon: UIApplicationShortcutIcon(type: .add), userInfo: nil)
        UIApplication.shared.shortcutItems = [shortcutItem1, shortcutItem2, shortcutItem3]
    }
}
The code is pretty much the same as the previous example. We create three quick action items. Each of which has its own identifier, title, and icon.
So, where should we call this createQuickActions() method?
According to Apple, it's a good time to update any dynamic quick actions when the app transits to a background state because the system executes the code before the user returns to the Home Screen.
The next question is how can we detect this state change? In SwiftUI, you can read the current scene phase by observing the scenePhase value in the Environment. Insert this line of code in FoodPinApp to retrieve the scenePhase value:
@Environment(\.scenePhase) var scenePhase
You can monitor the change of scene phase by attaching the .onChange modifier to the WindowGroup like this:
WindowGroup {
    MainView()
        .environment(\.managedObjectContext, persistenceController.container.viewContext)
}
.onChange(of: scenePhase) { (phase) in
    switch phase {
    case .active:
        print("Active")
    case .inactive:
        print("Inactive")
    case .background:
        createQuickActions()
    @unknown default:
        print("Default scene phase")
    }
}
The code above listens to the change of the scenePhase state. When the state is changed to the background phase, we invoke the createQuickActions method to update the quick actions.
Now you can build and run the app in a simulator. After the app launch, go back to the Home screen. Tap and hold the FoodPin icon for a second. You should then see the quick action menu.
Handling Quick Actions Using Custom URL Scheme
The quick actions are not ready to work yet because we haven't implemented the required methods to launch the quick actions. In UIKit, there is a method called windowScene(_:performActionFor:completionHandler:) defined in the UIWindowSceneDelegate protocol. When the user selects a quick action, this method is called. We will implement the method in FoodPinApp.swift.
Note: The current version of SwiftUI doesn't provide a native method for handling quick actions. This is why we still need to revert it to UIKit.
So, how can we direct the user to a particular part of the app when a quick action is selected? We will make use of Custom URL schemes. This feature provides a way to reference a particular content or resource inside an app. Say, for example, we define the following custom URL:
foodpinapp://actions/OpenDiscover
When a user taps the URL, the system directs the user to the Discover tab of the FoodPin app. What we are going to do is create a custom URL scheme named foodpinapp://. Each quick action has their own custom URL to direct users to a specific screen of the app:
foodpinapp://actions/OpenFavorites- open the Favorites tabfoodpinapp://actions/OpenDiscover- open the Discover tabfoodpinapp://actions/NewRestaurant- show the New Restaurant view
In the FoodPinApp.swift, insert the following code snippet:
final class MainSceneDelegate: UIResponder, UIWindowSceneDelegate {

    @Environment(\.openURL) private var openURL: OpenURLAction

    func windowScene(_ windowScene: UIWindowScene, performActionFor shortcutItem: UIApplicationShortcutItem, completionHandler: @escaping (Bool) -> Void) {
        completionHandler(handleQuickAction(shortcutItem: shortcutItem))
    }

    private func handleQuickAction(shortcutItem: UIApplicationShortcutItem) -> Bool {
        let shortcutType = shortcutItem.type

        guard let shortcutIdentifier = shortcutType.components(separatedBy: ".").last else {
            return false
        }

        guard let url = URL(string: "foodpinapp://actions/" + shortcutIdentifier) else {
            print("Failed to initiate the url")
            return false
        }

        openURL(url)

        return true
    }
}
The code above creates a MainSceneDelegate class and implements the windowScene(_:performActionFor:completionHandler:) method to launch the quick actions. The handleQuickActions method takes in the shortcut item as a parameter. It first analyzes what this shortcut item is by parsing its type value (e.g. com.appcoda.foodpin.OpenFavorites). Based on the value extracted, it constructs the custom URL (e.g. foodpinapp://actions/OpenFavorites).
To open a URL in SwiftUI, you can get the .openURL key from the environment and open the URL like this:
openURL(url)
Next, we need to create an AppDelegate class to set the MainSceneDelegate as the delegate class. Insert the following code in the same file:
final class AppDelegate: UIResponder, UIApplicationDelegate {

    func application(_ application: UIApplication, configurationForConnecting connectingSceneSession: UISceneSession, options: UIScene.ConnectionOptions) -> UISceneConfiguration {
        let configuration = UISceneConfiguration(name: "Main Scene", sessionRole: connectingSceneSession.role)

        configuration.delegateClass = MainSceneDelegate.self

        return configuration
    }
}
Though we've created the AppDelegate class and adopted all the required protocols, the FoodPinApp struct from SwiftUI still has no ideas about all the classes we implemented. We need to let it know to use the AppDelegate class from UIKit. You can insert the following line of code in the FoodPinApp struct to register the AppDelegate class:
@UIApplicationDelegateAdaptor private var appDelegate: AppDelegate
Now that you should understand how we handle the quick actions, however, the quick actions are not ready to work yet. If you try to open any of the quick actions, you should see the following error in the console:
2021-05-26 12:39:31.547378+0800 FoodPin[36298:10370760] [default] Failed to open URL foodpinapp://actions/OpenDiscover: Error Domain=NSOSStatusErrorDomain Code=-10814 "(null)" UserInfo={_LSLine=229, _LSFunction=-[_LSDOpenClient openURL:options:completionHandler:]}
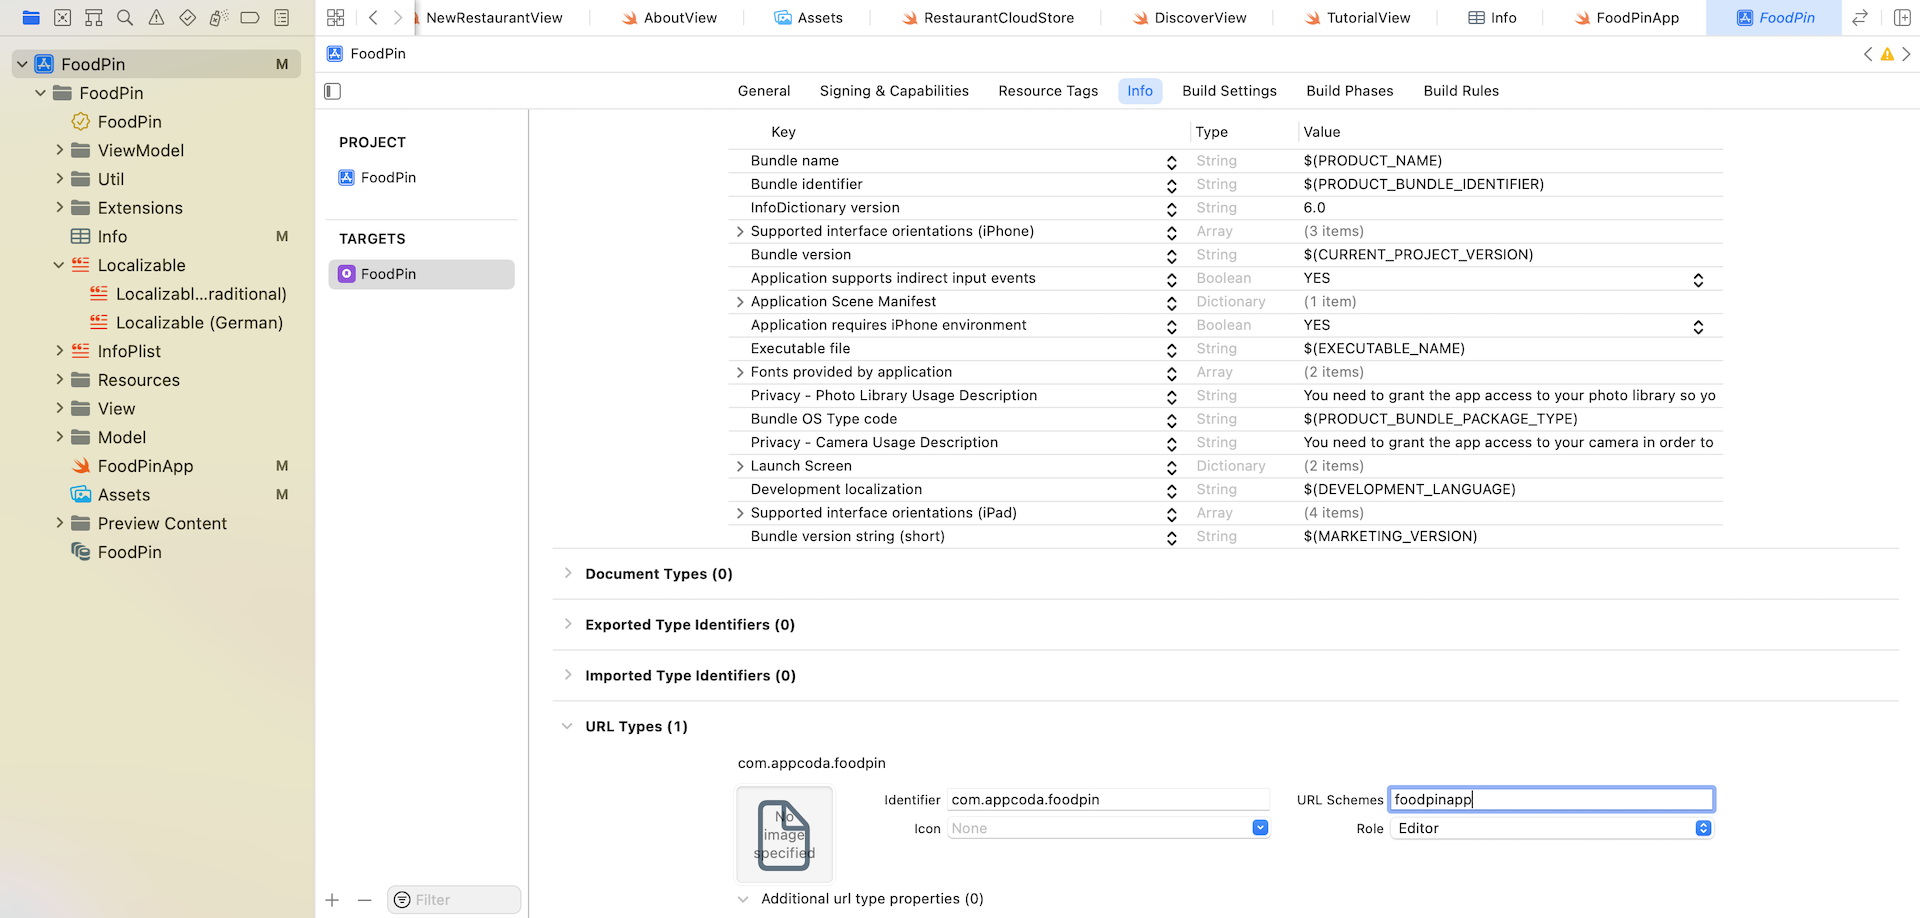
The reason is that we have registered the custom scheme in the project. Without the registration, the system will not redirect the URL to your app.
Switch to the project configuration and open the Info tab. In the URL Types section, click the + button to add a new URL type. Enter your identifier and set the URL schemes option to foodpinapp.
Are we done yet? We created the URL scheme and the app opens the URL when a quick action is selected. There is still one thing left. The app still doesn't know how to respond to the URL.
Now switch over to MainView.swift. Attach the onOpenURL modifier to the TabView:
.onOpenURL(perform: { url in

    switch url.path {
    case "/OpenFavorites": selectedTabIndex = 0
    case "/OpenDiscover": selectedTabIndex = 1
    case "/NewRestaurant": selectedTabIndex = 0
    default: return
    }
})
When the view receives an URL, the .onOpenURL function is called. We then check the URL path and update the value of selectedTabIndex accordingly.
For the NewRestaurant action, we need to add a special handling. Open RestaurantListView.swift and attach another onOpenURL modifier to the NavigationView:
.onOpenURL(perform: { url in
    switch url.path {
    case "/NewRestaurant": showNewRestaurant = true
    default: return
    }
})
We set the showNewRestaurant variable to true when the NewRestaurant action is detected.
The app is now ready to test. Run it in a simulator and try to open a quick action in the Home screen. The app should direct you to the corresponding screen depending on your selected quick action.
What if the App is not Running
I guess all your tests are done while the app is running. Have you tried to kill the app and launch the quick actions again? If the app is not running, the quick actions don't work. The windowScene(_:performActionFor:completionHandler:) method is called only when the app is in the running state.
If the app is not running, the system calls the following delegate method instead:
scene(_:willConnectTo:options:)
To fix the issue, open FoodPinApp.swift and implement the method in the MainSceneDelegate class:
func scene(_ scene: UIScene, willConnectTo session: UISceneSession, options connectionOptions: UIScene.ConnectionOptions) {
    guard let shortcutItem = connectionOptions.shortcutItem else {
        return
    }

    handleQuickAction(shortcutItem: shortcutItem)
}
You can test the app again. The quick action will work even when the FoodPin app is not running.
Summary
In this chapter, I have walked you through some basic APIs for implementing quick actions in SwiftUI projects. Quick actions are essentially shortcuts for your app and offer a quick way for users to access a particular feature of an app. As an app developer, it is your responsibility to deliver a great user experience for your users. When you're going to build your own app, consider to add quick actions to enhance the user experience of your app.
For reference, you can download the complete Xcode project from http://www.appcoda.com/resources/swift57/swiftui-foodpin-haptictouch.zip.