- Made by AppCoda
- Contact us / Support
- Tweet this book
- Preface
- 1. The Development Tools, the Learning Approach, and the App Idea
- 2. Your First Taste of Swift with Playgrounds
- 3. Build Your First App in Swift and SwiftUI
- 4. Designing UI Using Stack Views
- 5. Introduction to Prototyping
- 6. Understanding List and ForEach
- 7. Customizing List Views
- 8. Displaying Confirmations and Handling List View Selection
- 9. Understanding Struct, Project Organization and Code Documentation
- 10. List Deletion, Swipe Actions, Context Menus and Activity Controller
- 11. Working with Navigation View
- 12. Detail View Enhancement, Custom Fonts and Navigation Bar Customization
- 13. Understanding Colors, Swift Extensions and Dynamic Type
- 14. Working with Maps
- 15. View Animations and Blur Effect
- 16. Working with Observable Objects and Combine
- 17. Working with Forms and Camera
- 18. Working with Core Data
- 19. Adding a Search Bar Using Searchable
- 20. Building Walkthrough Screens Using TabView
- 21. Working with Tab View and Tab Bar Customizations
- 22. Displaying Web Content with WKWebView and SFSafariViewController
- 23. Working with CloudKit
- 24. Localizing Your App to Support Multiple Languages
- 25. Deploying and Testing Your App on a Real iOS Device
- 26. Beta Testing with TestFlight and CloudKit Production Deployment
- 27. Submit Your App to App Store
- 28. Adopting Haptic Touch
- 29. Working with User Notifications
- 30. Appendix - Swift Basics
- Published with GitBook
Chapter 23
Working with CloudKit

The most impressive people I know spent their time with their head down getting shit down for a long, long time.
- Sam Altman
Let's start with some history. When Steve Jobs unveiled iCloud to complement iOS 5 and OS X Lion at Apple's annual Worldwide Developers Conference (WWDC) in 2011, it gained a lot of attention but came as no surprise. Apps and games could store data on the cloud and have it automatically synchronize between Macs and iOS devices.
But iCloud fell short as a cloud server.
Developers are not allowed to use iCloud to store public data for sharing. It is limited to sharing information between multiple devices that belong to the same user. Take our Food Pin app as an example - you can't use the classic version of iCloud to store your favorite restaurants publicly and make them available for other app users. The data, that you store on iCloud, can only be read by you.
If you wanted to build a social app to share data amongst users at that time, you either came up with your home-brewed backend server (plus server-side APIs for data transfer, user authentication, etc) or relied on other cloud service providers such as Firebase and Parse.
Note: Parse was a very popular cloud service at the time. But Facebook announced the demise of the service on January 28, 2016.
In 2014, the company reimagined iCloud functionality and offered entirely new ways for developers, as well as, users to interact with iCloud. The introduction of CloudKit represents a big improvement over its predecessor and the offering is huge for developers. You can develop a social networking app or add social sharing features easily using CloudKit.
What if you have a web app and you want to access the same data on iCloud as your iOS app? Apple further takes CloudKit to the next level by introducing CloudKit web services or CloudKit JS, a JavaScript library. You can develop a web app with the new library to access the same data on iCloud as your app.
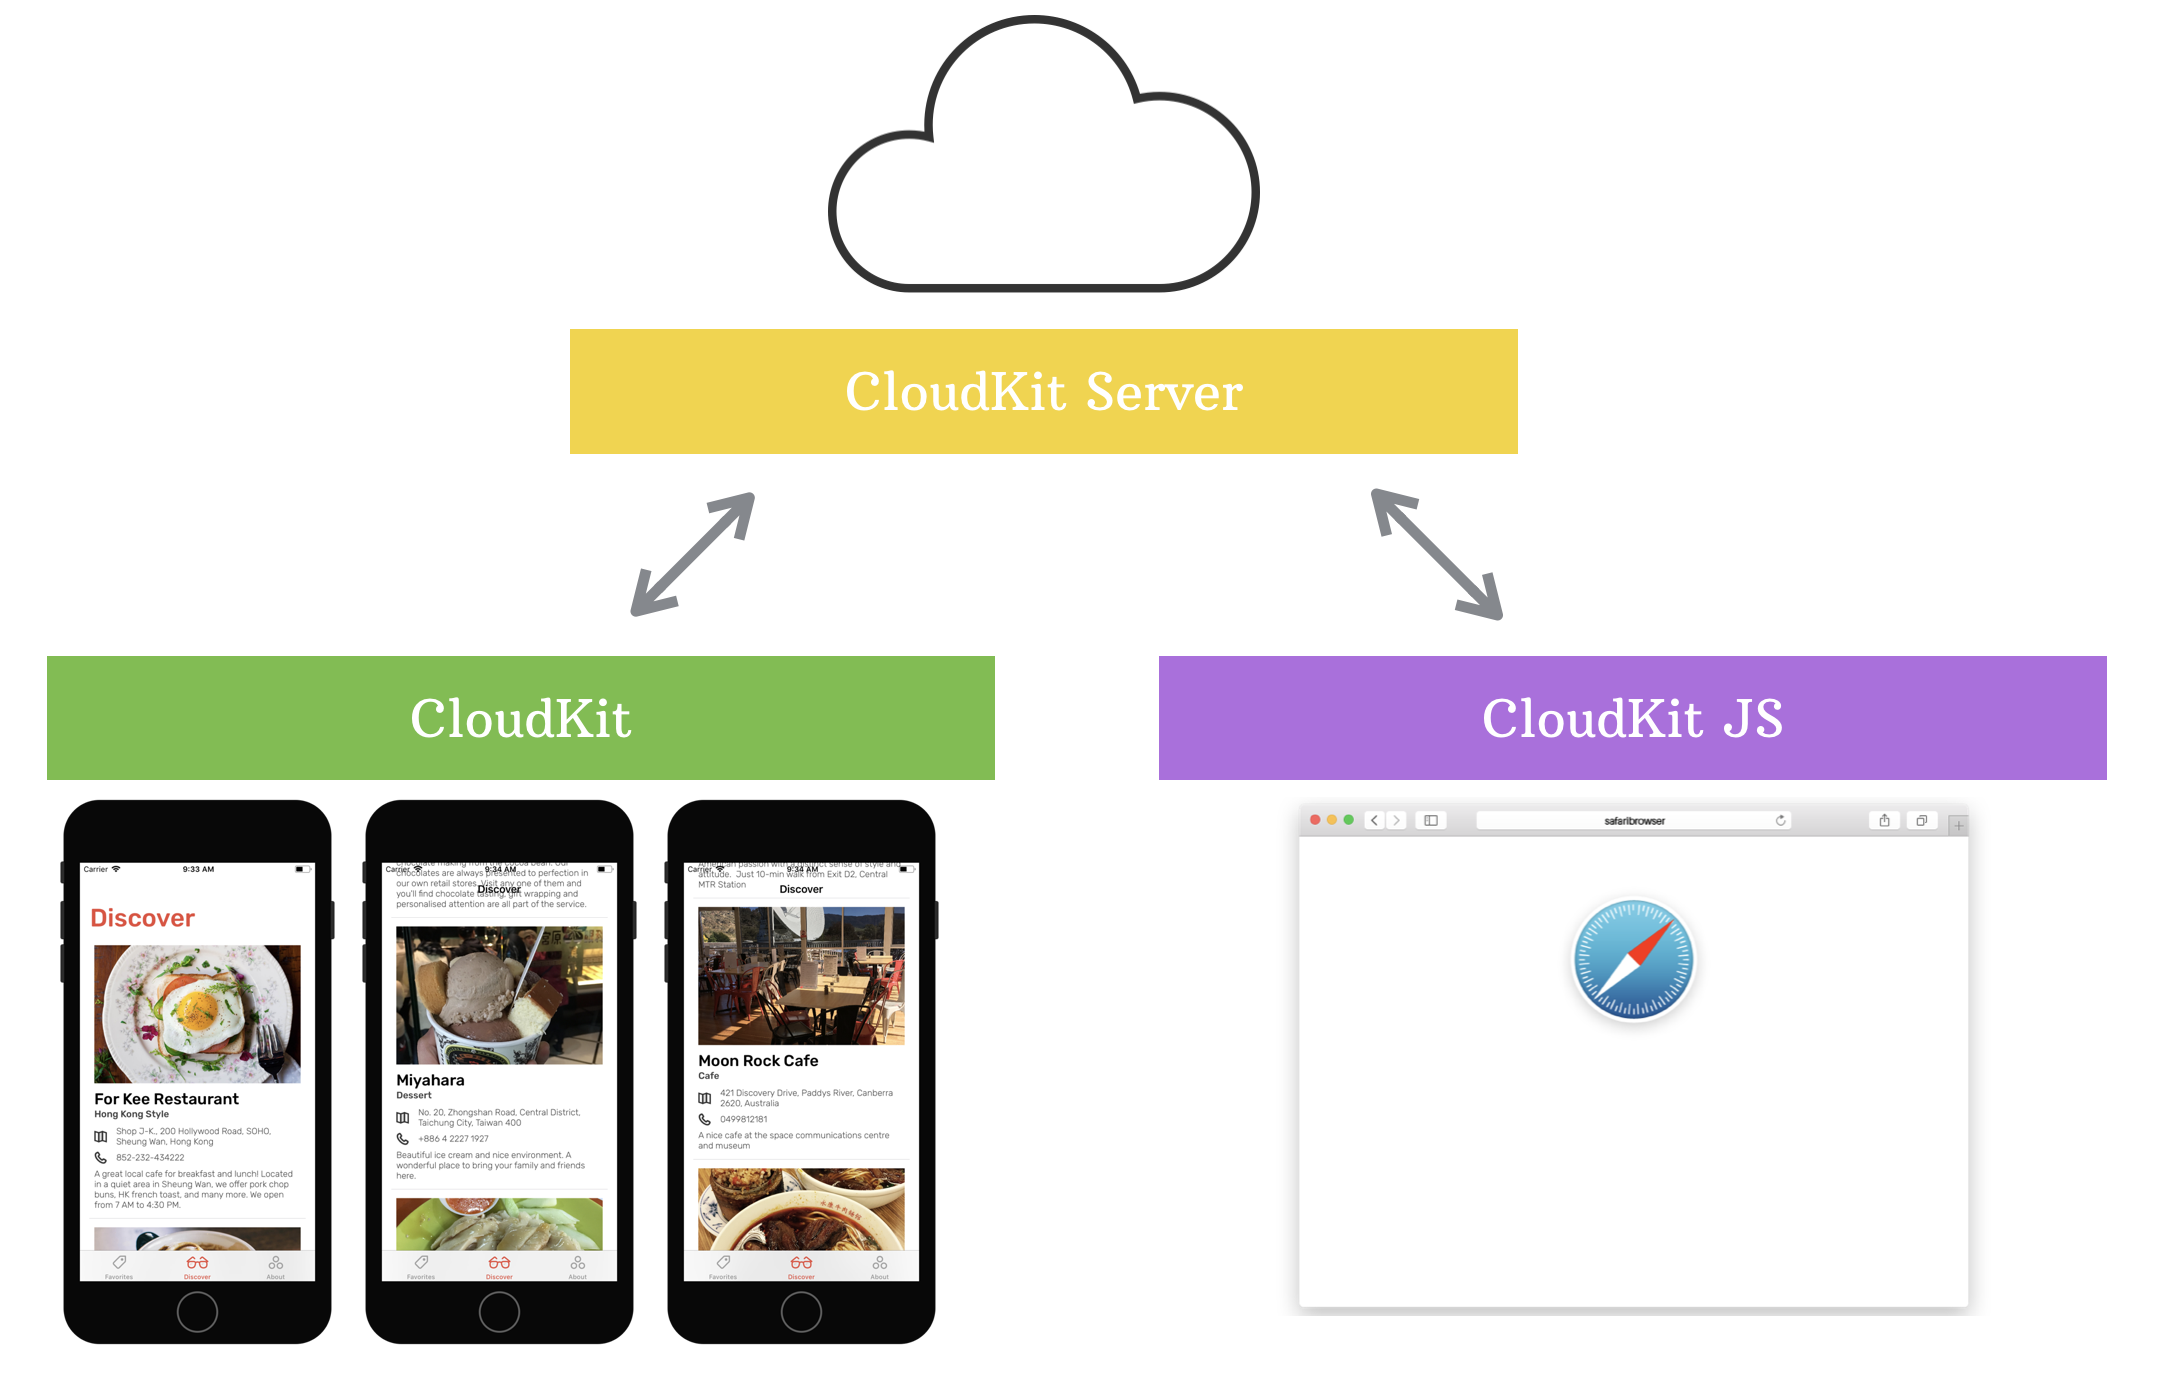
In WWDC 2016, Apple announced the introduction of Shared Database. Not only can you store your data publicly or privately, CloudKit now lets you store and share the data with a group of users.
CloudKit makes developers' lives easier by eliminating the need to develop our own server solutions. With minimal setup and coding, CloudKit empowers your app to store data, including structured data and assets, in the cloud.
Best of all, you can get started with CloudKit for free (with limits). It starts with:
- 10GB for assets (e.g. images)
- 100MB for database
- 2GB for data transfer
As your app becomes more popular, the CloudKit storage grows with you and adds an additional 250MB for every single user. For each developer account, you can scale all the way up to the following limits:
- 1PB assets
- 10TB database
- 200TB data transfer
That's a massive amount of free storage and is sufficient for the vast majority of apps. According to Apple, the storage should be enough for about 10 million free users.
With CloudKit, we were able to focus on building our app and even squeeze in a few extras.
- Hipstamatic
In this chapter, I will walk you through the integration of iCloud using the CloudKit framework. But we will only focus on the Public database. Similar to the web views we discussed in the previous chapter, there is no specific CloudKit components provided by the SwiftUI framework. I will show you how to apply the CloudKit APIs in SwiftUI projects. In particular, you will learn how to retrieve and manage records on the iCloud database. We will enhance the app to let users share their favorite restaurants anonymously and upload it to the public database of iCloud. All users can view others' favorite restaurants in the Discover tab.
There is a catch, however. You have to enroll in the Apple Developer Program (USD99/year). Apple opens up the CloudKit storage for paid developers only. If you're serious about creating your app, it's time to enroll in the program and build some CloudKit-based apps.
Understanding CloudKit Framework
CloudKit is not just about storage. Apple provides the CloudKit framework for developers to interact with iCloud. The CloudKit framework offers services for managing the data transfer to and from iCloud servers. It's a transfer mechanism that takes your user's app data from the device and transfers it to the cloud.
Importantly, CloudKit doesn't provide any local persistence and it only provides minimal offline caching support. If you need caching to persist the data locally, you should develop your own solution.
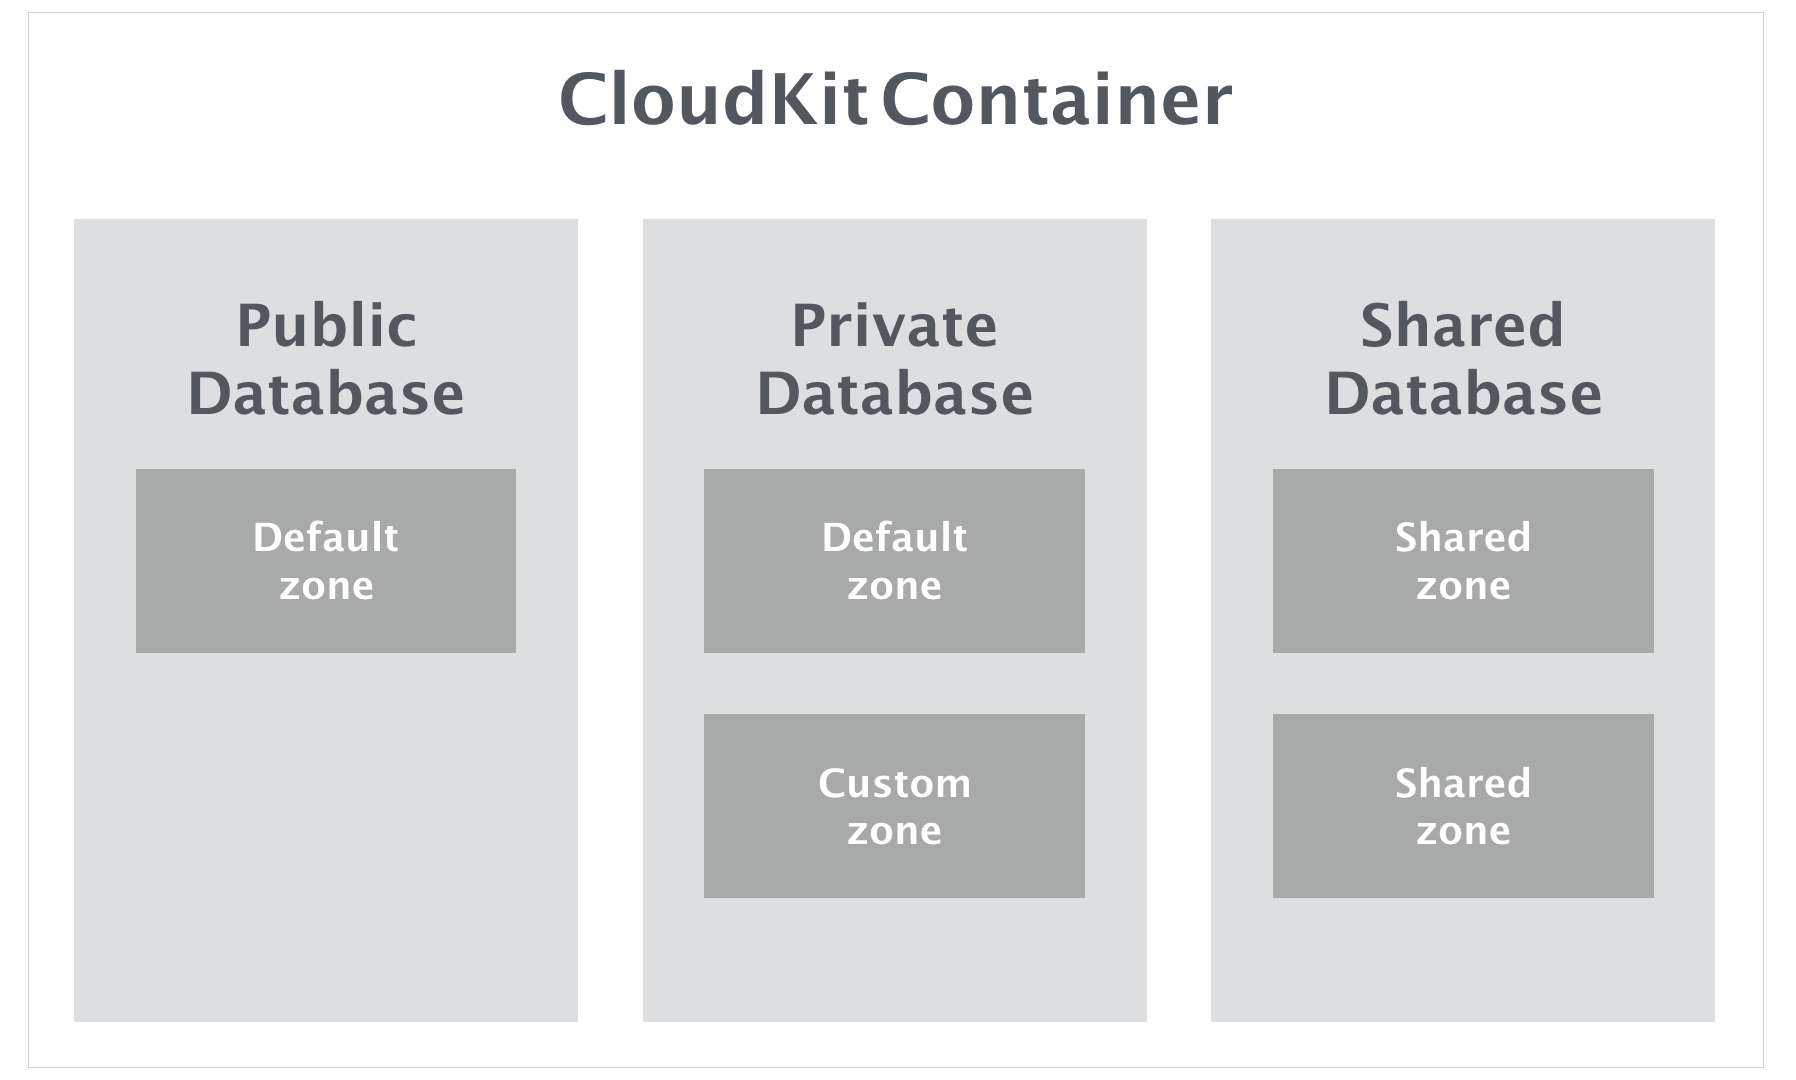
Containers and databases are the fundamental elements of the CloudKit framework. Every app has its own container for managing its content. By default, one app talks to one container. The container is exposed as the CKContainer class.
Inside a container, it contains a public database, a shared database and a private database for storing data. As the name suggests, the public database is accessible by all users of the app and is designed to store shared data. Data stored in the private database is visible to a single user, while data stored in the shared database can be shared among a group of users.
Apple lets you choose the type of database that best fits your app. For example, if you're developing an Instagram-like app, you can use the public database to save photos uploaded by users. Or if you're creating a To-do app, you probably want to use the private database to store the to-do items per user. The public database doesn't require users to have an active iCloud account unless you need to write data to the public database. Users need to log into the iCloud before accessing its private database. In the CloudKit framework, the database is exposed as the CKDatabase class.
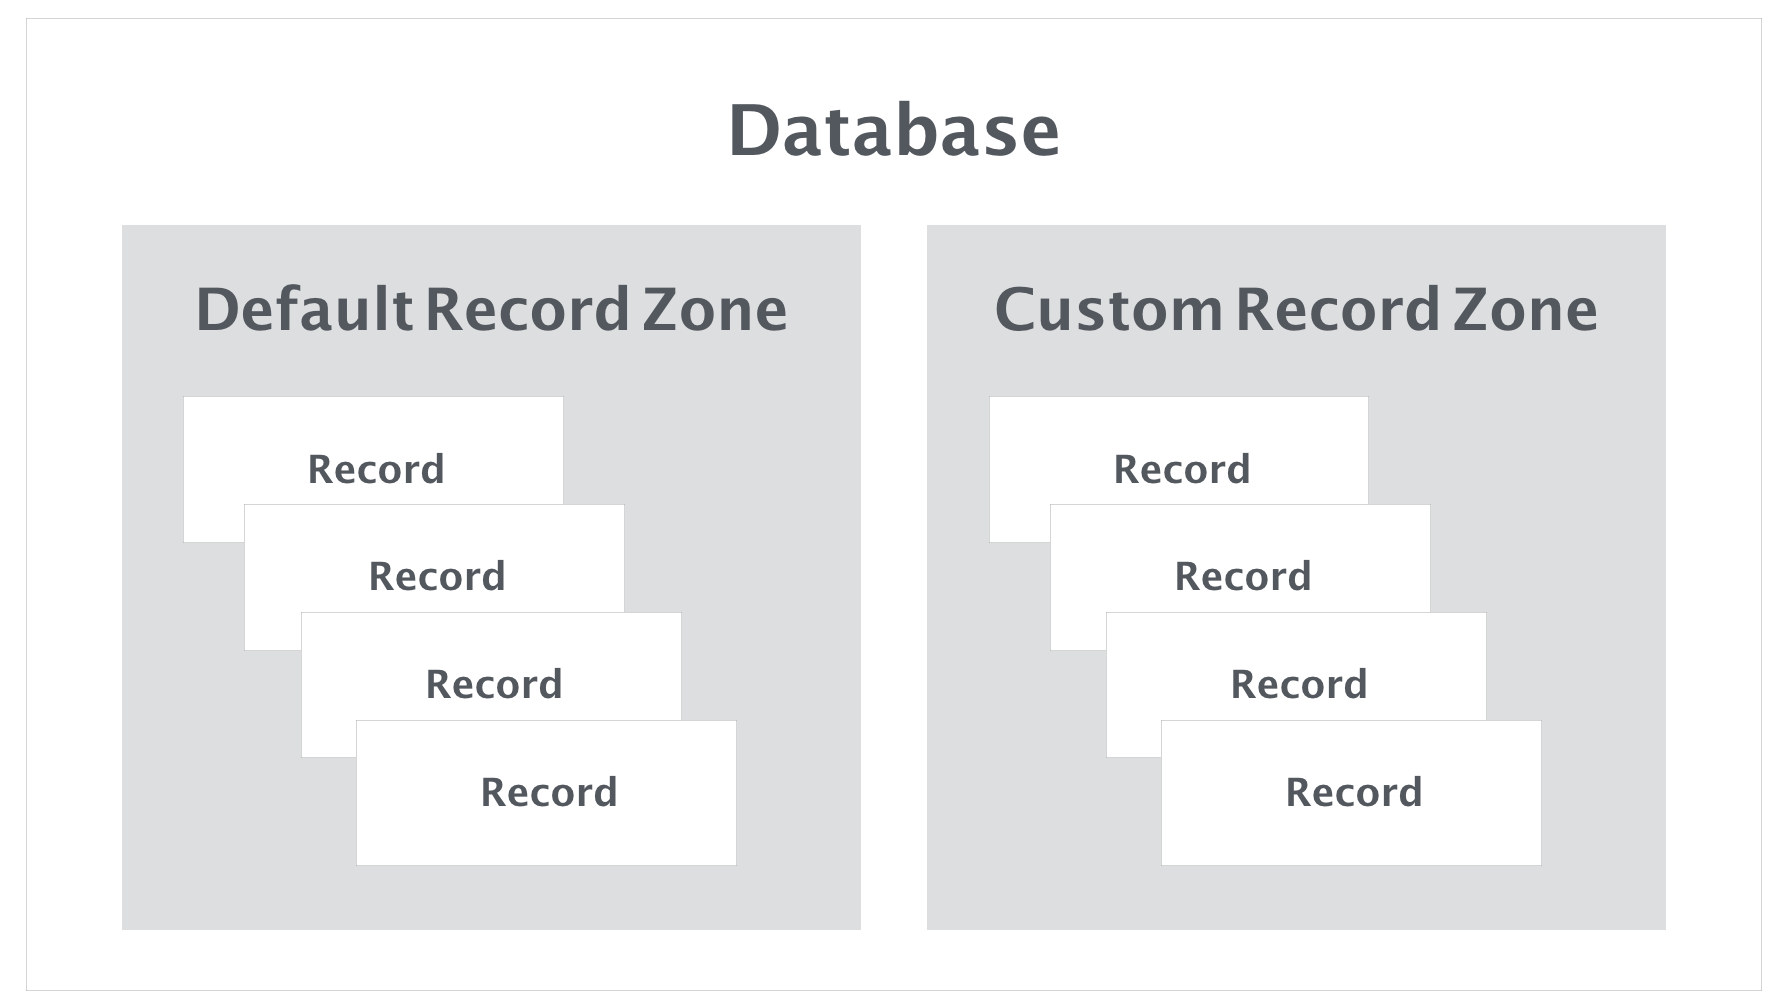
Navigating further down the hierarchy is Record Zone. CloudKit does not store data loosely. Instead, records of data are partitioned into different Record Zones. Depending on the type of database, it supports different types of record zone. Both private and public databases have a default zone. It is good enough for most scenarios. That said, you're allowed to create custom zones if needed. Record Zone is exposed as the CKRecordZone class in the framework.
At the heart of the data, a transaction is a Record, represented by the CKRecord class. A Record is essentially a dictionary of key-value pairs. The key represents a record field. The associated value of a key is the value of a specific record field. Each record has a record type. The record type is defined by developers in the CloudKit dashboard. Meanwhile, you may be confused about all these terms. No worries. You will understand what they mean after going through a working demo.
Now that you have some ideas about the CloudKit framework, let's get started and build the Discover tab. By integrating the app with CloudKit, you'll learn:
- How to enable CloudKit in your app
- How to use CloudKit Dashboard to create your records in the cloud
- How to fetch records asynchronously from iCloud
- How to load image asynchronously using AsyncImage
- How to save data to iCloud servers
Enabling CloudKit in Your App
Assuming you have enrolled in the Apple Developer Program, the very first thing of using CloudKit is to register your account in the Xcode project. Under the Signing & Capabilities tab, if you haven't assigned a developer account in the Signing section, click Add Account... and sign in with your developer account.
Note: In the project navigator, select the FoodPin project and then select FoodPin under targets. If you are usingcom.appcoda.FoodPinas the bundle identifier, you will need to change it to something else. Say,[your domain].FoodPin. If you don't own a domain, you may use[your name].FoodPin. Later, CloudKit will use the bundle identifier to generate the container. Because the name space of containers is global to all developers, you have to ensure the name is unique.
Under the Signing & Capabilities tab, if you haven't assigned a developer account in the Signing section, simply click the dropdown box of the Team option. Select Add an account, you'll be prompted to log in with your developer account. Follow the procedures and your developer account will appear in the Team option.

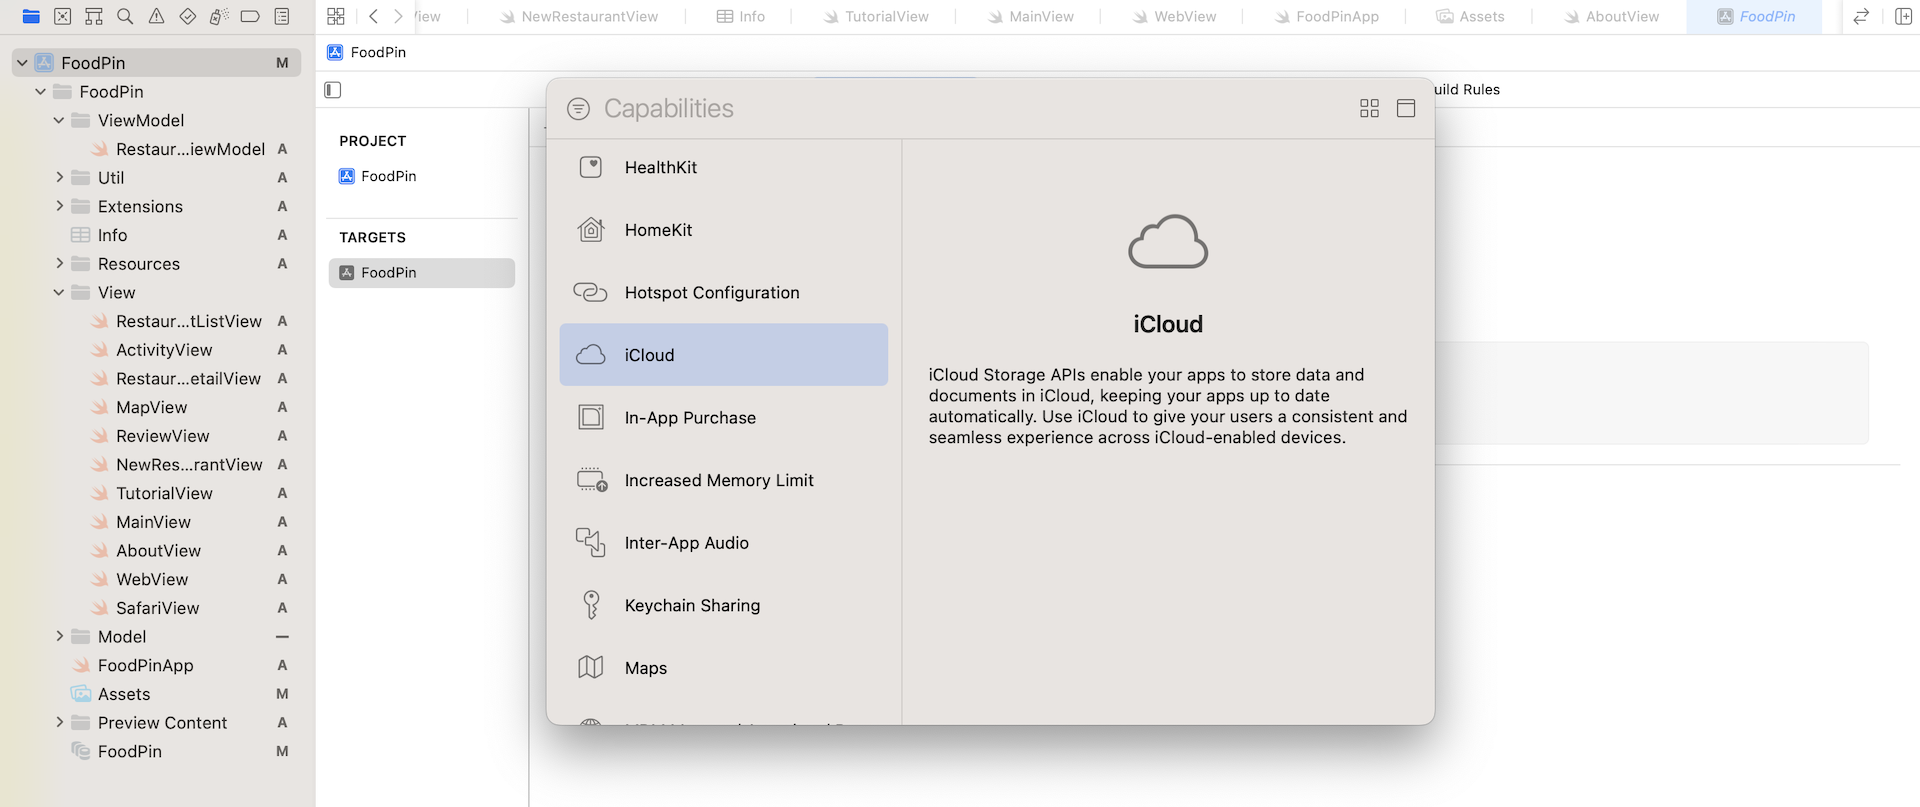
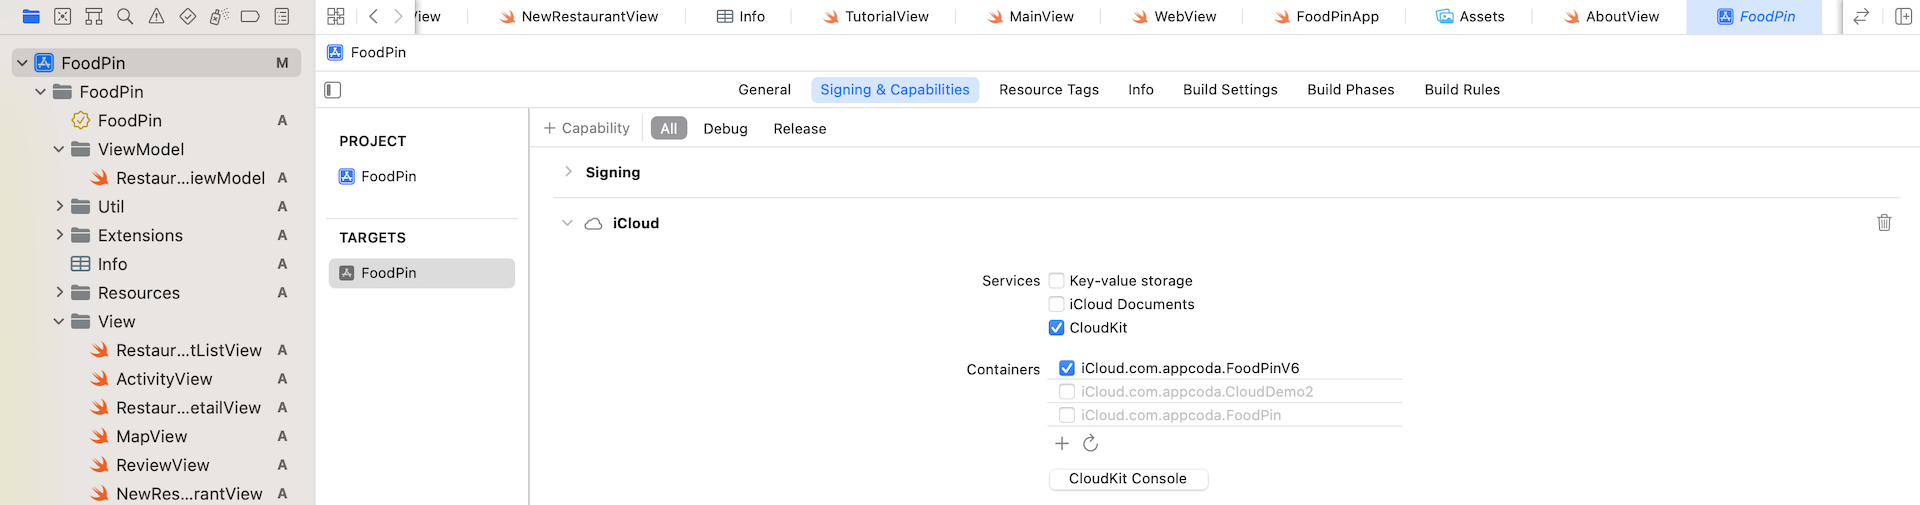
Assuming you have the identity and bundle identifier configured, click the +Capability button. To enable CloudKit, all you need to do is add the iCloud module to your project. And then select CloudKit in the services option.
For containers, click the + button in the Containers section to create a new container. The naming convention is like this:
iCloud.com.[bundle-ID]
For me, I used iCloud.com.appcoda.FoodPinV6. As soon as you confirm, Xcode automatically creates the container on the CloudKit server and adds the necessary frameworks in the project. It may take a few minutes for Xcode to create the container on the cloud for you. If the container is not ready, it's displayed in red. You can click the reload button until the container changes to black.
Quick tip: If you experience the error "An App ID with identifier is not available. Please enter a different string.", you may need to choose another bundle identifier.
Managing Records in CloudKit Dashboard
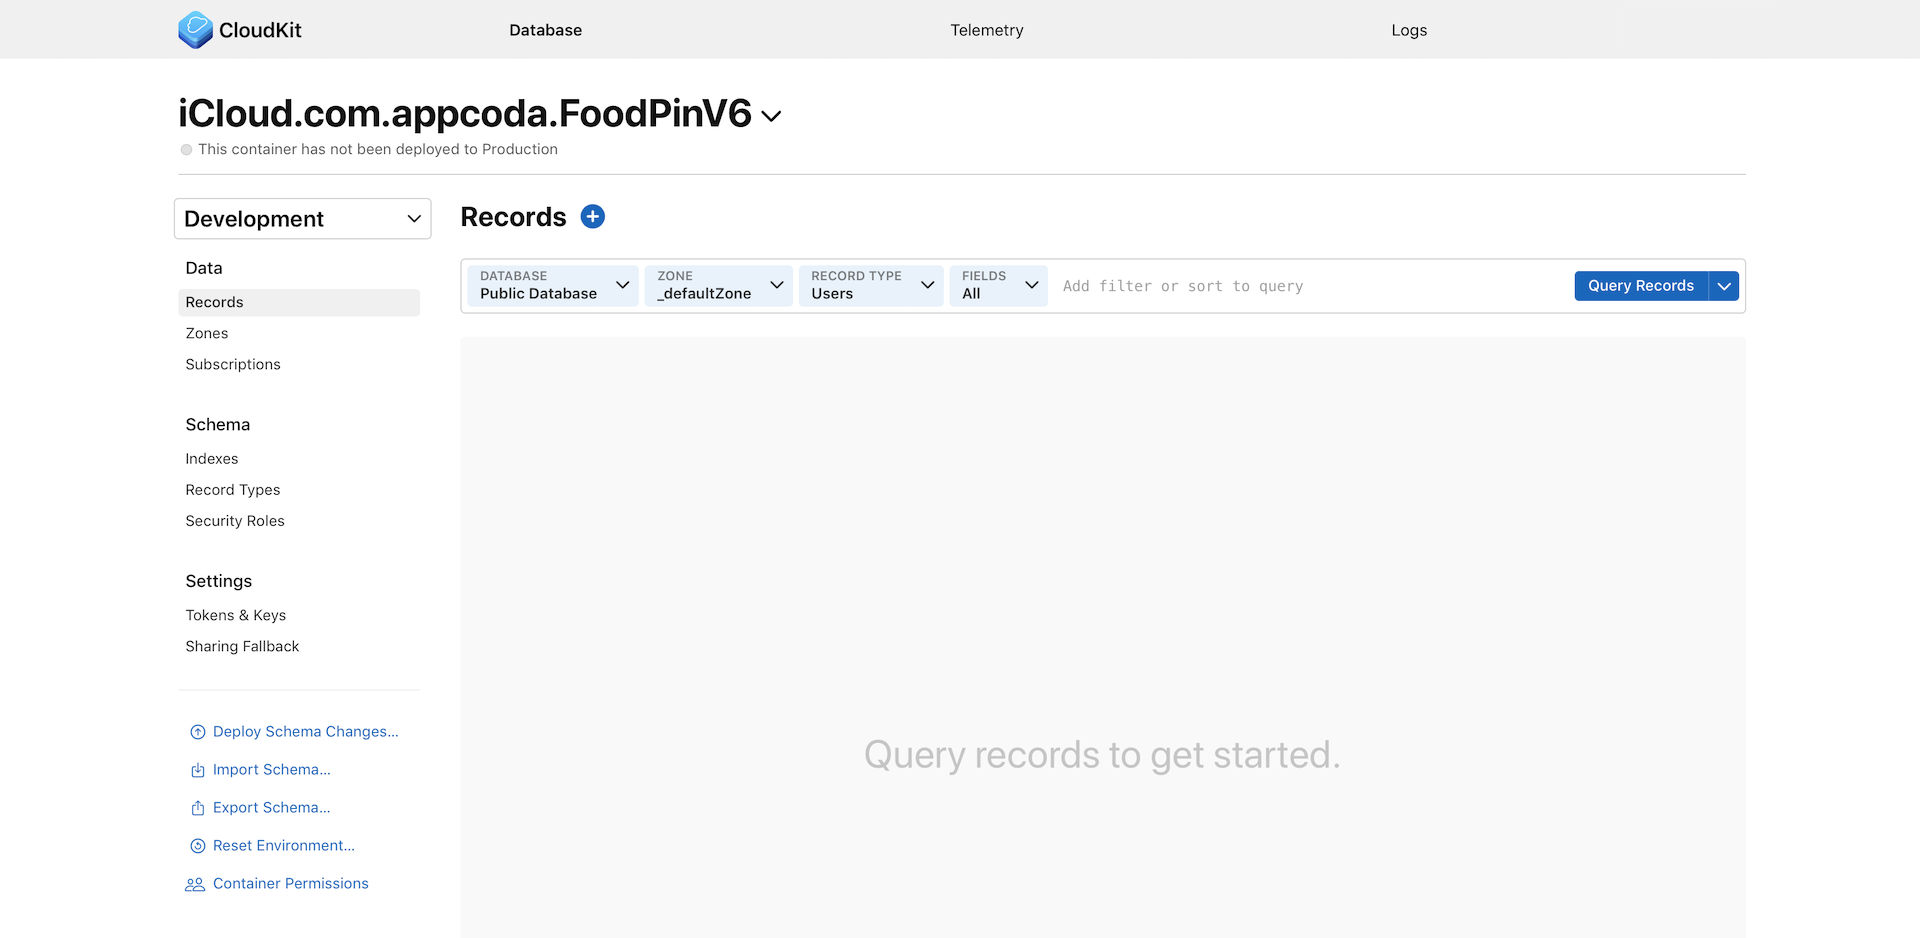
Before we can save a record to the cloud using CloudKit, we have to configure the record using CloudKit dashboard. You can click the CloudKit Console button to open a web-based dashboard. Click the CloudKit Database button and you should see the iCloud container with the name "iCloud.com.appcoda.FoodPinV6. The name of the iCloud container is iCloud.com.appcoda.FoodPinV6. In case if you can't see the cloud container of your choice, you can click on the down arrow next to the container name and choose the correct container.
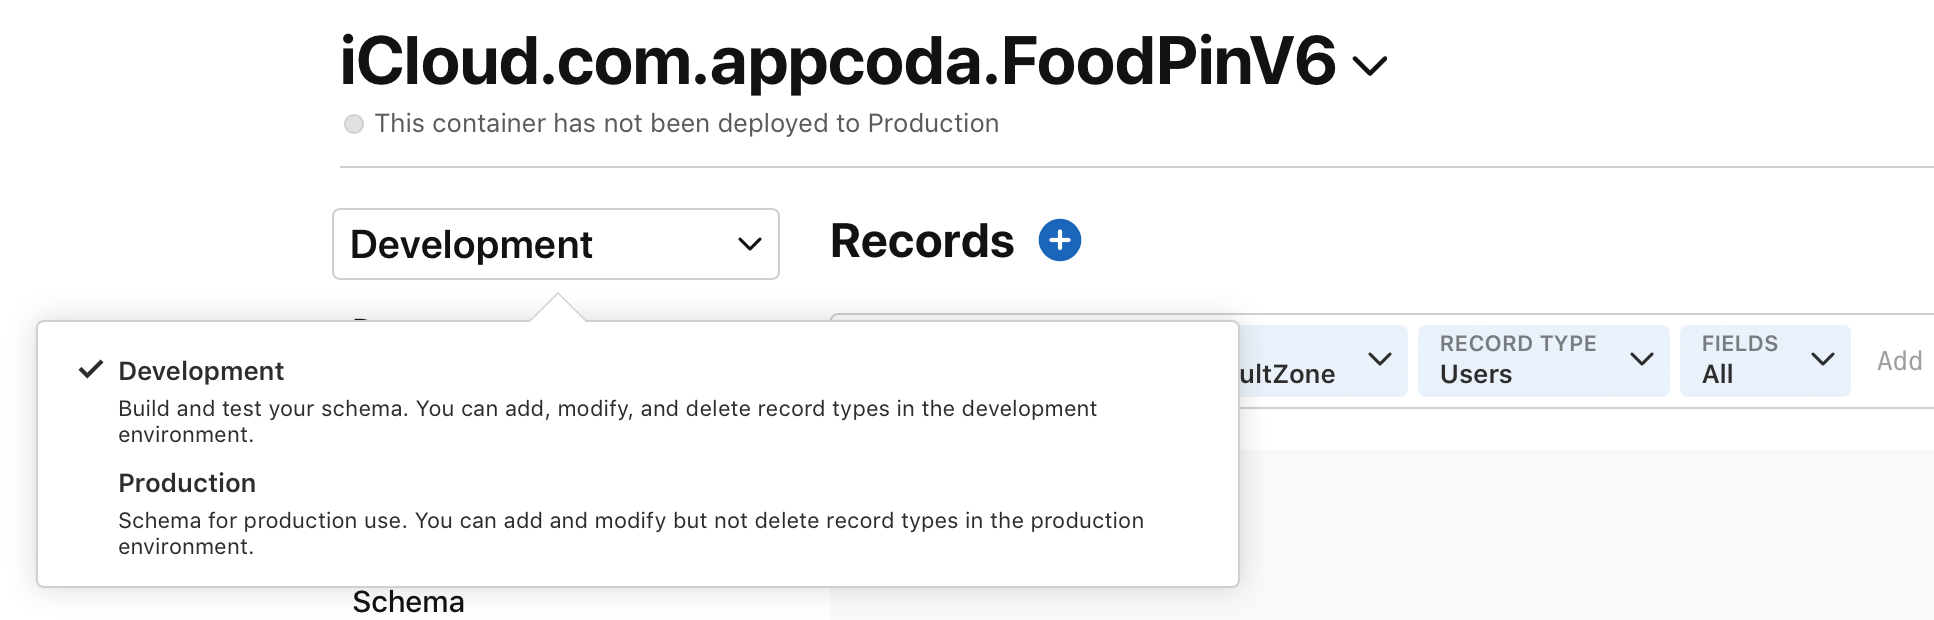
The cloud container has two environments: Development and Production. Production is the live environment that is used when your app is released to public users. Development, as the name suggests, is used when you are developing the app or for testing. You should choose the development environment for development purpose.
This dashboard lets you manage your container and perform operations like adding record types and removing records.
Before your app can save restaurant records to the cloud, you first need to define a record type. Do you remember that we created a Restaurant entity when working with Core Data? A record type in CloudKit is equivalent to an entity in Core Data.
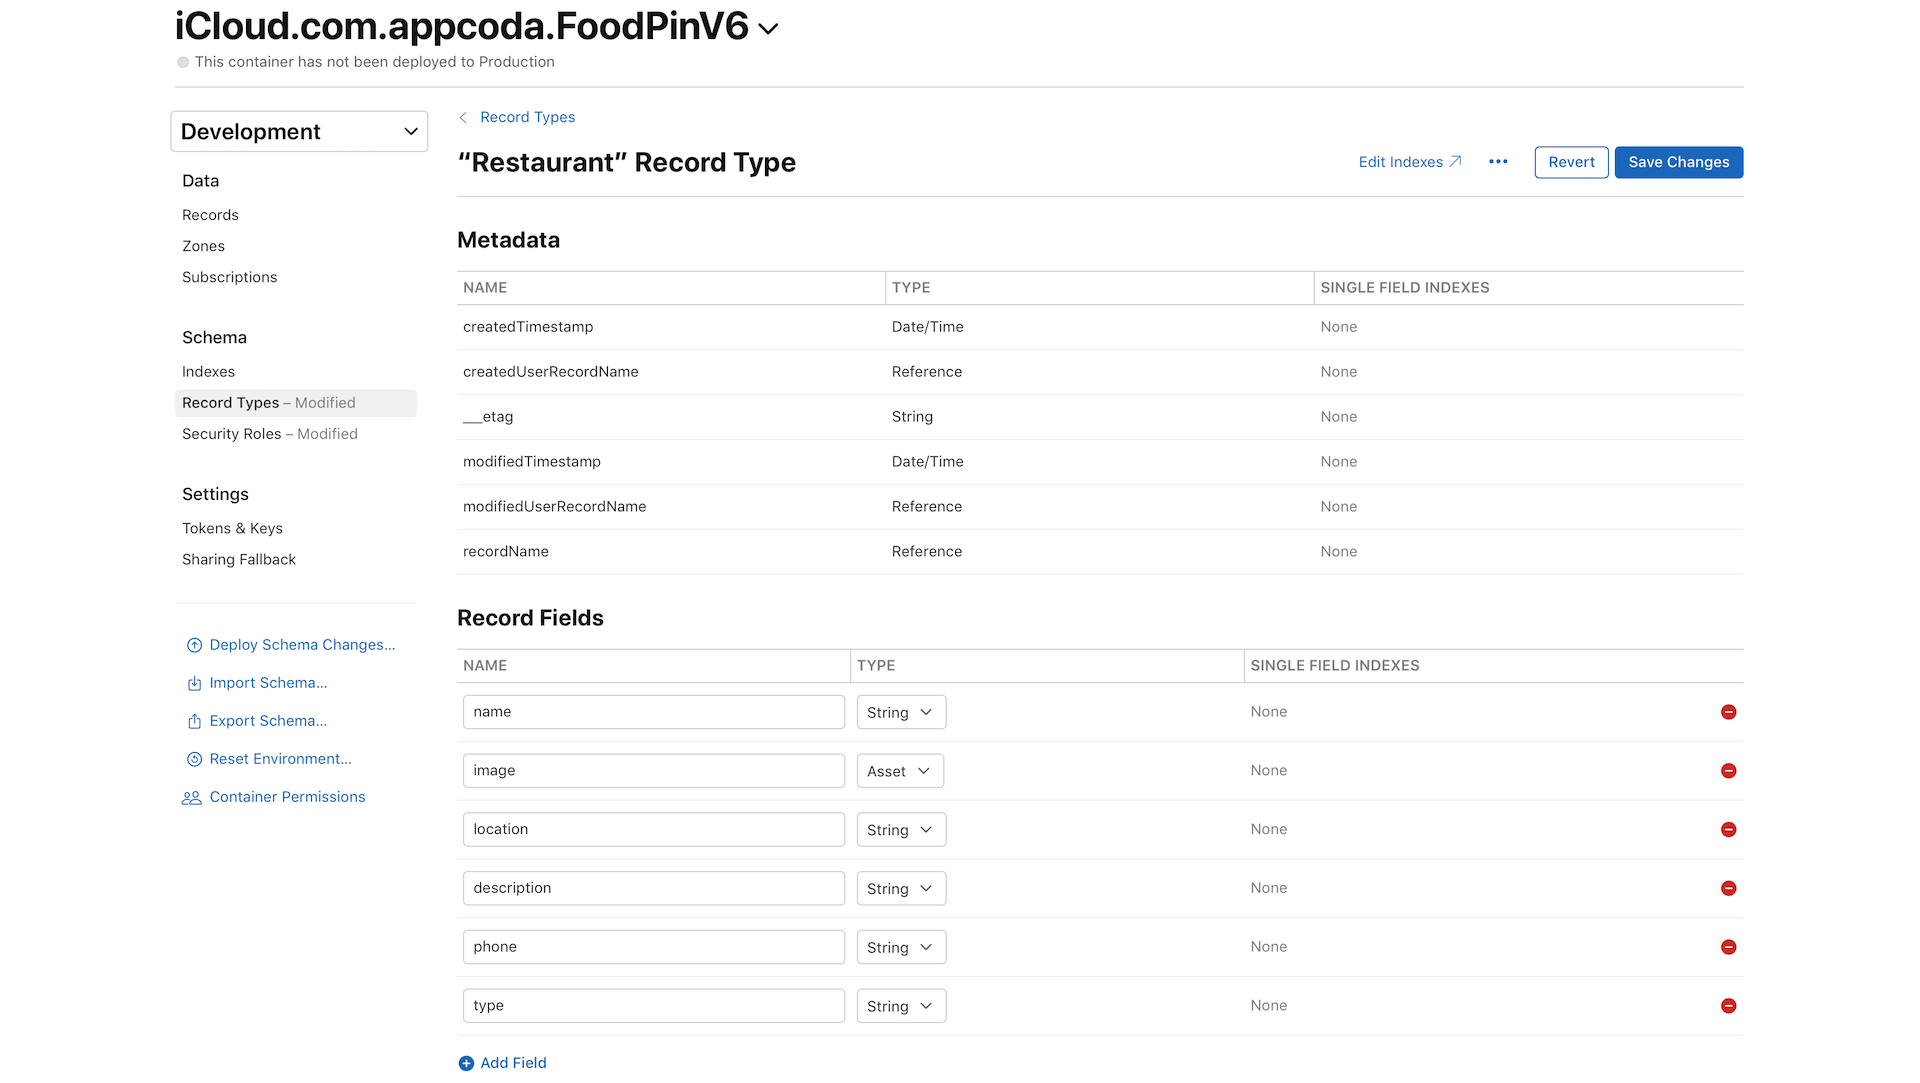
In the side menu of the dashboard, select Record Types and then click + to create a new record type. Name the record type Restaurant. Once you created the record type, CloudKit dashboard will show you some system fields such as createdBy and createdAt.
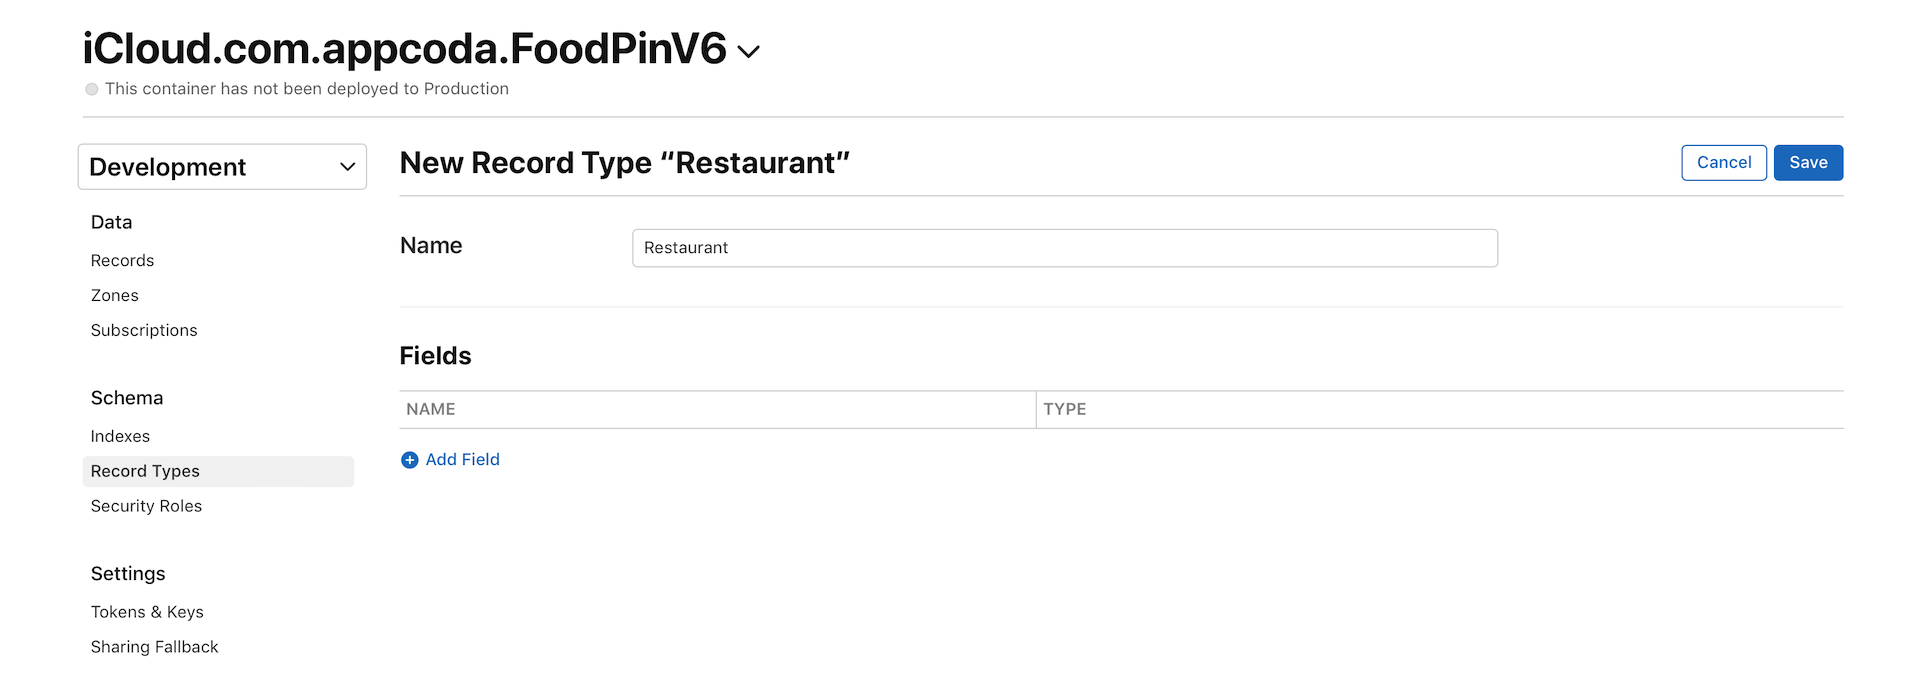
You can define your own field name and type for the Restaurant record type. CloudKit supports various attribute types such as String, Date/Time, Double, and Location. If you need to store binary data like image, you use the Asset type.
Now click the Add Field button and add the following field names/types for the Restaurant record type:
| Field Name | Field Type |
|---|---|
| name | String |
| type | String |
| location | String |
| phone | String |
| description | String |
| image | Asset |
Once you finish adding your own fields, don't forget to click the Save Changes button to confirm the changes.
Note: CloudKit uses asset objects to incorporate external files such as image, sound, video, text, and binary data files. An asset is exposed as the CKAsset class and associated with a record. When saving an asset, CloudKit only stores the asset data. It does not store the filename. Other than images, you can configure the sort, query and search options for the rest of the fields.
With the record type configured, it's ready for your app to upload the restaurant records to iCloud. You have two ways to add records to the database:
You either create the records through the CloudKit APIs.
Or you add the records via the CloudKit dashboard.
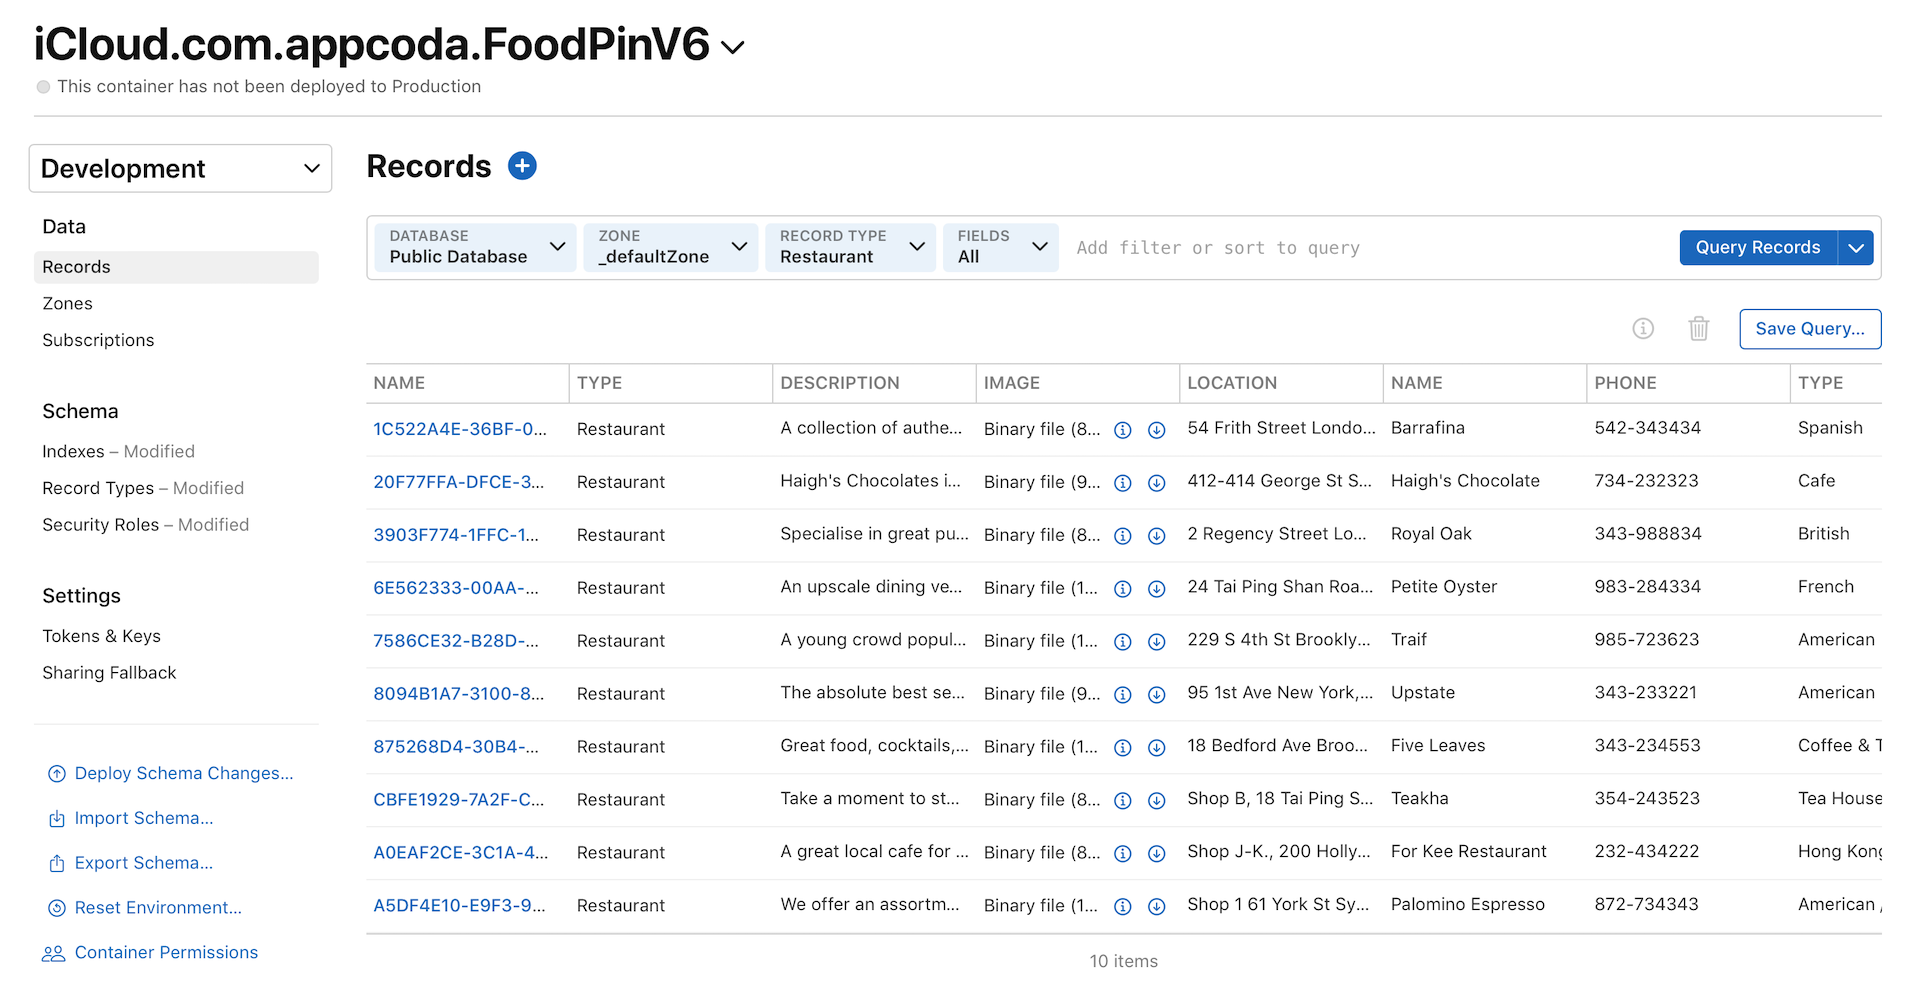
Let's try to populate some records using the dashboard. In the sidebar menu, choose Records to go back to the records panel. Please make sure the Public Database option is selected.
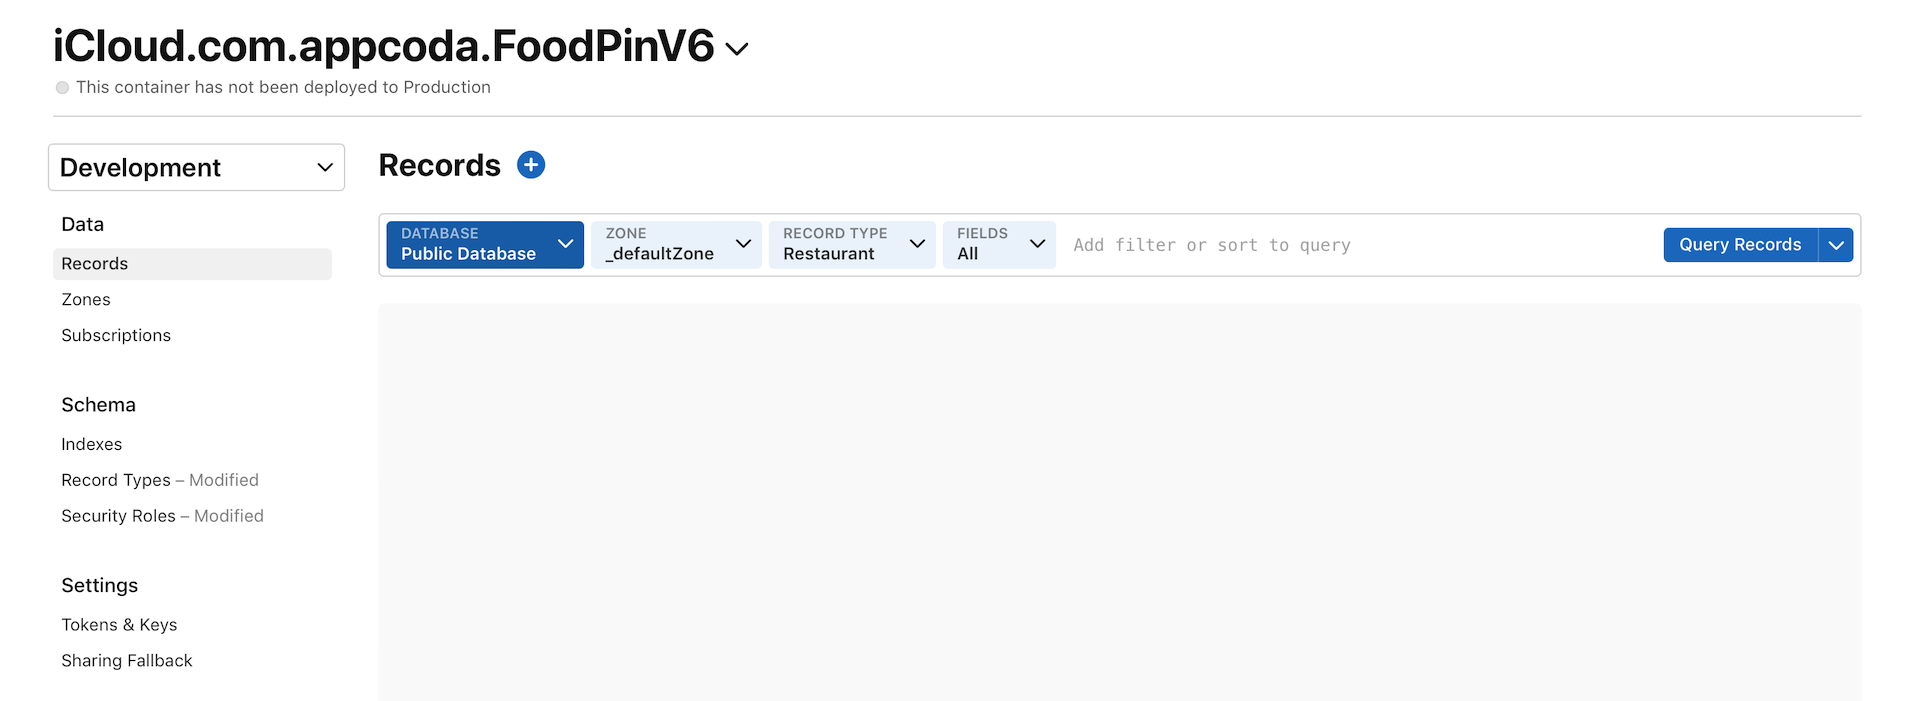
For the zone option, please also make sure the _defaultZone is selected. This is the default record zone of your public database. For the record type, set it to Restaurant. By default, the zone doesn't contain any records. You can click the + button to create one. Simply key in the name, type, location, phone, description, and upload your image. Then click Save to save the record. Figure 23-12 shows a sample new record.
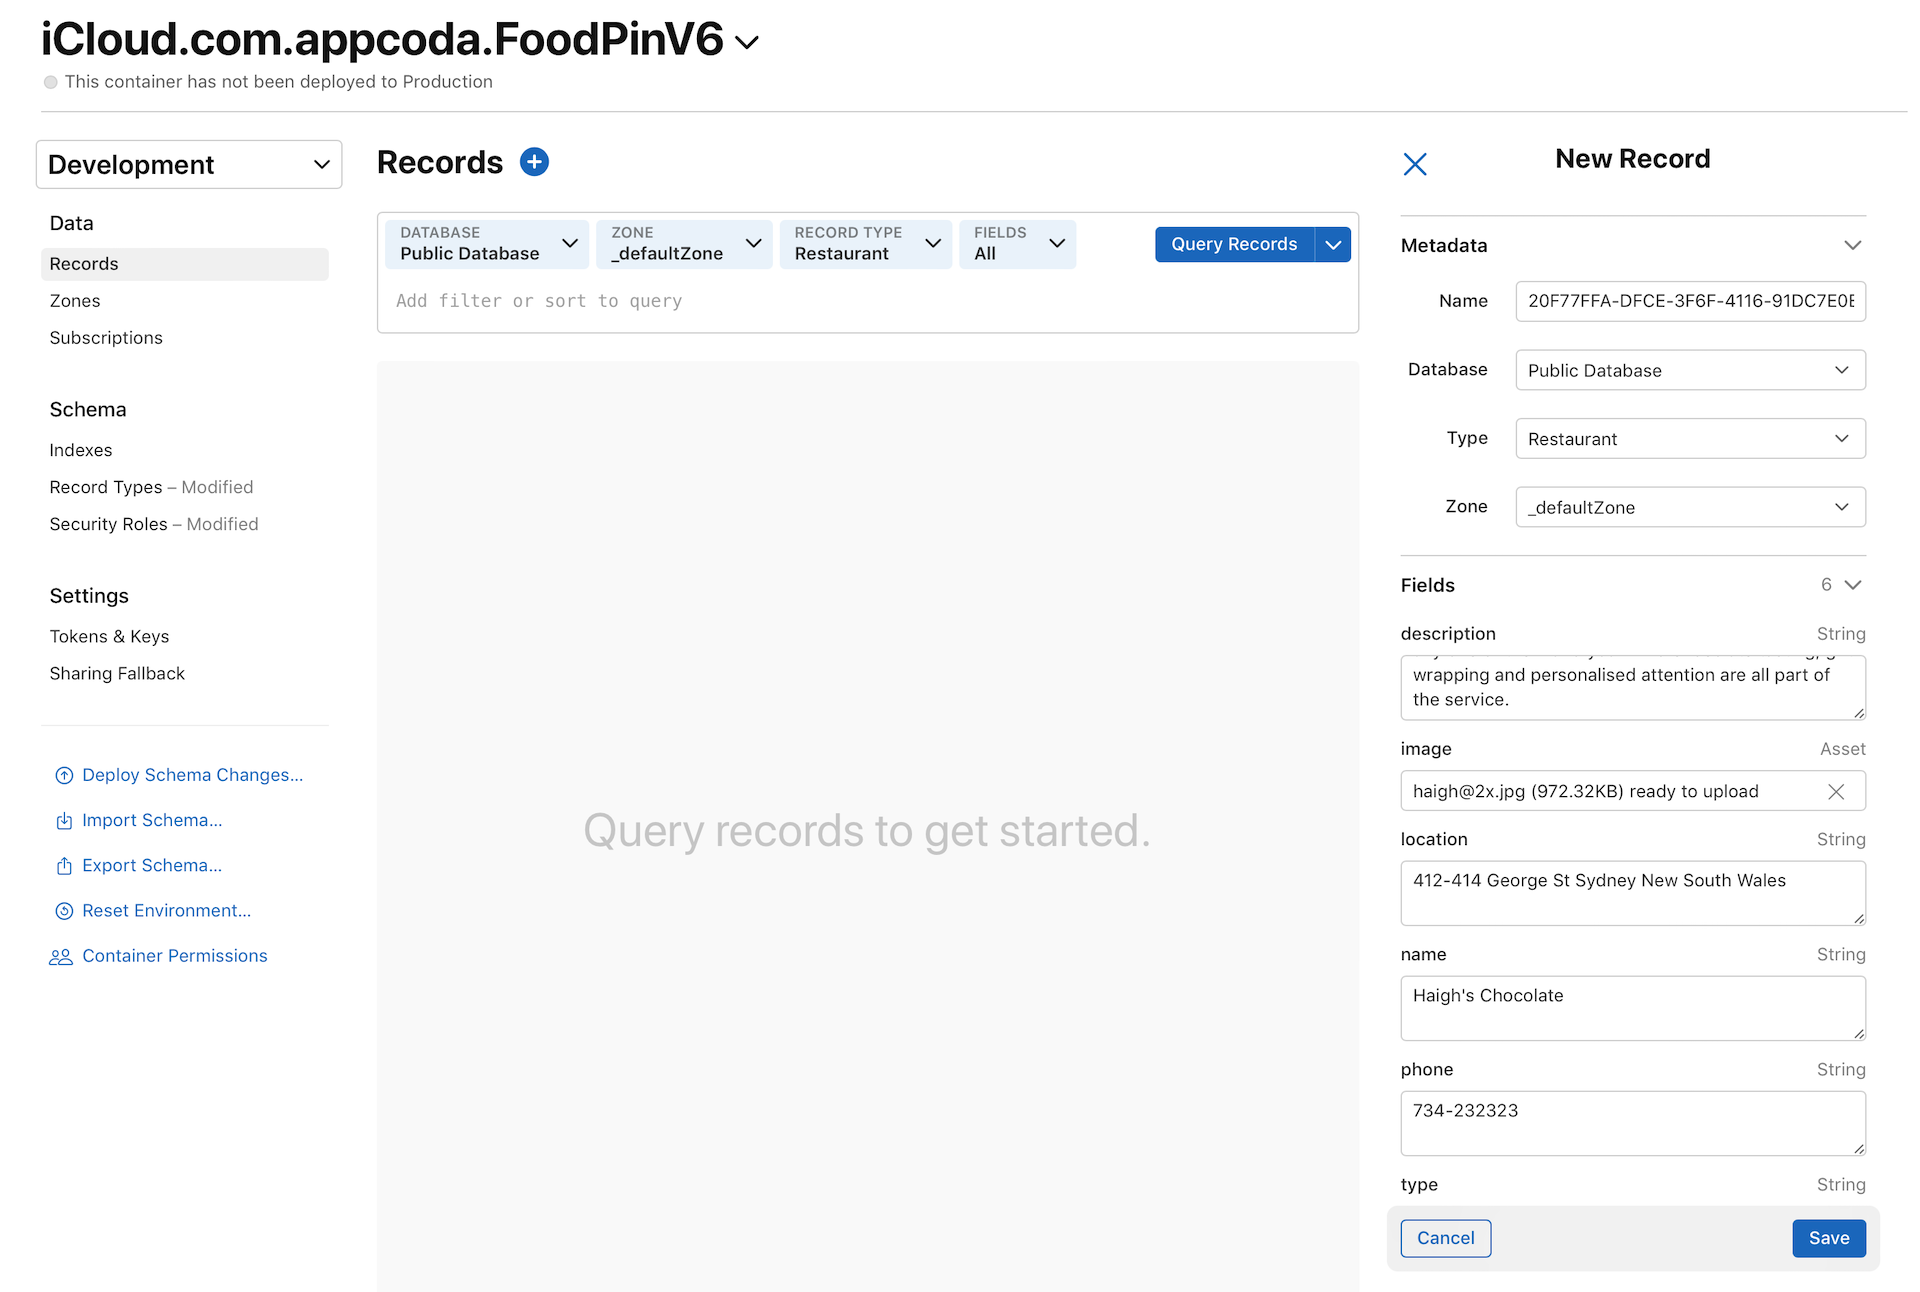
Now you have created a Restaurant record in the cloud. Repeat the same procedures and create around 10 records; we'll use them later.
If you've tried to query the records, you will end up with an error "Queried type is not marked indexable." All the metadata indexes for record types created are disabled by default. Therefore, before you are allowed to query the records, you will have to add an index to the database.
Click the Indexes option under Schema in the menu bar, choose Restaurant, and then click + to add a new index. A database index allows a query to efficiently retrieve data from a database. You can click the Add Index button to create an index. We are going to create two indexes on the recordName and createdTimestamp fields. For the recordName field, the index type is set to Queryable which means that the records can be queried. Later, we will retrieve the records in reverse chronological order. Thus, we set the index type of the createdTimestamp field to Sortable.
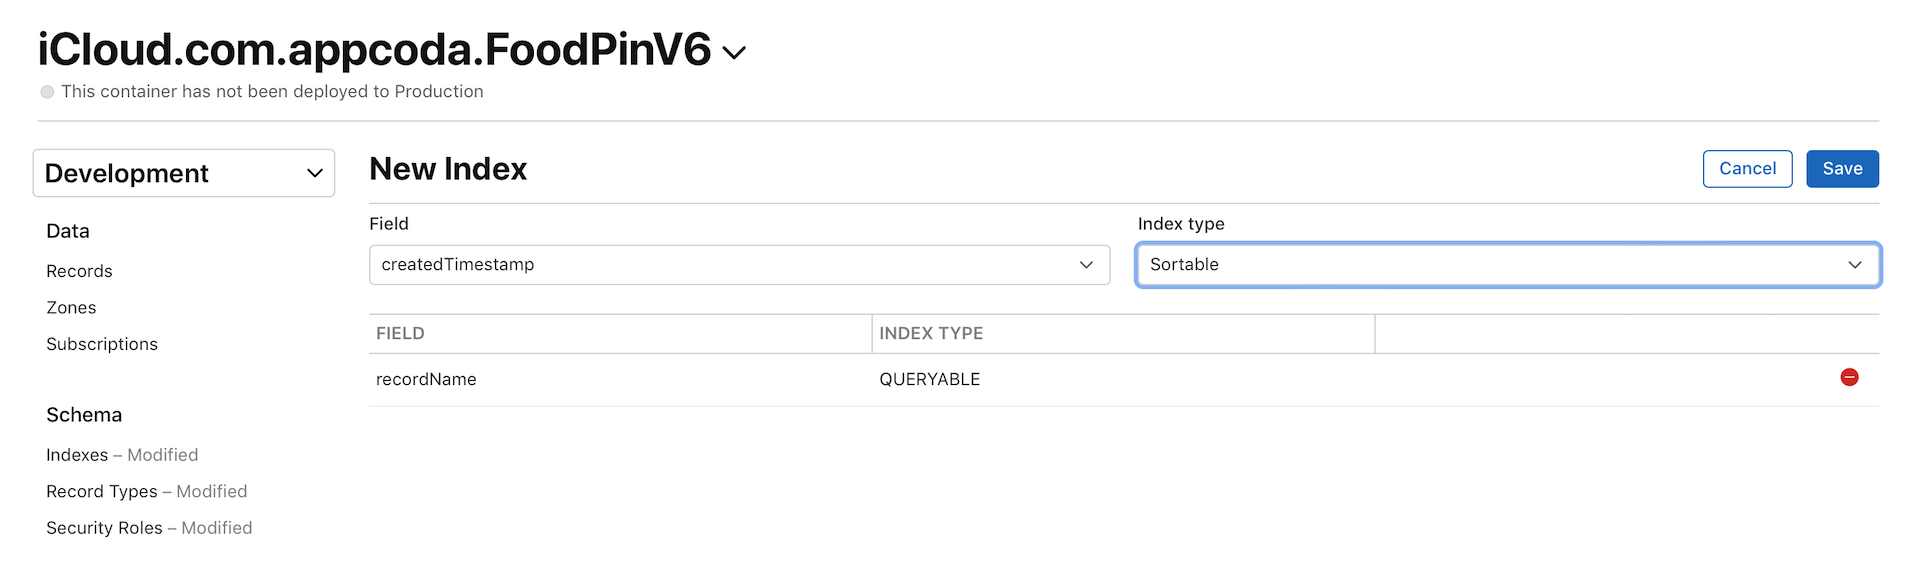
After saving the changes, go back to the Records panel, choose Public Database, and click the Query Records button. You should now be able to retrieve the restaurant records.
Fetching Data from a Public Database Using Convenience API
The CloudKit framework provides two types of APIs (Convenience APIs and Operational APIs) for developers to interact with iCloud. Both APIs let you save and fetch data from iCloud asynchronously. In other words, the data transfer is executed in the background. We will first go over the convenience API and use it to implement the Discover tab. After that, we will discuss the operational API.
As its name suggests, the convenience API allows you to interact with iCloud with just a few lines of code. In general, you just need the following code to fetch the Restaurant records from the cloud:
let cloudContainer = CKContainer.default()
let publicDatabase = cloudContainer.publicCloudDatabase
let predicate = NSPredicate(value: true)
let query = CKQuery(recordType: "Restaurant", predicate: predicate)

do {
    let results = try await publicDatabase.records(matching: query)

    // Process the records

} catch {
    // Handle the error
}
The above code is fairly straightforward. We first get the default CloudKit container of the app, followed by obtaining the default public database. To retrieve the Restaurant records from the public database, we construct a CKQuery object with the Restaurant record type and the search criteria (i.e. predicate).
The predicate may be new to you. The iOS SDK provides a foundation class called NSPredicate for developers to specify how data should be filtered. If you have some database background, you may think of it as the WHERE clause in SQL. You can't perform a CKQuery without a predicate. Even if you want to query the records without any filtering, you still need to specify a predicate. In this case, we initialize a predicate that always evaluates to true. This means we do not perform any sorting on the query result.
Lastly, we call the records method of CKDatabase with the query. CloudKit then searches and returns the results. The search and data transfer operations are executed in the background (or run asynchorously) to prevent the blocking of UI operations.
In iOS 15, Apple introduced a new feature known as async/await for handling asynchronous operations. This feature simplifies the code when we need to work with background operations.
If you take a look at the API documentation, the records method is an asynchronization function, which is indicated by the async keyword:
func records(matching query: CKQuery, inZoneWith zoneID: CKRecordZone.ID? = nil, desiredKeys: [CKRecord.FieldKey]? = nil, resultsLimit: Int = CKQueryOperation.maximumResults) async throws -> (matchResults: [(CKRecord.ID, Result<CKRecord, Error>)], queryCursor: CKQueryOperation.Cursor?)
This means this operation is executed asynchronously. When calling a method with the async keyword, you need to put the await keyword in front of the call:
let results = try await publicDatabase.records(matching: query)
That's all you need to do to work with asynchronously operation. The system will wait for the completion of this asynchronous operation before executing the code below // Process the records.
Note that the try keyword is used to catch any errors during the record fetch.
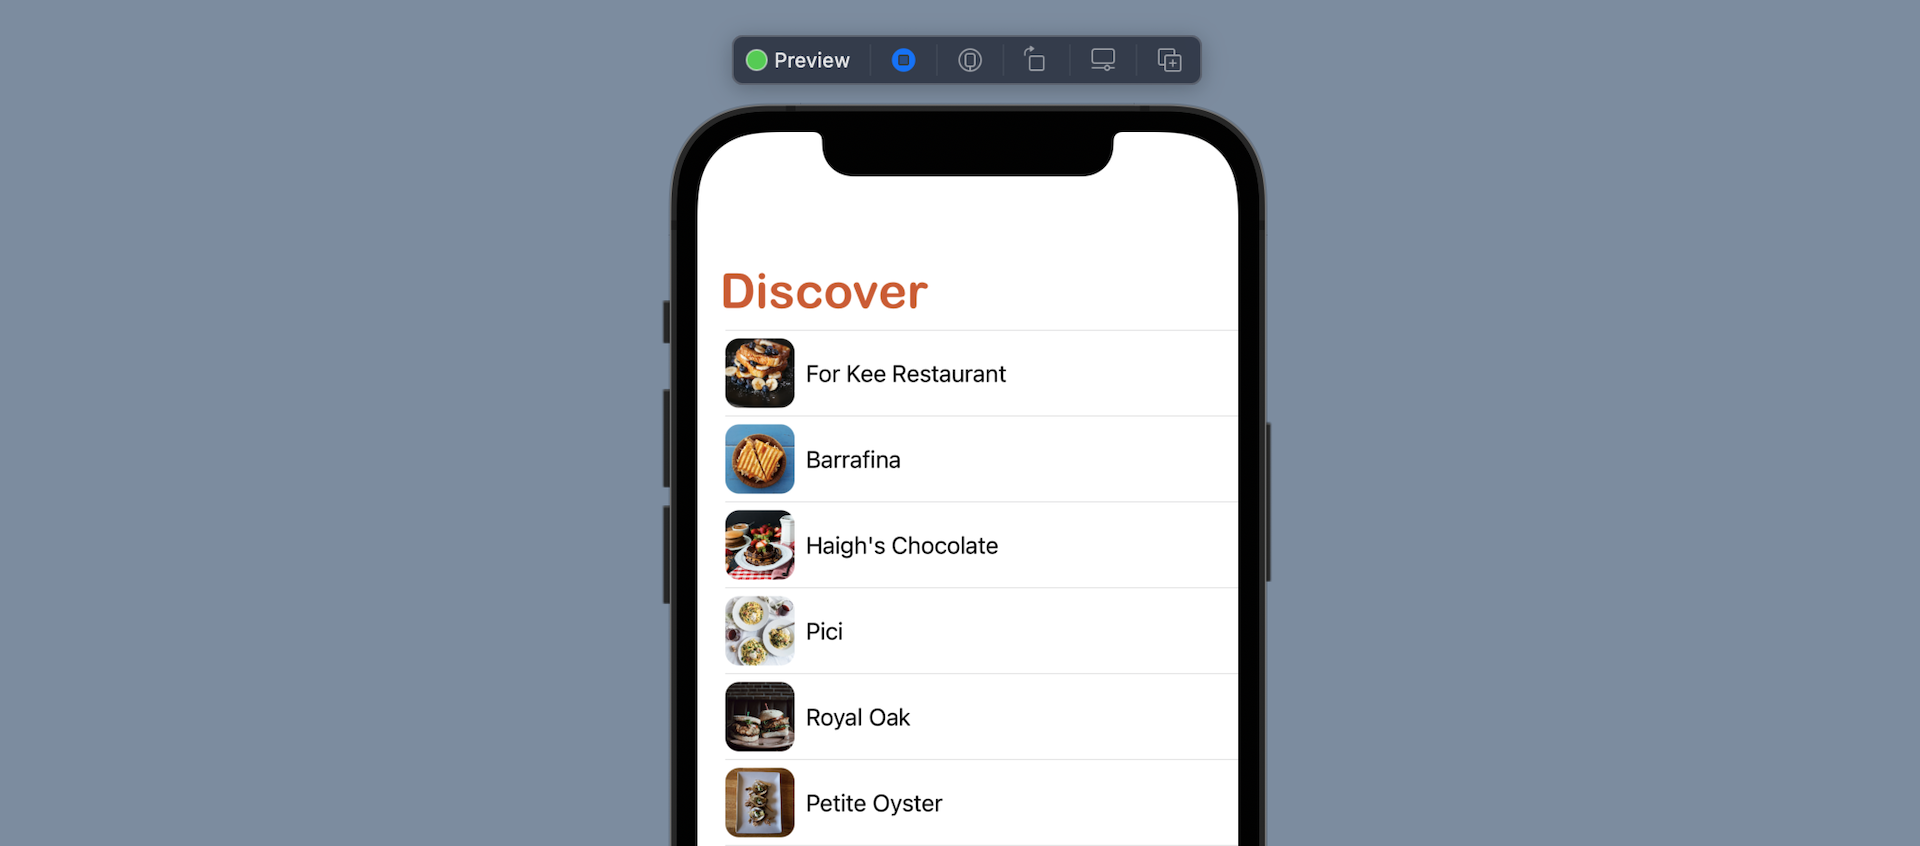
Simple, right? Now let's go back to our FoodPin project and implement the Discover tab. The tab presents a list of restaurants retrieved from iCloud. Figure 23-15 shows you the sample UI.
We will create a separate class to provide the common functions for interacting with iCloud and storing the records retrieved from the cloud database. In the project navigator, right click the Model group to create a new file. Choose the Swift File template and name the file RestaurantCloudStore.swift.
Replace the file content like this:
import CloudKit
import SwiftUI

class RestaurantCloudStore: ObservableObject {

    @Published var restaurants: [CKRecord] = []

    func fetchRestaurants() async throws {
        // Fetch data using Convenience API
        let cloudContainer = CKContainer.default()
        let publicDatabase = cloudContainer.publicCloudDatabase
        let predicate = NSPredicate(value: true)
        let query = CKQuery(recordType: "Restaurant", predicate: predicate)

        let results = try await publicDatabase.records(matching: query)

        for record in results.matchResults {
            self.restaurants.append(try record.1.get())
        }
    }
}
This class is a subclass of ObservableObject because it needs to emit changes when the restaurants array is updated. To fetch records from iCloud with Convenience APIs, we first get the default CloudKit container of the app and then obtain the default public database.
The CKQuery instance specifies the type of record to retrieve and how it's ordered (i.e. predicate). Once we prepare the query, we can call the perform method of the database to connect to iCloud and get the records in the form of a CKRecord array. We save the record returned to the restaurants array, which is marked as @Published. So, whenever the restaurants array is updated, the changes will be announced to the views that listen to the change. In this case, the view is DiscoverView that we are going to implement.
Now right click the View folder and choose New File.... Select the SwiftUI View template and name the file DiscoverView.swift.
First, import the CloudKit framework and then declare a state object to hold the RestaurantCloudStore instance:
@StateObject private var cloudStore: RestaurantCloudStore = RestaurantCloudStore()
With the @StateObject property wrapper, SwiftUI creates a new instance of RestaurantCloudStore only once. When the published property (i.e. restaurants) changes, SwiftUI updates those views affected by the changes.
For simple types like Boolean, we use the @State property wrapper to hold the state. The @StateObject property wrapper is used for instantiating an observable object.
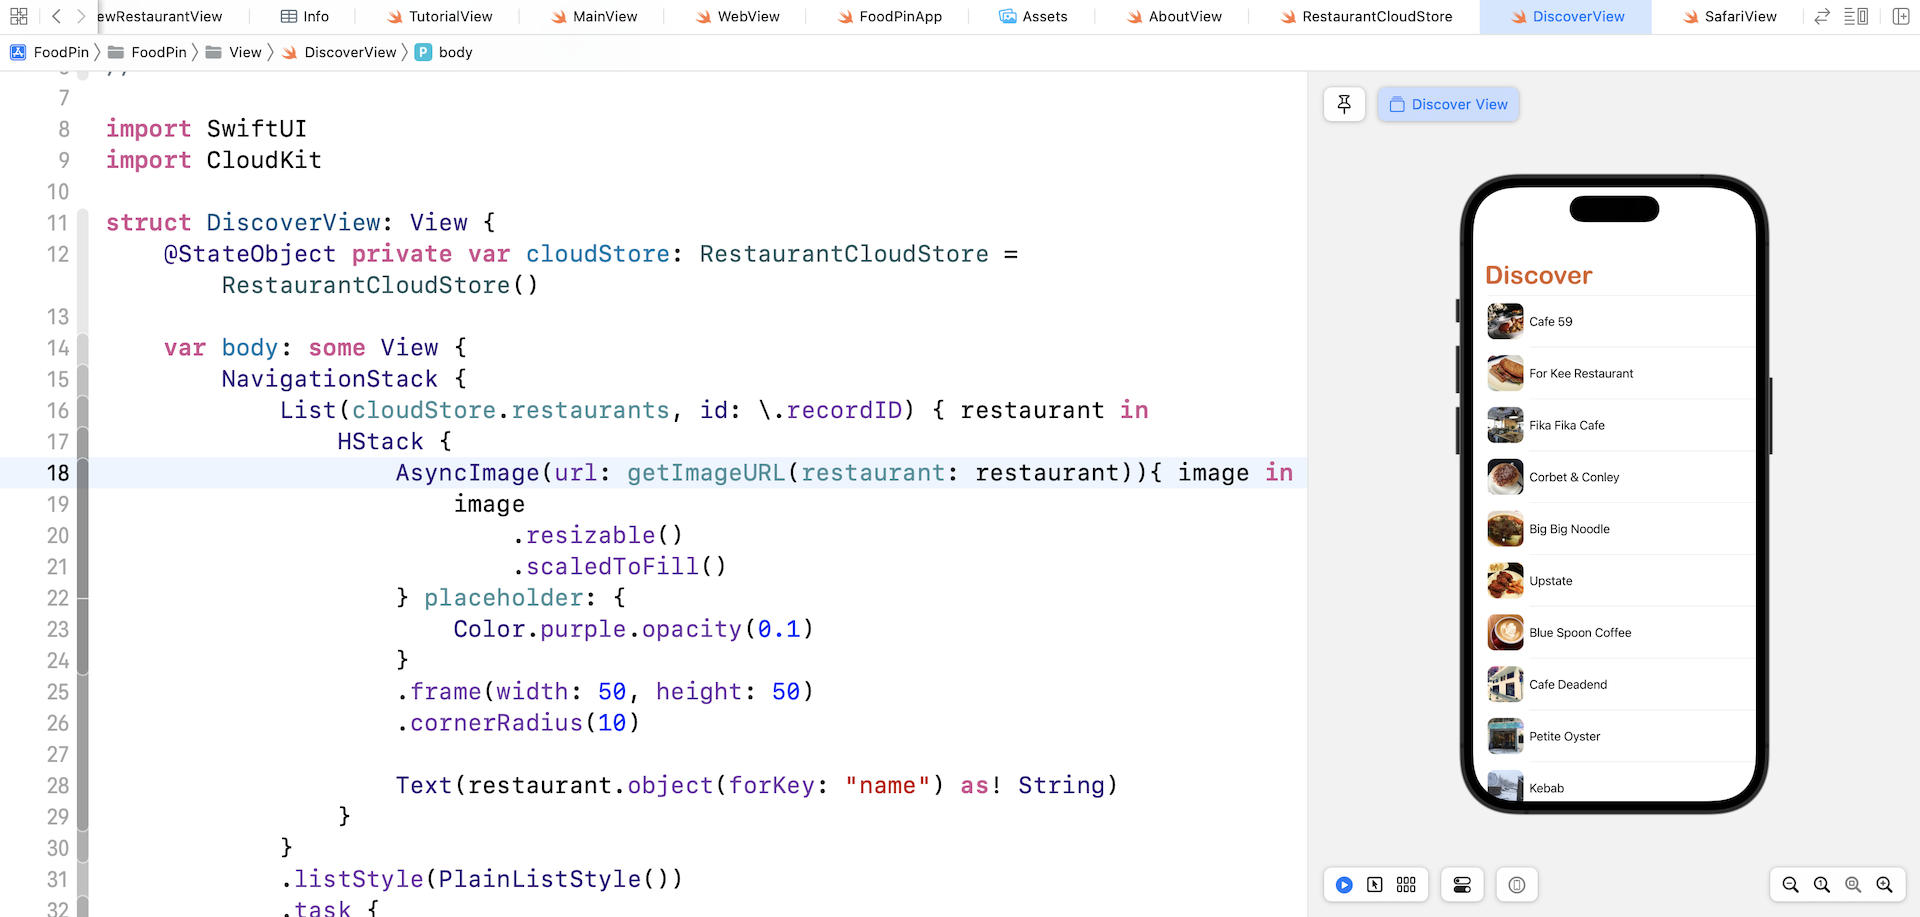
Next, update the body part like this:
NavigationStack {
    List(cloudStore.restaurants, id: \.recordID) { restaurant in
        HStack {
            AsyncImage(url: getImageURL(restaurant: restaurant)){ image in
                image
                    .resizable()
                    .scaledToFill()
            } placeholder: {
                Color.purple.opacity(0.1)
            }
            .frame(width: 50, height: 50)
            .cornerRadius(10)

            Text(restaurant.object(forKey: "name") as! String)
        }
    }
    .listStyle(PlainListStyle())
    .task {
        do {
            try await cloudStore.fetchRestaurants()
        } catch {
            print(error)
        }
    }

    .navigationTitle("Discover")
    .navigationBarTitleDisplayMode(.automatic)

}
You should be very familiar with List and NavigationStack. We present the restaurants in a list view and wrap it in a navigation view. However, there are a couple of things that may confuse you. Let's check out the code above line by line.
First, it's the task modifier. When the list view appears, we call cloudStore.fetchRestaurants() to fetch the restaurants from the iCloud database. This operation will update the restaurants property of the cloud store. Since the fetchRestaurants() method is an async operation, we have to place the await keyword before the call. To catch any errors, we use the do-try-catch syntax.
When the restaurants are fetched from the cloud, the cloud store notifies the list view about the update. The list view then updates itself and presents the restaurants in a simple list format. For each row, it shows a small image of the restaurant and displays the restaurant name.
Since restaurant is of the type CKRecord, you can call the .object(forKey:) method to retrieve a specific value. In the code above, we use restaurant.object(forKey: "name") to get the restaurant name. But what about the restaurant image? What's AsyncImage?
Up till now, we only work with images which are stored locally on the device. We can easily load a local image using the Image view. Now that the restaurant images are stored on the cloud, how can we load it remotely?
The Swift framework has a view named AsyncImage which is a built-in view for loading and displaying remote images asynchronously. All you need is to tell it what the image URL is. AsyncImage then does the heavy lifting to grab the remote image and show it on screen.
This is what the method getImageURL is designed for. We haven't implemented the method, so insert the following code in DiscoverView:
private func getImageURL(restaurant: CKRecord) -> URL? {
    guard let image = restaurant.object(forKey: "image"),
          let imageAsset = image as? CKAsset else {
        return nil
    }

    return imageAsset.fileURL
}
We use restaurant.object(forKey: "image") to get the restaurant image. As the image is defined as an asset type, we can retrieve the image's URL by accessing the fileURL property.
Once you pass the AsyncImage view the image's URL, it connects to the URL and download the image automatically. The simplest way to use AsyncImage is like below:
AsyncImage(url: getImageURL(restaurant: restaurant))
So, why do we write the code like this?
AsyncImage(url: getImageURL(restaurant: restaurant)) { image in
    image
        .resizable()
        .scaledToFill()
} placeholder: {
    Color.purple.opacity(0.1)
}
.frame(width: 50, height: 50)
.cornerRadius(10)
If you just use the simple way to initialize an AsyncImage, it displays the image in its intrinsic size. To customize its size, we have to use an alternate init method. The alternate way provides us the resulting image in the closure for further manipulation. Together with the frame modifier, we can apply the resizable and scaledToFill modifier to scale it to the preferred size.
This alternate init method also lets us define our own placeholder instead of using the default one. Here, we display a placeholder in light purple.
Now the preview pane should show you the restaurant records fetched from iCloud. Figure 23-16 shows a sample screenshot of the Discover tab.
As you can see, AsyncImage automatically displays the placeholder before the image is ready to display.
Fetching Data from Public Database Using Operational API
You've noticed some drawback of using Convenience API. It's good for simple queries, however, it's not optimized to retrieve a large amount of data from the cloud. When you call the records method, it retrieves all restaurant records at one time. Depending on the size of the data, it takes a considerable amount of time to download the data.
We are going to perform a couple of optimizations to reduce the loading time of the Discover tab. First, we will switch to use the Operational API. The usage is very similar to that of the Convenience API but the Operational API offers more flexibility. For example,we don't need to download the whole restaurant record but retrieve only the fields we need. With the Operational APIs, we can specify to retrieve only the name and image fields of the record. In addition to that, it allows you to control the maximum number of records to download. By retrieving less data, this would speed up the loading time of the Discover tab.
Now open RestaurantCloudStore.swift again and create a new method like this:
func fetchRestaurantsWithOperational() {
    // Fetch data using Operational API
    let cloudContainer = CKContainer.default()
    let publicDatabase = cloudContainer.publicCloudDatabase
    let predicate = NSPredicate(value: true)
    let query = CKQuery(recordType: "Restaurant", predicate: predicate)

    // Create the query operation with the query
    let queryOperation = CKQueryOperation(query: query)
    queryOperation.desiredKeys = ["name", "image"]
    queryOperation.queuePriority = .veryHigh
    queryOperation.resultsLimit = 50
    queryOperation.recordMatchedBlock = { (recordID, result) -> Void in
        if let restaurant = try? result.get() {
            DispatchQueue.main.async {
                self.restaurants.append(restaurant)
            }
        }
    }

    queryOperation.queryResultBlock = { result -> Void in
        switch result {
        case .success(let cursor): print("Successfully retrieve the data from iCloud.")
        case .failure(let error): print("Failed to get data from iCloud - \(error.localizedDescription)")
        }
    }

    // Execute the query
    publicDatabase.add(queryOperation)
}
The first few lines of code are exactly as before. We get the default container and the public database, followed by creating the query for retrieving the restaurant records.
Instead of calling the record method to fetch the records, we create a CKQueryOperation object for the query. This is why Apple called it operational API. The query operation object provides several options for your configuration. The desiredKeys property lets you specify the fields to fetch. You use this property to retrieve only those fields that you need for the app. In the above code, we tell the query operation object that we only need the name and image fields of the records.
Other than the desiredKeys property, you can use the queuePriority property to specify the execution priority of the operation and resultsLimit property to set the maximum number of records at any one time.
The operation object will be executed in the background. It reports the status of the query operation through two callbacks. One is recordMatchedBlock and the other is queryResultBlock. The block of code within recordMatchedBlock will be executed every time a record returned. In the code snippet, we simply append each of the returned records to the restaurants array. The DispatchQueue.main.async method ensures the insertion of the restaurant records is performed in the main thread.
On the other hand, queryResultBlock allows you to specify the code block that executes after all records are fetched. In this case, we ask the table view to reload and display the restaurant records.
Let me talk a bit more about the queryResultBlock. It provides a cursor object (embedded in the result object) to indicate if there are more results to fetch. Recall that we use the resultsLimit property to control the number of the fetched records, the app may not be able to fetch all data in a single query. In this case, a CKQueryCursor object indicates there are more results to fetch. Additionally, it marks the stopping point of the query and the starting point for retrieving the remaining results. For example, let's say you have a total of 100 restaurant records. For each search query, you can get a maximum of 50 records. After the first query, the cursor would indicate that you have fetched record 1-50. For your next query, you should start from the 51st record. The cursor is very useful if you need to get your data in multiple batches. This is one of the ways to retrieve a large set of data.
At the end of the fetchRecordsFromCloud method, we call the add method of the CKDatabase class to execute the query operation.
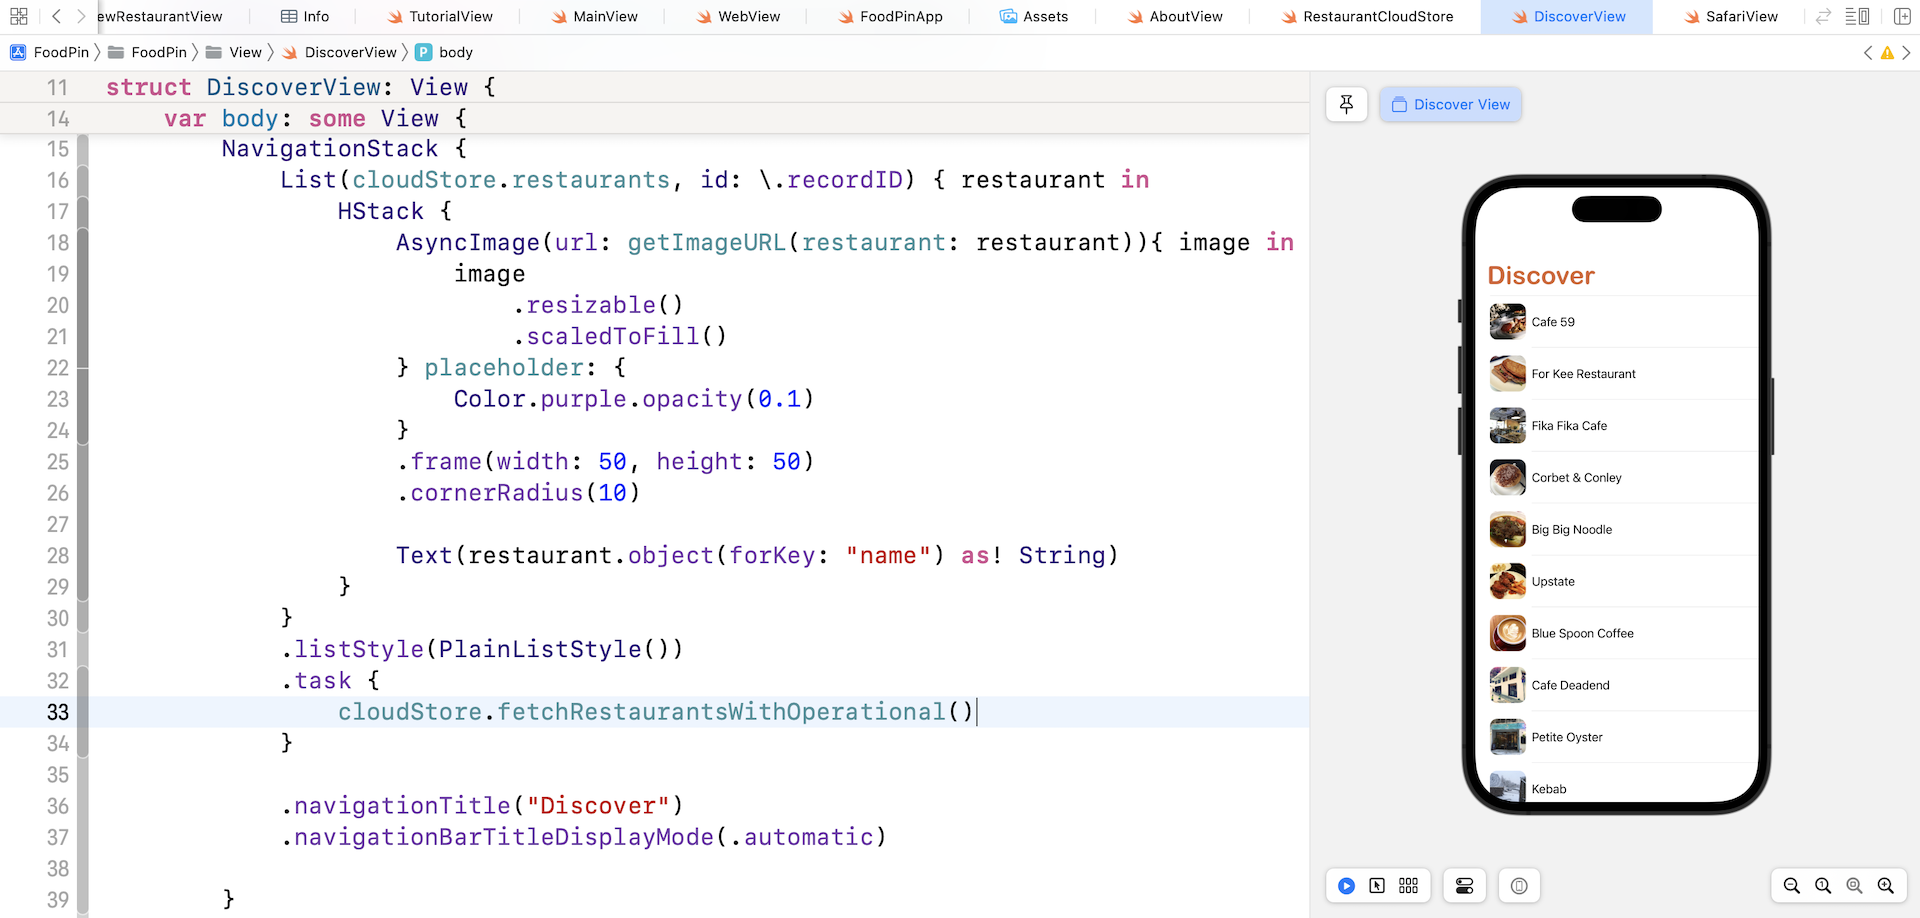
Before you test the app, switch over to DiscoverView.swift and update the task modifier from:
.task {
    do {
        try await cloudStore.fetchRestaurants()
    } catch {
        print(error)
    }
}
To:
.task {
    cloudStore.fetchRestaurantsWithOperational()
}
It's a bit troublesome at this stage while Apple is transiting from completion handler-based asynchronous APIs into the new async/await-based APIs. The API we used in the previous section is the new async APIs. This is why we use async/await. In this section, the API we deal with is completion handler-based asynchronous APIs. You can just make the call directly.
The preview pane should already show you the restaurant records. The result should be the same as before. Internally, however, you have built a custom query to fetch those data you need.
Optimizing the Performance with Activity Indicator
When we talk about performance optimization, sometimes we're not talking about optimizing the real performance but rather perceived performance. Perceived performance refers to how fast your user thinks your app is. Let me give you an example. Say, after a user taps the Discover tab, it takes 10 seconds to load the restaurant records. You then optimize the image sizes and reduce the loading time to 6 seconds. The real performance is improved by 40%. You think that's a huge improvement. But the perceived performance is still sluggish. To the user, your app is still slow because it can't respond instantaneously. When it comes to performance optimization, sometimes the technical statistics do not matter. Rather, it's about optimizing the perceived performance to make users feel that your app is speedy. One approach to improve the perceived performance is by adding an activity indicator when users switch over to the Discover tab.

In SwiftUI, it has a native component called ProgressView to display the status of an operation. You can use it as an activity indicator like below:
ProgressView()
To use the activity indicator in the Discover view, switch over to DiscoverView.swift. Declare a state variable to control the appearance of the loading indicator:
@State private var showLoadingIndicator = false
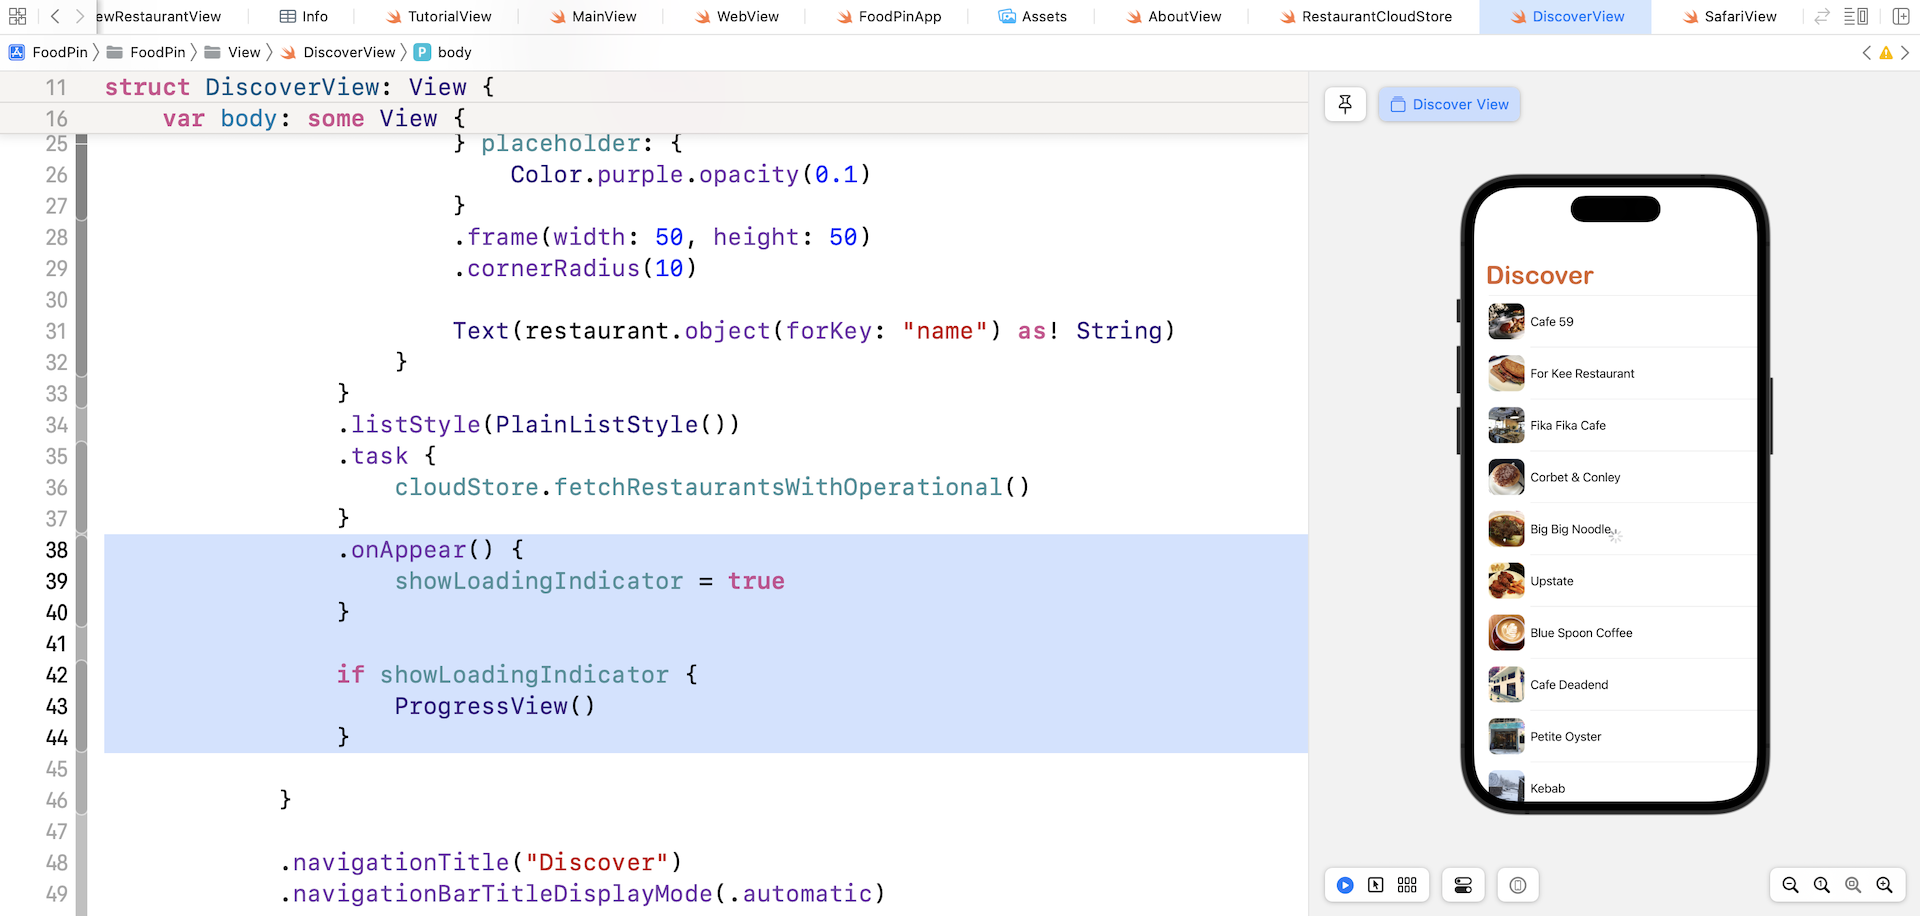
To display the loading indicator, we embed the List view in a ZStack and then place the ProgressView on top of the list view like this:
ZStack {
    List(cloudStore.restaurants, id: \.recordID) { restaurant in
        .
        .
        .
    }
    .onAppear() {
        showLoadingIndicator = true
    }

    if showLoadingIndicator {
        ProgressView()
    }
}
The loading indicator is displayed when the List view appears. If you run the app in the preview pane, the loading indicator still shows up even when the restaurant records are fully loaded.
The indicator has no idea when it should be hidden, so we have to explicitly hide the indicator after the records are downloaded. modify the fetchRestaurantsWithOperational() method in RestaurantCloudStore to accept a completion closure:
func fetchRestaurantsWithOperational(completion: @escaping () -> ()) {
Then update the queryCompletionBlock property like this:
queryOperation.queryResultBlock = { result -> Void in
    switch result {
    case .success(let cursor): print("Successfully retrieve the data from iCloud.")
    case .failure(let error): print("Failed to get data from iCloud - \(error.localizedDescription)")
    }

    DispatchQueue.main.async {
        completion()
    }
}
When the records are retrieved, we call the completion() function to execute whatever operation specified by the caller. Since the completion operation is UI-related, we tell the system to run the code in the main queue.
Now switch back to DiscoverView.swift. Replace cloudStore.fetchRestaurantsWithOperational() with the following code:
cloudStore.fetchRestaurantsWithOperational {
    showLoadingIndicator = false
}
When we complete the fetch operation, we set the value of showLoadingIndicator to false to hide the loading indicator.
Now test the app again to see if the loading indicator works. The indicator should disappear when the records are loaded.
Pull to Refresh
After all the tweaks, the Discover tab should be working much better. However, there is a limitation. Once the restaurant records are loaded, there is no way to get an update.
Most modern iOS apps allow users to refresh their content through a feature called pull-to-refresh. The pull-to-refresh interaction was originally created by Loren Brichter. Since its invention, an endless number of apps, including Apple's Mail app, have adopted the design for content updates.
Starting from iOS 15, Apple added a standard pull-to-refresh control for the SwiftUI framework. With the built-in refreshable modifier, it is very simple to add the pull-to-refresh feature to your app.
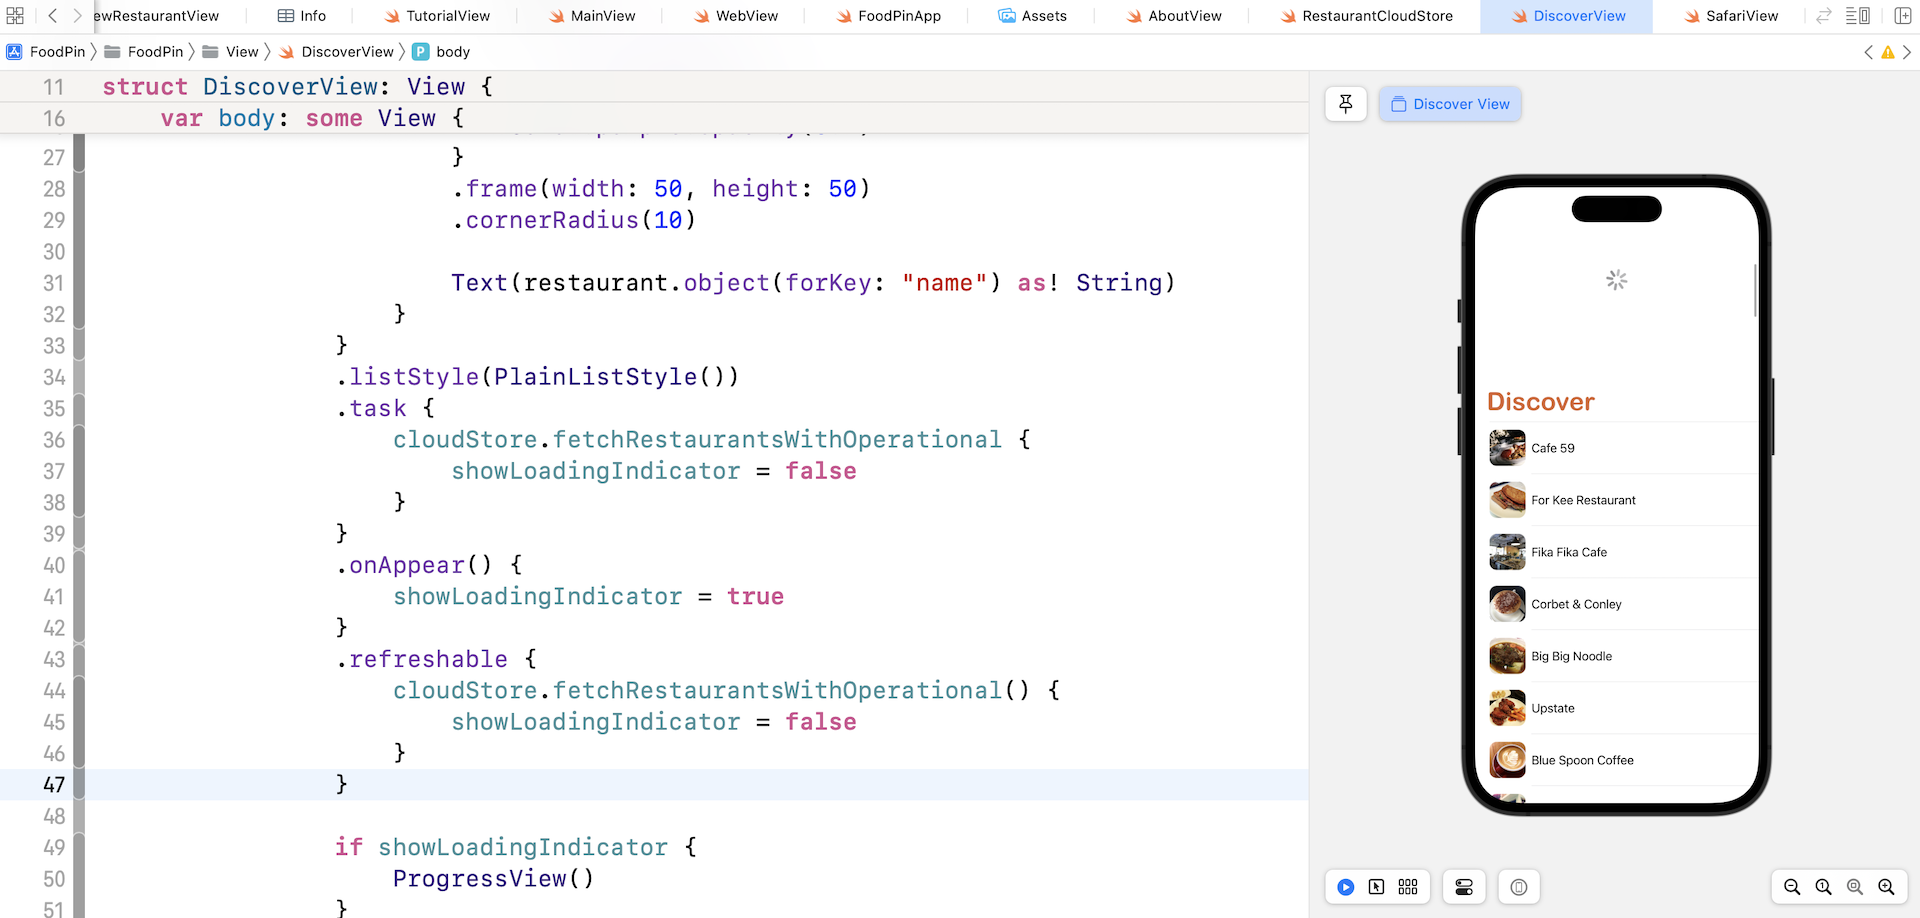
Simply add the .refreshable modifier to the List view in the DiscoverView struct:
.refreshable {
    cloudStore.fetchRestaurantsWithOperational() {
        showLoadingIndicator = false
    }
}
This automatically adds a pull-to-refresh feature to your app. When a user pulls to refresh the list, the code defined in the closure will be executed to fetch the latest restaurant records.
Currently, there is a bug when you refresh the data from the cloud. Some of the records are duplicated because we didn't perform any checking before appending the records to the restaurants array. A simple fix is to update the recordMatchedBlock of the query operation in the fetchRestaurantsWithOperational method:
queryOperation.recordMatchedBlock = { (recordID, result) -> Void in
    if let _ = self.restaurants.first(where: { $0.recordID == recordID }) {
        return
    }

    if let restaurant = try? result.get() {
        DispatchQueue.main.async {
            self.restaurants.append(restaurant)
        }
    }
}
Before appending the record to the restaurants array, we check if the record already appears in the array by using the record ID.
Saving Data Using CloudKit
Now that we have discussed data query, let's further explore the CloudKit framework and see how you can save data to the cloud. It all comes down to this convenience API provided by the CKDatabase class:
func save(_ record: CKRecord, completionHandler: @escaping (CKRecord?, Error?) -> Void)
The save(_:completionHandler:) method takes in a CKRecord object and uploads it to iCloud. When the operation completes, it reports the status by calling the completion handler. You can examine the error and see if the record is saved successfully.
To demonstrate the usage of the API, we'll tweak the Add Restaurant function of the FoodPin app. When a user adds a new restaurant, in addition to saving it to the local database, the record will also be uploaded to iCloud.
Now open RestaurantCloudStore.swift and add a new function for uploading a record to the cloud:
func saveRecordToCloud(restaurant: Restaurant) {

    // Prepare the record to save
    let record = CKRecord(recordType: "Restaurant")
    record.setValue(restaurant.name, forKey: "name")
    record.setValue(restaurant.type, forKey: "type")
    record.setValue(restaurant.location, forKey: "location")
    record.setValue(restaurant.phone, forKey: "phone")
    record.setValue(restaurant.summary, forKey: "description")

    let imageData = restaurant.image as Data

    // Resize the image
    let originalImage = UIImage(data: imageData)!
    let scalingFactor = (originalImage.size.width > 1024) ? 1024 / originalImage.size.width : 1.0
    let scaledImage = UIImage(data: imageData, scale: scalingFactor)!

    // Write the image to local file for temporary use
    let imageFilePath = NSTemporaryDirectory() + restaurant.name
    let imageFileURL = URL(fileURLWithPath: imageFilePath)
    try? scaledImage.jpegData(compressionQuality: 0.8)?.write(to: imageFileURL)

    // Create image asset for upload
    let imageAsset = CKAsset(fileURL: imageFileURL)
    record.setValue(imageAsset, forKey: "image")

    // Get the Public iCloud Database
    let publicDatabase = CKContainer.default().publicCloudDatabase

    // Save the record to iCloud
    publicDatabase.save(record, completionHandler: { (record, error) -> Void  in

        if error != nil {
            print(error.debugDescription)
        }

        // Remove temp file
        try? FileManager.default.removeItem(at: imageFileURL)
    })
}
To save a restaurant to the cloud, we first prepare a CKRecord object using the restaurant properties. The restaurant image requires a bit of work. First, we don't want to upload a super-high resolution photo. We would like to scale it down before uploading. The UIImage class allows us to create an object with a certain scaling factor. In this case, any photo with a width larger than 1024 pixels will be resized.
As you know, you use CKAsset object to represent an image on the cloud. To create the CKAsset object, we have to provide the file URL of the scaled image. So we save the image in the temporary folder. You can use the NSTemporaryDirectory function to get the path of the temporary directory. By combining the path with the restaurant name, we have the temporary file path of the image. We then use jpegData(compressionQuality:) function of UIImage to compress the image data and call the write method to save the compressed image data as a file.
With the scaled image ready for upload, we can create the CKAsset object using the file URL. Lastly, we get the default public database and save the record to the cloud using the save method of CKDatabase. In the complete handler, we clean up the temporary file just created.
Now that the saveRecordToCloud method is ready, let's modify NewRestaurantView.swift to upload the new restaurant record to the cloud.
In the save() method of NewRestaurantView, insert the following lines of code before the closing bracket:
let cloudStore = RestaurantCloudStore()
cloudStore.saveRecordToCloud(restaurant: restaurant)
Before we test this new feature on a simulator, we have to make some changes in the MainView.swift file. In the MainView struct, change this line of code from:
Text("Discover")
To:
DiscoverView()
You're ready to go! Hit the Run button and test the app. Click the + button to add a new restaurant. Once you save the restaurant, go to the Discover tab and you should find the new restaurant there. If it doesn't appear, wait for a few seconds, and pull-to-refresh the table again. Alternatively, you can go up to CloudKit Dashboard to reveal the new record.
In case if you ended up with the following error in the console, this means you do not have the Write permission to save the restaurant record.
Optional(<CKError 0x6000031ac690: "Permission Failure" (10/2007); server message = "Operation not permitted"; uuid = C057A757-193A-4245-9E00-CEBA5D9E6EF5; container ID = "iCloud.com.appcoda.FoodPinV6">)
To fix the issue, you have to change the permission of the Restaurant type in your cloud container. Therefore, go up to the CloudKit dashboard and select your container. In the top menu, choose Schema and then select Security Role.
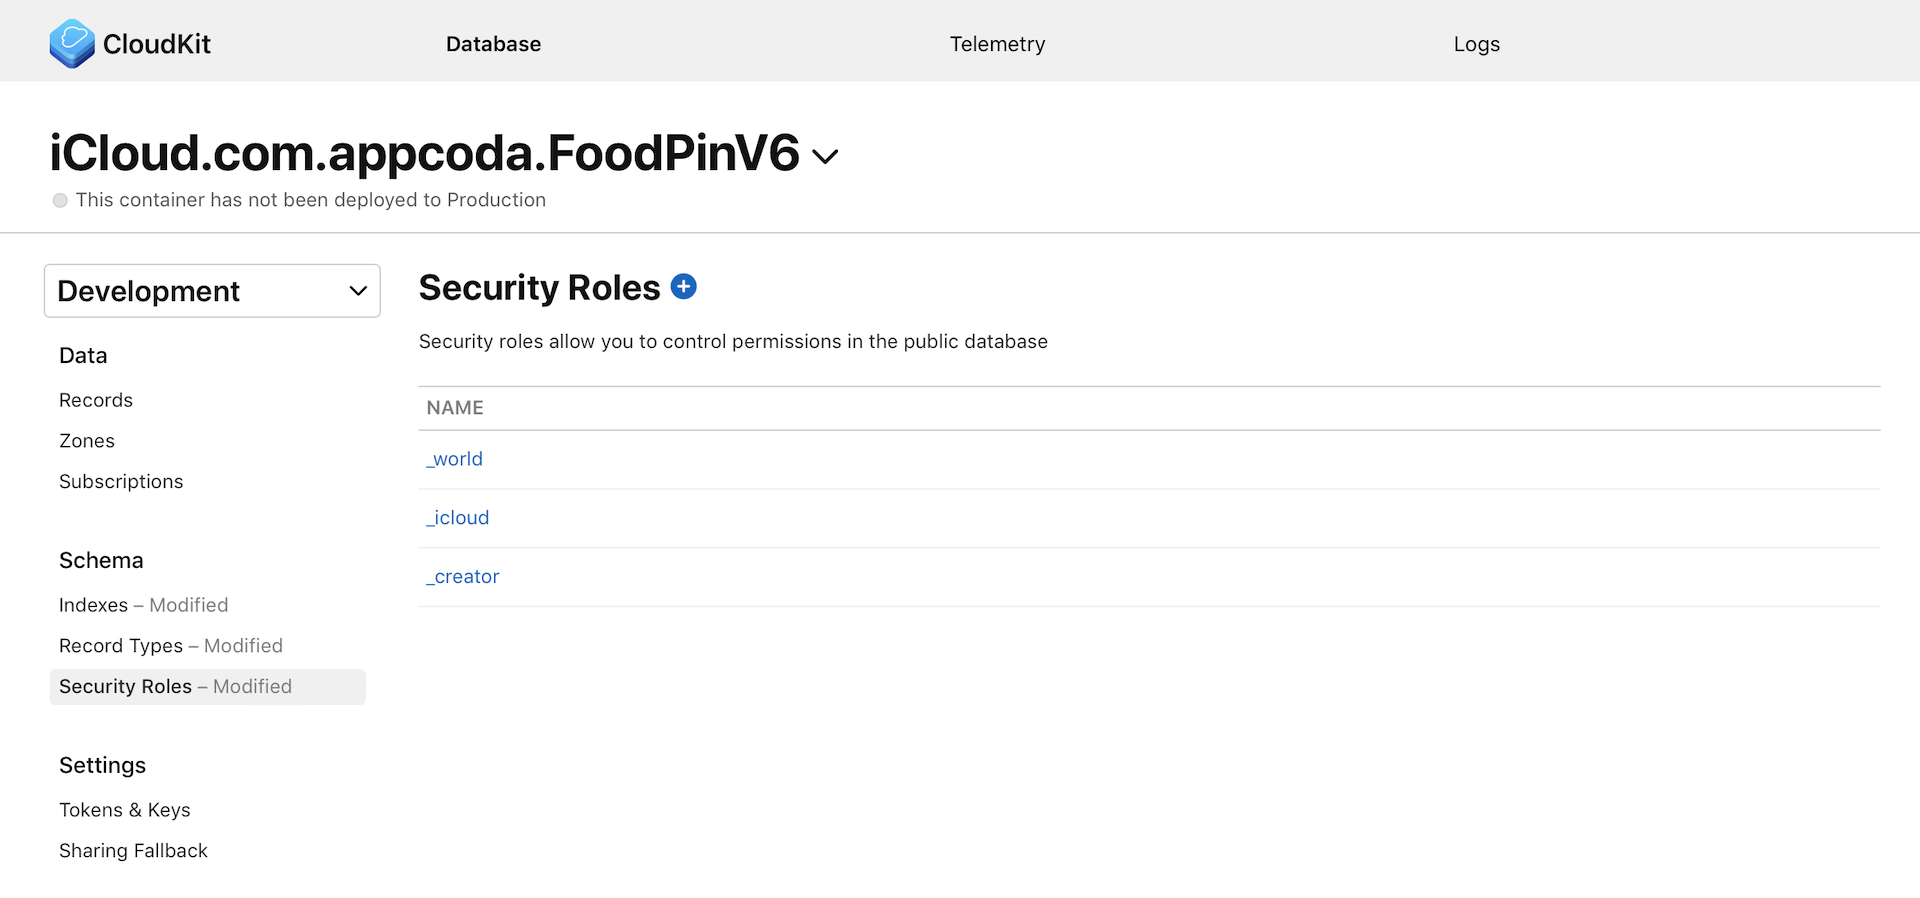
Next, choose _iCloud, which means those authenticated iCloud users, to set the permission of this role. By default, only the Create permission is enabled. To fix the issue, you have to enable both Read and Write permissions for the authenticated users.

Once you save the role, you can test the app again. If you've already signed into iCloud on the simulator, you should be able to save the restaurant record to the cloud.
Sorting the Result by Creation Date
One problem with the Discover feature is that the restaurants are not in any order. As a user, you may want to view the new restaurants shared by other app users. That means, we need to arrange the results in reverse chronological order.
Sorting has been built into the CKQuery class, which provides a property named sortDescriptor for you to specify the sorting order. In the fetchRestaurants method (and fetchRestaurantsWithOperational method) of RestaurantCloudStore, insert the below line of code after the instantiation of CKQuery:
query.sortDescriptors = [ NSSortDescriptor(key: "creationDate", ascending: false) ]
This creates an NSSortDescriptor object using the creationDate key (which is a property of CKRecord) and sets the order to descending. When CloudKit performs the search query, it will order the results by creation date. You can run now the app again and add a new restaurant. Once saved, go to the Discover tab and the restaurant just added should appear first.
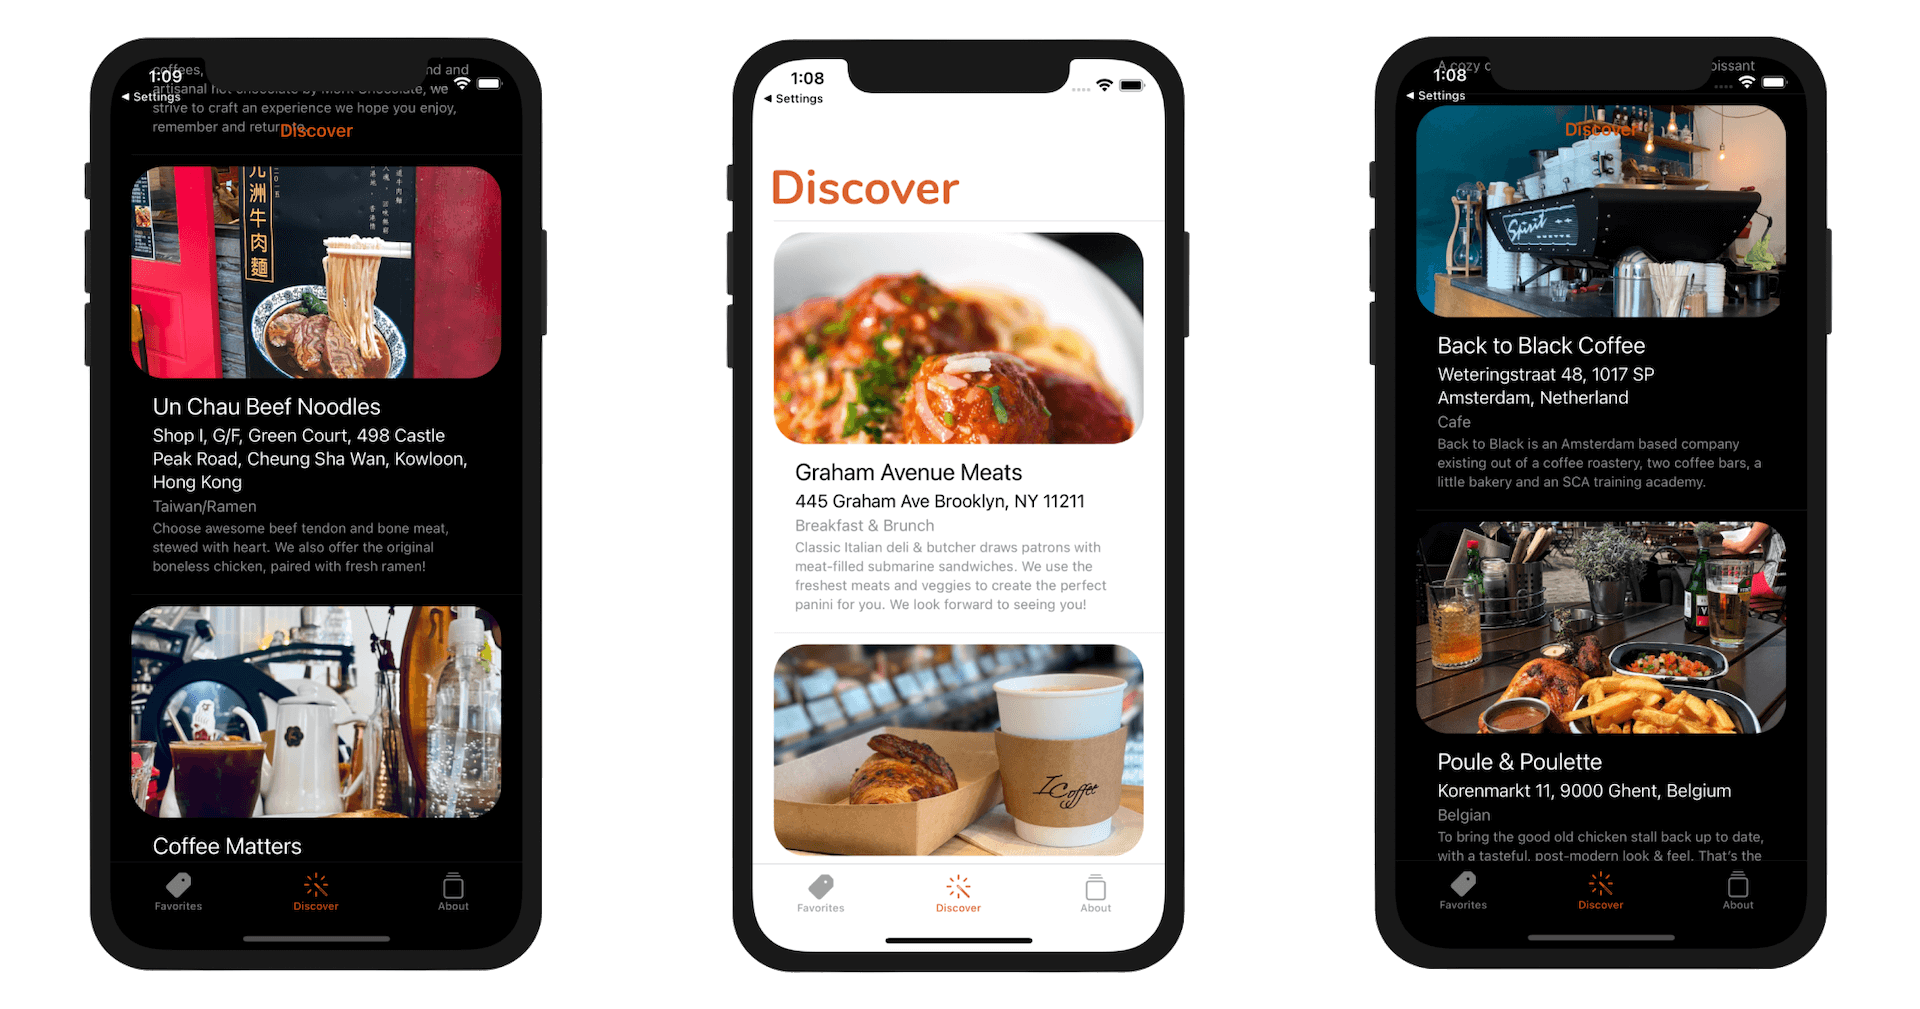
Exercise
Presently, each row in the Discover tab only displays the name and thumbnail of a restaurant. Modify the project so that it shows the restaurant's location and type. Figure 23-23 displays a sample screenshot.
Summary
Wow! You've made a social network app for sharing restaurants. This is a huge chapter; by now you should understand the basics of CloudKit. With CloudKit, Apple has made it so easy for iOS developers to integrate their apps with the iCloud database. The service is completely free, as long as, you've enrolled in the Apple Developer Program ($99 per year).
Along with the introduction of CloudKit JS, you are able to build a web app for users to access the same containers as your iOS app. This is a huge deal for developers. That said, CloudKit isn't perfect. CloudKit is an Apple product. I don't see any possibilities that the company would open up the service to other platforms. If you want to create a cloud-based app for both iOS and Android, CloudKit may not be your first choice. You may want to explore Google's Firebase, Contentful, or Microsoft's Azure.
If your primary focus is on the iOS platform, CloudKit holds a lot of potential for both you and your users. I encourage you to adopt CloudKit in your next app.
For your reference, you can download the complete Xcode project from http://www.appcoda.com/resources/swift57/swiftui-foodpin-cloudkit.zip.
For the solution to the exercise, you can download the project from http://www.appcoda.com/resources/swift57/swiftui-foodpin-cloudkit-exercise.zip.